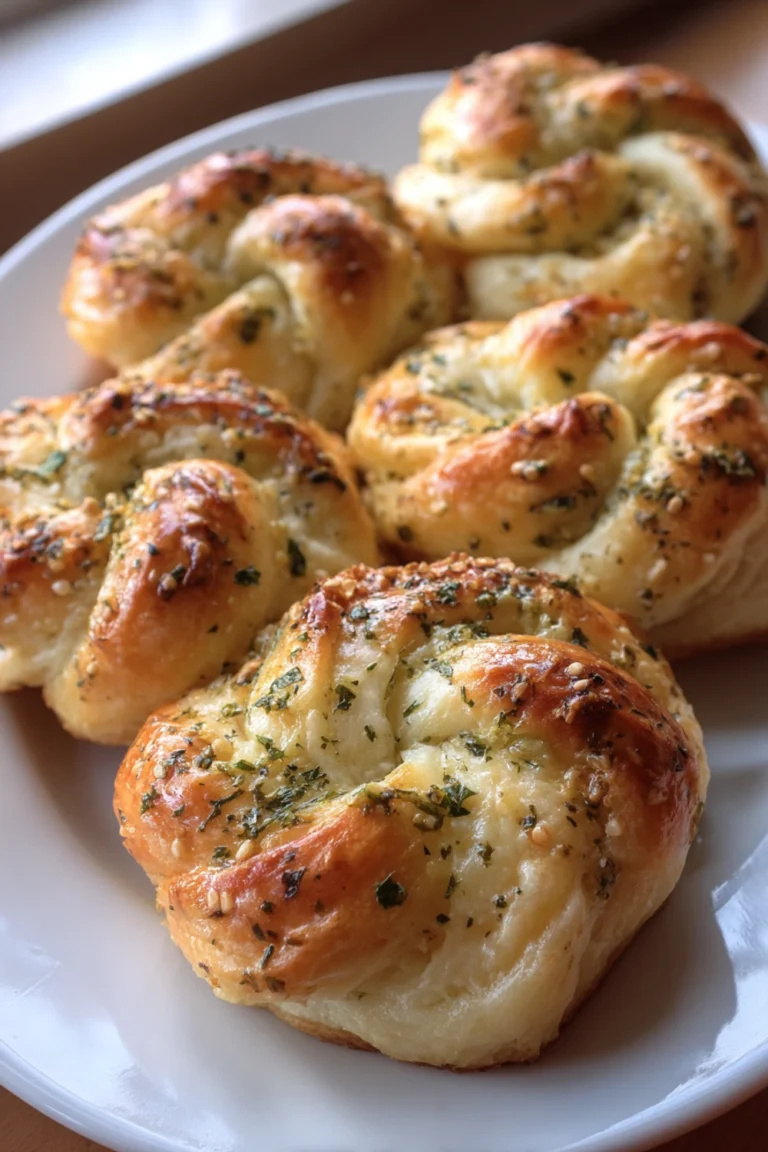
Herby Cloverleaf Rolls Recipe
The first time I made these herby cloverleaf rolls, I was convinced I’d failed. It was Thanksgiving and my aunt, who always brings the perfect store-bought rolls, was coming over. I wanted to prove I could do it. My kitchen looked like a flour bomb went off and my first batch came out so dense you could’ve used them as hockey pucks. But that one, single perfect roll in the second batch, the one that was fluffy and buttery and smelled like heaven? That’s the one that made me obsessed with getting this recipe right.
Recipe Card
| Recipe Title | Herby Cloverleaf Rolls Recipe |
|---|---|
| Servings | 12 rolls |
| Prep Time | 2 hours 15 minutes (includes rising) |
| Cooking Time | 18-20 minutes |
| Calories | About 180 per roll |
Ingredients
- 1 cup warm whole milk (about 110°F)
- 1/4 cup granulated sugar
- 2 1/4 tsp active dry yeast (one packet)
- 1 large egg, at room temp
- 3 tbsp unsalted butter, melted, plus more for brushing
- 3 1/4 cups all-purpose flour, plus more for dusting
- 1 tsp fine sea salt
- 2 tbsp fresh parsley, finely chopped
- 1 tbsp fresh dill, finely chopped
- 1 tsp fresh thyme leaves
- 1/2 tsp garlic powder
That warm milk is so crucial. I once used milk that was way too hot and it basically murdered the yeast. My rolls didn’t rise at all, they were just sad little lumps. And the fresh herbs? Don’t be like me and try to use dried once because you’re lazy. The flavor is just not the same, it tastes dusty. Fresh makes all the difference.
Directions
- In a large bowl, whisk the warm milk, sugar, and yeast together. Let it sit for 5-10 minutes until it’s foamy.
- Whisk in the melted butter and the egg until everything is combined.
- Add the flour, salt, and all the herbs (parsley, dill, thyme, garlic powder).
- Stir with a wooden spoon until a shaggy dough forms.
- Turn the dough out onto a lightly floured surface and knead for about 5-7 minutes. It should be smooth and spring back when you poke it.
- Place the dough in a lightly greased bowl, cover with a clean kitchen towel, and let it rise in a warm spot for 1 to 1.5 hours, until doubled in size.
- Punch the dough down to release the air. Divide it into 12 equal pieces.
- Then, divide each of those 12 pieces into 3 smaller, equal-sized balls.
- Lightly grease a standard 12-cup muffin tin. Place three little dough balls into each muffin cup.
- Cover the pan with the towel again and let the rolls rise for another 30-45 minutes.
- Preheat your oven to 375°F (190°C).
- Bake the rolls for 18-20 minutes, until they’re golden brown on top.
- As soon as they come out of the oven, brush the tops with melted butter. Let them cool in the pan for 5 minutes before transferring to a wire rack.
The part where you divide the dough into threes for each roll is where I always used to mess up. I’d get impatient and make the balls way too big, and they’d just bake together into one giant mutant roll instead of a cloverleaf. You really gotta make them small and round. And that second rise? Don’t skip it! I did once because I was in a hurry and the rolls were so tough. Patience is key here, even when you don’t have any.
I love making these on a lazy Sunday. The whole house smells amazing and it feels like such an accomplishment. They’re the ultimate comfort food and a total family favorite, especially with a big pot of soup. My kids call them “little pull-apart breads” and they fight over the crispiest ones.
The best part might be the leftovers, honestly. They reheat surprisingly well. Just wrap them in foil and warm them in the oven for a few minutes. They’re never quite as perfect as day one, but they’re still way better than anything from a bag.
If I were to change one thing next time, I might try a healthy swap and use half whole wheat flour. I tried all whole wheat once and it was a disaster, way too heavy. But I think half might give it a nice nutty flavor without sacrificing that fluffy texture we all love.
Nutrition Info (per serving)
| Calories | Carbs | Fat | Protein |
|---|---|---|---|
| 180 | 28g | 5g | 5g |
Okay, so these aren’t a health food, let’s be real. They’re a treat. I was actually surprised the calories weren’t higher, but all that butter brushing really adds up. I did try making them with almond milk once for a friend who’s lactose intolerant, and it worked pretty well! The texture was a tiny bit different but still good. If you’re watching carbs, maybe just have one and savor it.
Ingredient Swaps
| Ingredient | Substitution |
|---|---|
| Whole Milk | 2% milk or warmed buttermilk |
| Fresh Herbs | 1 tsp each of dried parsley and dill (but fresh is best!) |
| All-Purpose Flour | Up to 1.5 cups can be swapped for whole wheat flour |
| Garlic Powder | 1 small minced fresh garlic clove |
I’ve tried most of these swaps out of necessity. The buttermilk one is actually a win, it gives a nice little tang. But the dried herbs? Like I said, it’s a last resort. The flavor is just weaker. And if you use fresh garlic instead of powder, be careful not to use too much or it can burn and taste bitter. I learned that the hard way, of course.
Tips
- Your yeast is your best friend. If your milk-yeast mixture doesn’t get foamy, start over. The yeast is dead and your rolls will be bricks.
- Don’t have a warm spot for the dough to rise? I turn my oven on for just one minute, then turn it OFF and put the bowl in there. It’s the perfect little proofing box.
- When you’re brushing with butter at the end, be generous. This is what gives them that gorgeous, shiny, restaurant-style top.
- Use a kitchen scale to divide the dough. It sounds fussy, but it’s the only way to get rolls that are all the same size and bake evenly.
I wish I knew the oven trick years ago. I used to put the bowl on top of the radiator in the winter and it would get way too hot. I killed more than one batch of yeast that way. The scale tip I learned after my husband joked that my rolls were “assorted sizes” and it was so true. Weighing them is a game-changer for consistency.
FAQ
Can I make the dough ahead of time?
Oh yeah, totally. After the first rise, punch the dough down, stick it in a greased bowl with a lid, and put it in the fridge overnight. The next day, let it sit on the counter for about an hour to take the chill off, then shape them and do the second rise. It actually develops more flavor!
Why are my rolls so dense?
Welcome to the club! This usually means one of three things happened to me: my yeast was dead, I used too much flour, or I didn’t let them rise long enough. It’s so tempting to add more flour when the dough is sticky, but try to resist. A slightly sticky dough makes for a lighter roll.
Can I freeze these?
For sure. Let them cool completely after baking, then wrap them tightly in plastic and foil. They’ll keep for about a month. To reheat, just pop the frozen roll in a 350°F oven for 10-15 minutes, still wrapped in the foil so it doesn’t dry out.
That’s everything I know about making herby cloverleaf rolls! Hope you give it a try, and if you mess it up, you’re in good company—I still do it sometimes. Text me a picture if you make them!
Herby Cloverleaf Rolls
Fluffy, buttery pull-apart rolls infused with fresh herbs and baked to golden perfection. These cloverleaf rolls are a family favorite that will make your house smell amazing.

Ingredients
- 1 cup warm whole milk (about 110°F)
- 1/4 cup granulated sugar
- 2 1/4 tsp active dry yeast (one packet)
- 1 large egg, at room temperature
- 3 tbsp unsalted butter, melted, plus more for brushing
- 3 1/4 cups all-purpose flour, plus more for dusting
- 1 tsp fine sea salt
- 2 tbsp fresh parsley, finely chopped
- 1 tbsp fresh dill, finely chopped
- 1 tsp fresh thyme leaves
- 1/2 tsp garlic powder
Instructions
-
In a large bowl, whisk the warm milk, sugar, and yeast together. Let it sit for 5-10 minutes until foamy.
-
Whisk in the melted butter and egg until everything is combined.
-
Add the flour, salt, and all the herbs (parsley, dill, thyme, garlic powder).
-
Stir with a wooden spoon until a shaggy dough forms.
-
Turn the dough out onto a lightly floured surface and knead for 5-7 minutes until smooth and springy.
-
Place the dough in a lightly greased bowl, cover with a clean kitchen towel, and let rise in a warm spot for 1 to 1.5 hours until doubled in size.
-
Punch the dough down to release air. Divide into 12 equal pieces.
-
Divide each of the 12 pieces into 3 smaller, equal-sized balls.
-
Lightly grease a standard 12-cup muffin tin. Place three dough balls into each muffin cup.
-
Cover the pan with the towel and let the rolls rise for another 30-45 minutes.
-
Preheat oven to 375°F (190°C).
-
Bake the rolls for 18-20 minutes until golden brown on top.
-
As soon as they come out of the oven, brush the tops with melted butter. Let cool in the pan for 5 minutes before transferring to a wire rack.
Nutrition (Per Serving)