
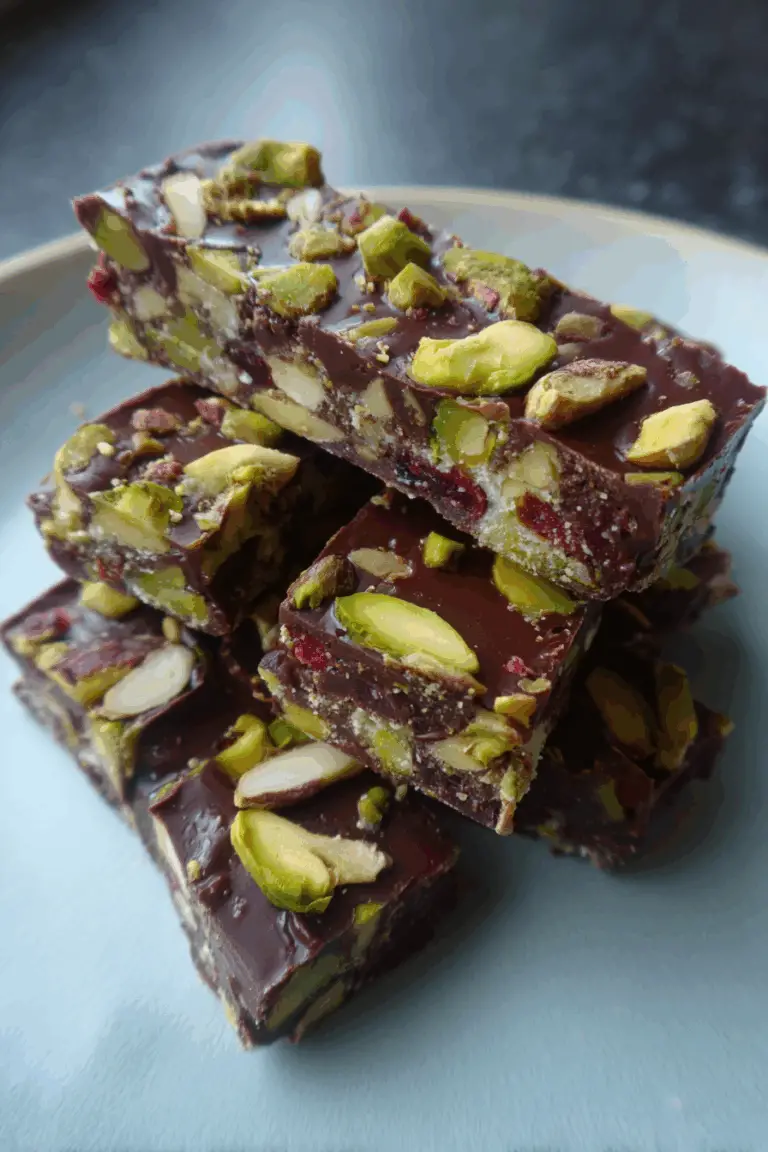
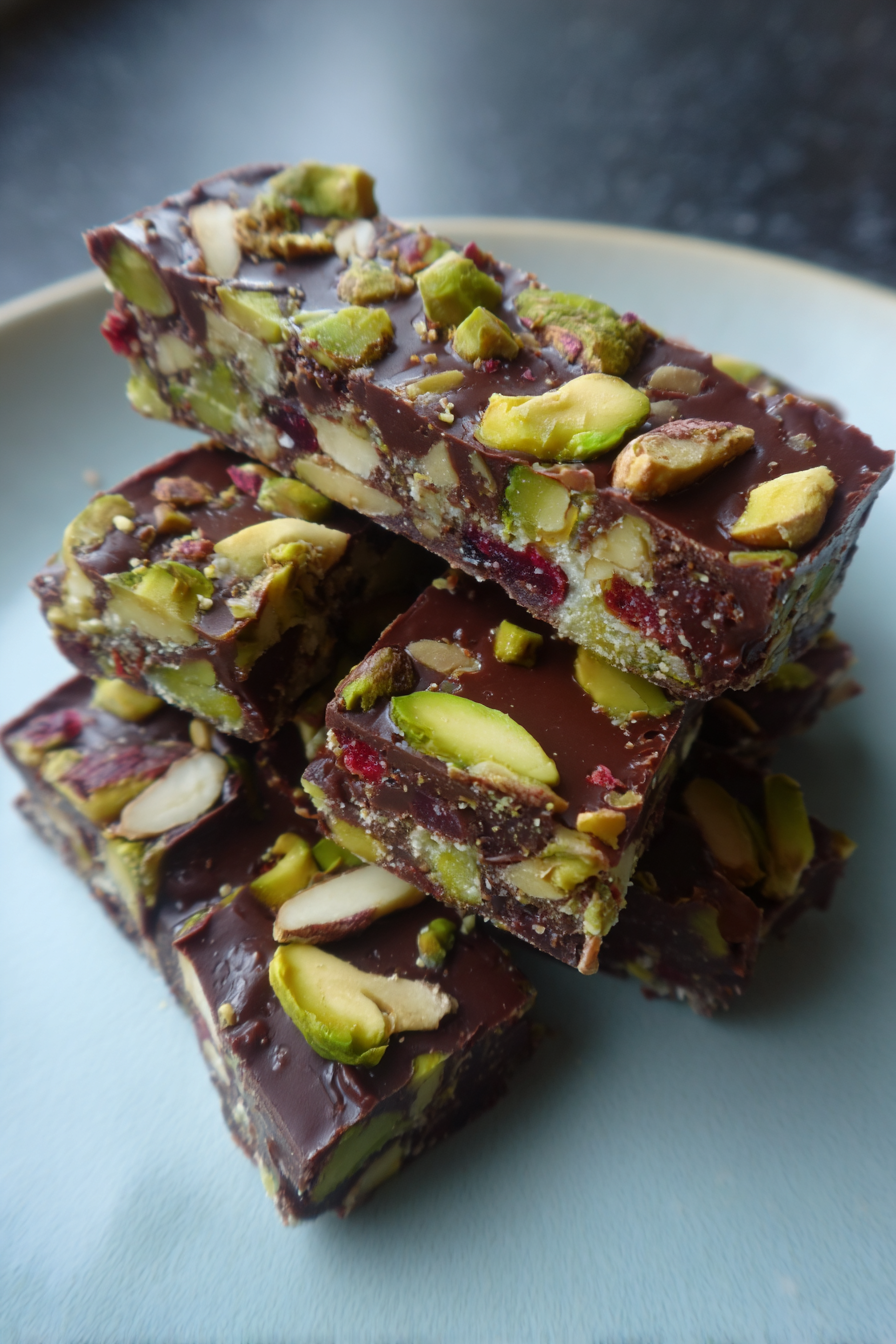
Dubai Pistachio Chocolate Bars Recipe
Oh man, the first time I tried to make these Dubai Pistachio Chocolate Bars, it was a disaster, a beautiful, delicious disaster. My friend Sarah had just come back from a trip and was raving about this fancy dessert she had. She described it as this gorgeous green layer, super rich, with chocolate on top, and I just *had* to try making it myself. I dove in headfirst, thinking “how hard can a no-bake bar be, right?” Famous last words. I ended up with a runny, melty mess because I didn’t chill things enough, and my chocolate topping seized up like a rock. We still ate it with spoons straight from the pan, laughing, but I was determined to get it right. It’s been a journey of trial and error since, but now, it’s a total showstopper and a go-to for special occasions.
Recipe Card
| Recipe Title | Dubai Pistachio Chocolate Bars Recipe |
|---|---|
| Servings | 16-20 bars |
| Prep Time | 30 minutes |
| Cooking Time | 0 minutes (no-bake!) |
| Chill Time | 4-6 hours or overnight |
| Calories | Approx. 300-350 per bar |
Ingredients
- 2 cups (about 250g) digestive biscuits or graham crackers, finely crushed
- 1/2 cup (113g) unsalted butter, melted
- 1 (14-ounce) can sweetened condensed milk, divided
- 1 cup (about 120g) shelled pistachios, unsalted
- 1/4 cup (50g) white chocolate chips or chopped white chocolate
- 1 tsp green food coloring (optional, but makes it pretty)
- 1 cup (170g) milk or dark chocolate chips (I like dark)
- 1 tbsp coconut oil or unsalted butter
- 2-3 tbsp chopped pistachios, for garnish
Getting the base right is super important, and for these Dubai Pistachio Chocolate Bars, digestive biscuits are my absolute fave. I remember one time I ran out and tried using some stale shortbread cookies I had. Big mistake. The texture was all off, too crumbly and not sturdy enough to hold the rich pistachio layer. Just stick with the classics here, folks.
For the butter, always unsalted. You want to control the saltiness yourself, especially with the sweet condensed milk coming into play. I once accidentally used salted butter for a batch and the base had this weird salty-sweet thing going on that just didn’t hit right. Live and learn!
The sweetened condensed milk is the glue and the sweetness for both the base and the pistachio layer. Seriously, don’t get this confused with evaporated milk – I did that once and my base was just a wet, sticky disaster that never set. It was like a very sweet, very sad soup. Check the label twice, trust me.
Pistachios are the star, obviously! Shelled and unsalted are key. I’ve bought roasted, salted ones in a pinch and spent way too long trying to wipe the salt off, which was futile. It made the whole bar too salty. Grinding your own fresh pistachios makes a huge difference in flavor and vibrancy compared to pre-ground stuff, which can be a bit dull.
White chocolate chips help bind the pistachio layer and add a lovely creaminess. I usually go for good quality chips because they melt smoother. One time I used some cheap baking white chocolate and it just clumped up and was impossible to get smooth, leaving chunks in my beautiful green layer.
The green food coloring is totally optional, but it gives that signature vibrant “Dubai” look. Without it, the pistachio layer is more of a muted, natural beige-green, which is fine, but for that wow factor, a tiny drop goes a long way. Don’t overdo it, though, or it’ll look artificial, like a science experiment gone wrong.
For the top layer, I typically use dark chocolate chips because I like the contrast with the sweet pistachio. But milk chocolate works if you have a sweeter tooth! Just make sure whatever chocolate you pick, it’s something you enjoy eating on its own. The coconut oil or butter added to the chocolate helps it melt smoothly and gives it a gorgeous shine when it sets, making it easier to cut without cracking.
Directions
- Line an 8×8 inch square baking pan with parchment paper, leaving an overhang on the sides.
- In a medium bowl, combine the crushed biscuits and melted butter. Add 2 tablespoons of sweetened condensed milk and mix well until everything is evenly moistened and clumpy.
- Press the mixture firmly and evenly into the bottom of the prepared pan. Use the back of a spoon or a flat-bottomed glass. Refrigerate for at least 15-20 minutes while you prepare the next layer.
- In a food processor, finely grind the shelled pistachios until they resemble a fine meal. Be careful not to over-process, or they’ll turn into a paste.
- In a heatproof bowl, combine the remaining sweetened condensed milk, white chocolate chips, and ground pistachios.
- Melt this mixture over a double boiler or in the microwave in 30-second intervals, stirring until smooth and melted. If using, stir in the green food coloring until fully incorporated.
- Pour the pistachio mixture over the chilled biscuit base, spreading it evenly with an offset spatula or the back of a spoon.
- Return the pan to the refrigerator and chill for at least 2 hours, or until the pistachio layer is firm to the touch.
- Once the pistachio layer is firm, prepare the chocolate topping. In a separate heatproof bowl, combine the milk/dark chocolate chips and coconut oil (or butter).
- Melt this mixture over a double boiler or in the microwave in 30-second intervals, stirring until completely smooth and glossy.
- Pour the melted chocolate evenly over the chilled pistachio layer, spreading quickly as it will start to set.
- Immediately sprinkle the chopped pistachios over the wet chocolate layer.
- Return the pan to the refrigerator for another 1-2 hours, or until the chocolate layer is completely set.
- Once fully chilled and firm, lift the bars out of the pan using the parchment paper overhang. Slice into squares or rectangles using a sharp, hot knife (dip the knife in hot water and wipe clean between cuts).
Okay, let’s talk about step 3: pressing the base. This might seem simple, but it’s where I messed up big time on my second attempt. I didn’t press it down firmly enough, and when I tried to cut the bars later, the base just crumbled apart. It was so frustrating! Now, I really lean into it, using the bottom of a measuring cup to get it super compact. Don’t be shy, give it some muscle, you want a sturdy foundation for those delicious layers above.
Step 6, melting the pistachio mixture, is another tricky one. I’ve absolutely scorched white chocolate in the microwave by trying to rush it, leaving me with a grainy, unappetizing mess. It totally seized up! Melting it slowly over a double boiler, or in short bursts in the microwave with lots of stirring, is crucial. Patience is your best friend here. And for the green food coloring, a tiny toothpick dip is usually enough to start; you can always add more, but you can’t take it away. I once squirted too much in and ended up with something that looked like Hulk food.
And step 14, slicing! This is the grand finale, and where presentation really comes in. My first few times, I tried to cut them cold, right out of the fridge, and the chocolate topping just cracked and splintered. It looked like an earthquake hit my bars! What I learned the hard way is that using a *hot* knife makes all the difference. Dip it in hot water, wipe it clean and dry, and then make your cut. Repeat for each slice. It gives you those beautiful, clean lines and prevents the chocolate from cracking. Trust me on this, it’s a game-changer.
Honestly, making these Dubai Pistachio Chocolate Bars has been a journey. My first attempts were more like “deconstructed” bars, eaten with a spoon because they wouldn’t hold together. But even then, the flavors were there, and everyone still loved them, mess and all. That’s why I keep coming back to this recipe. It’s become a favorite because even when I mess up, it’s still undeniably delicious.
It’s such a comfort food for me now, even though it’s technically a fancy dessert. It brings back memories of laughing with friends over my kitchen blunders. It’s definitely not a one-pot meal, but it’s no-bake, which is a huge win when you don’t want to turn on the oven. Plus, it makes a big batch, so it’s awesome for family gatherings or having fancy leftovers for days. The only thing I sometimes wish I could change is how quickly they disappear from the fridge!
Nutrition Info (per serving)
| Calories | Carbs | Fat | Protein |
|---|---|---|---|
| 325 | 35g | 19g | 5g |
Yeah, looking at those nutrition numbers, it’s safe to say these aren’t exactly diet food. Each bar is definitely a treat! I’ve tried to make them lighter once, swapping out some condensed milk for sugar-free alternatives, but it just didn’t have that same richness and texture. It ended up being a bland disappointment, honestly. My advice? Embrace it for what it is—a decadent dessert! If you’re on a special diet, maybe enjoy a smaller piece, or save it for a cheat day. These bars are meant to be an indulgence, not a health food.
Ingredient Swaps
| Ingredient | Substitution |
|---|---|
| Digestive biscuits | Graham crackers, shortbread cookies (carefully!) |
| Pistachios | Almonds, cashews (will change flavor significantly) |
| White chocolate | More condensed milk (texture will be softer) |
| Milk/Dark chocolate | White chocolate (for an all-white version) |
Okay, so ingredient swaps. You *can* swap graham crackers for digestive biscuits, and that works pretty well. They give a slightly different flavor, more American campfire-s’mores vibe, but the texture is good. I once tried shortbread, thinking “oh, same crumbly goodness,” but it was too buttery and dense. It didn’t absorb the condensed milk quite right and felt heavy.
As for swapping pistachios? I mean, you *could* use almonds or cashews, but then it’s not really a “Dubai Pistachio Chocolate Bar,” is it? It’ll be a delicious nutty bar, but it loses that unique pistachio flavor that makes it special. I did try once with almonds when pistachios were ridiculously expensive, and while good, it just wasn’t the same. It lacked that vibrant green color and distinct taste. So, if you’re going for the authentic experience, stick with the pistachios.
Tips
- **Chill, Chill, Chill:** Don’t skimp on the chilling time between layers.
- **Parchment Paper is Your Best Friend:** Always use it with an overhang for easy removal.
- **Quality Matters (Especially for Pistachios):** Good pistachios make all the difference.
- **Hot Knife for Clean Cuts:** Dip your knife in hot water and wipe dry between slices.
- **Don’t Over-process Pistachios:** Grind them until fine, but stop before they turn oily.
That first tip about chilling, man, I can’t stress it enough. I’m naturally an impatient person, especially when delicious treats are involved. On my very first attempt, I was so excited that I barely gave the base layer 10 minutes in the fridge before slathering on the pistachio. And then I rushed the pistachio layer, too. The result? When I poured the chocolate, the warm chocolate melted into the not-quite-set pistachio layer, which then started bleeding into the not-quite-set biscuit base. It was just a big, gooey, delicious blob. It tasted good, but it looked like a mess. I really wish someone had drilled into my head “PATIENCE!” from the beginning. Now, I try to time it so I can make one layer, go do something else for a bit, then come back for the next. It makes such a difference in how clean and structured your bars turn out.
FAQ
**Q: My chocolate topping seized up and became thick and grainy. What happened?**
A: Oh, I’ve been there! This usually happens for a couple of reasons. Either you got a tiny bit of water into your chocolate while melting (even a drop of steam can do it), or you overheated it, especially white chocolate. My trick now is to melt it slowly over a double boiler, or in the microwave in really short bursts (like 15-20 seconds), stirring vigorously after each one, until it’s just melted and smooth. Don’t rush it! And make sure your bowl and spoon are bone dry.
**Q: Can I make these ahead of time? How long do they last?**
A: Absolutely! These bars are fantastic for making ahead. In fact, I think they taste even better the next day once all the flavors have had time to meld. They’ll last beautifully in an airtight container in the refrigerator for up to a week. I’ve even kept them for 10 days before, and they were still delicious, though maybe a tiny bit less fresh-tasting. They’re a perfect make-ahead for parties.
**Q: My pistachio layer isn’t very green. Did I do something wrong?**
A: Not necessarily! The natural color of ground pistachios can vary a lot, depending on the type and freshness of the nuts. Some pistachios are naturally a duller green or even yellowish. If you want that bright, vibrant green you see in pictures, a tiny bit of green food coloring (gel food coloring works best) is your secret weapon. I usually add just a drop or two until I get the shade I’m happy with. I learned this after several batches looked more “army drab” than “Dubai glam.”
**Q: Can I freeze these bars?**
A: You betcha! These freeze surprisingly well. Once they’re completely set, slice them into individual bars and place them in an airtight container with parchment paper between layers to prevent sticking. They’ll keep in the freezer for up to 2-3 months. Just pop one out and let it thaw in the fridge for an hour or two, or on the counter for a quicker treat. It’s awesome for portion control… or, you know, just having a secret stash.
That’s everything I know about making Dubai Pistachio Chocolate Bars Recipe! Hope you give it a try. And if you mess it up, you’re in good company—I still do it sometimes, but they always taste amazing anyway.
Dubai Pistachio Chocolate Bars Recipe
Indulge in these luxurious no-bake Dubai Pistachio Chocolate Bars, featuring a crisp biscuit base, a rich, vibrant pistachio layer, and a decadent chocolate topping. Perfect for special occasions, this recipe guides you through creating a show-stopping dessert with stunning layers and irresistible flavor.
Ingredients
- 2 cups (about 250g) digestive biscuits or graham crackers, finely crushed
- 1/2 cup (113g) unsalted butter, melted
- 1 (14-ounce) can sweetened condensed milk, divided
- 1 cup (about 120g) shelled pistachios, unsalted
- 1/4 cup (50g) white chocolate chips or chopped white chocolate
- 1 tsp green food coloring (optional)
- 1 cup (170g) milk or dark chocolate chips
- 1 tbsp coconut oil or unsalted butter
- 2-3 tbsp chopped pistachios, for garnish
Instructions
-
Line an 8×8 inch square baking pan with parchment paper, leaving an overhang on the sides.
-
In a medium bowl, combine the crushed biscuits and melted butter. Add 2 tablespoons of sweetened condensed milk and mix well until everything is evenly moistened and clumpy.
-
Press the mixture firmly and evenly into the bottom of the prepared pan. Refrigerate for at least 15-20 minutes while you prepare the next layer.
-
In a food processor, finely grind the shelled pistachios until they resemble a fine meal. Be careful not to over-process, or they’ll turn into a paste.
-
In a heatproof bowl, combine the remaining sweetened condensed milk, white chocolate chips, and ground pistachios.
-
Melt this mixture over a double boiler or in the microwave in 30-second intervals, stirring until smooth and melted. If using, stir in the green food coloring until fully incorporated.
-
Pour the pistachio mixture over the chilled biscuit base, spreading it evenly with an offset spatula or the back of a spoon.
-
Return the pan to the refrigerator and chill for at least 2 hours, or until the pistachio layer is firm to the touch.
-
Once the pistachio layer is firm, prepare the chocolate topping. In a separate heatproof bowl, combine the milk/dark chocolate chips and coconut oil (or butter).
-
Melt this mixture over a double boiler or in the microwave in 30-second intervals, stirring until completely smooth and glossy.
-
Pour the melted chocolate evenly over the chilled pistachio layer, spreading quickly as it will start to set.
-
Immediately sprinkle the chopped pistachios over the wet chocolate layer.
-
Return the pan to the refrigerator for another 1-2 hours, or until the chocolate layer is completely set.
-
Once fully chilled and firm, lift the bars out of the pan using the parchment paper overhang. Slice into squares or rectangles using a sharp, hot knife (dip the knife in hot water and wipe clean between cuts).
Nutrition (Per Serving)

