Easy Butter Board Recipe
Okay, so I remember the first time I heard about a butter board. My friend, Sarah, was all over TikTok and she just kept gushing about this new “thing.” I rolled my eyes, honestly. Like, who needs a board for butter? Just put out a stick and a knife! But she convinced me to try it for a potluck we were having, saying it was “so easy” and “super impressive.” Well, easy it was not, at least not that first time. I tried to use butter straight from the fridge because I was in a hurry – big mistake. It was like trying to spread concrete with a spoon. Then, I went overboard with the toppings, just piled everything on because I thought more was more. It ended up looking like a colorful, but totally messy, butter-avalanche-disaster by the time anyone actually dared to scoop some up. But you know what? Even with all that, people *still* ate it, laughed about my “butter mountain,” and it was gone by the end of the night. That’s when I realized, even when you mess it up, butter boards are pretty darn special.
Recipe Card
| Recipe Title | Easy Butter Board Recipe |
|---|---|
| Servings | 6-8 (with plenty of dippers) |
| Prep Time | 15 minutes |
| Cooking Time | 0 minutes (unless you count toasting bread!) |
| Calories | Approx. 300 per serving (varies wildly with toppings and dippers) |
You know, the serving size for this thing is always a bit of a guess for me. I put 6-8 here, but honestly, it depends so much on how hungry everyone is, what other appetizers you have out, and how much people really love butter. Sometimes it disappears in minutes, other times it’s still hanging around. Just think of it as a really flexible snack, good for a small gathering or a bigger party. Prep time is super accurate though – it really is just minutes if your butter is ready!
Ingredients
- 1 cup (2 sticks) unsalted butter, softened to room temperature
- 1/4 teaspoon flaky sea salt (like Maldon)
- 2 tablespoons honey or maple syrup
- 1/4 cup fresh herbs, chopped (e.g., chives, dill, parsley, thyme)
- 2 tablespoons toasted nuts, roughly chopped (e.g., pecans, walnuts, pistachios)
- Zest of 1/2 lemon or orange (optional, but highly recommended!)
- Pinch of red pepper flakes (optional, for a little kick)
- Assorted dippers: crusty bread, crackers, pita bread, apple slices, carrot sticks
Okay, let’s talk about these ingredients because each one has a story for me. First, the butter. **Unsalted butter, softened.** This isn’t just a suggestion, it’s a commandment. I remember one time I was trying to rush things (again, typical me) and thought, “Oh, I’ll just microwave the butter for 30 seconds.” What I got was a pool of melted oil and a rock-hard core. Totally useless for spreading. You really need it soft, but not melted, so it spreads like a dream and actually sticks to the board. Don’t learn this lesson the hard way like I did, trying to salvage oily butter by chilling it again. It just doesn’t work right.
Then there’s the **flaky sea salt**. This is non-negotiable for me. I once used regular table salt because I ran out of the good stuff. It just didn’t have that satisfying crunch, that little burst of salty flavor that balances the richness of the butter and sweetness of the honey. It just dissolved and made the butter taste… well, just salty. Go for the good flaky stuff, trust me on this one. It’s worth the extra few bucks.
**Honey or maple syrup.** I’ve tried both, and honestly, they’re both fantastic. I usually go with whatever I have on hand. One time I tried to use agave syrup, thinking it would be similar, but it was just a bit too thin and drippy for my taste. It soaked into the butter rather than sitting on top in those pretty little swirls. Stick with honey or maple, they’ve got that perfect viscosity.
The **fresh herbs** are where you can really play. I’ve tried dried herbs too, especially when I’m feeling lazy or my herb garden is looking sad. But dried herbs just don’t have the same vibrancy, that fresh burst of green and flavor. They tend to just sit there, looking a bit dusty. One time I used way too much rosemary, and that stuff is potent, it totally overpowered everything else. Now I stick to chives or dill mostly, they’re more forgiving.
**Toasted nuts.** Please, please, please toast them! I forgot to do this once, and the nuts just tasted… raw. Not bad, but not exciting. Toasting them brings out all that amazing flavor and gives them a nice crispness. It’s a small step, but it makes a huge difference. I like pecans, but walnuts or pistachios work great too. Just whatever you have in the pantry that needs using up.
**Lemon or orange zest.** This is my secret weapon. That little bit of citrus brightens everything up so much. It cuts through the richness of the butter. I once tried it without, and while still good, it felt like something was missing. Don’t skip this if you can help it. Just be careful not to get any of the white pith, that’s where the bitterness hides!
And finally, **red pepper flakes.** This is totally optional, but if you like a little heat, it’s a game-changer. I accidentally put way too many on one time, and my husband (who loves spicy food) was sweating. So, start small and add more if you like. It just gives a nice little zing that makes you want another bite.
Directions
- Choose your board: A clean cutting board, platter, or even a large plate works great.
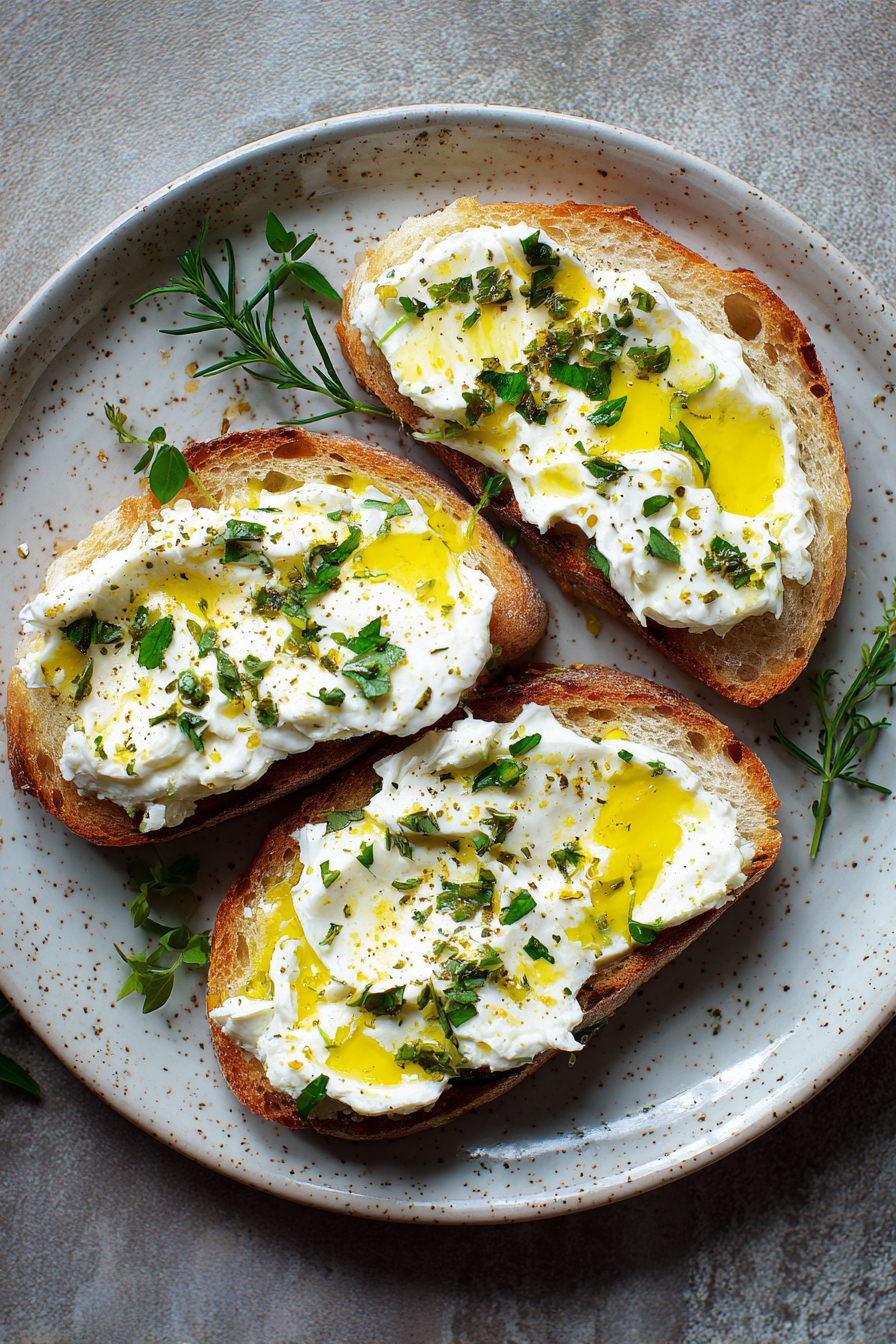
- Spread the butter: Evenly spread the softened butter across your chosen board. Use the back of a spoon or an offset spatula to create gentle swirls and peaks.
- Season with salt: Sprinkle the flaky sea salt generously over the butter.
- Drizzle with honey/maple syrup: Carefully drizzle the honey or maple syrup in pretty lines or swirls over the butter.
- Add your toppings: Sprinkle the fresh herbs, toasted nuts, lemon/orange zest, and red pepper flakes (if using) artfully over the butter.
- Chill (optional but recommended): If you have time, pop the board in the fridge for 10-15 minutes to let the butter firm up slightly and the flavors meld.
- Serve immediately: Arrange your dippers around the board and let everyone dig in!
Let’s break down those steps, because I’ve messed up pretty much every single one at some point. Choosing the board? Sounds simple, right? Wrong. I once tried to use a tiny little cheese board for a party of ten, thinking “It’ll be cute!” It was not cute. It was cramped, people couldn’t get to the butter without knocking toppings off, and it just looked sad. Make sure your board is big enough for all that beautiful butter and plenty of space for people to scoop without making a total mess. Nobody wants butter on their sleeve!
Spreading the butter is where my first big fail happened. Like I said earlier, cold butter is the enemy. It’s just impossible to get those nice swirls. Another time, I tried to make it super smooth, like frosting a cake, and it just looked… flat. The key is those *gentle* swirls and peaks. They catch the light, hold the toppings better, and just look more inviting. Don’t stress too much about perfection; a little rustic charm is part of the appeal.
Sprinkling salt: Sounds easy, but I’ve been heavy-handed before. Remember, it’s flaky salt, so a little goes a long way for flavor, but you can be a bit more generous for presentation. Just try to get an even spread so every bite gets some of that magic crunch.
Drizzling the honey or maple syrup is where I usually try to get fancy, and sometimes it works, sometimes it doesn’t. My biggest tip here is to warm the honey slightly if it’s super thick. Not hot, just slightly warm so it flows easily. One time I used super cold, thick honey, and it just came out in one big blob, completely messing up my beautiful butter canvas. Another time, I got too close and the stream was too thick. Hold the bottle a little higher and let it drizzle in thinner lines. It looks way prettier.
Adding your toppings is where the “art” comes in. My mistake was always just dumping everything in the middle. It looks messy, and again, hard for people to scoop without getting an entire herb garden on their cracker. Think about color and texture. Try to spread things out a bit, creating little “zones” or streaks. Maybe a line of nuts here, some herbs there, a sprinkle of zest in another spot. It just looks more appealing and makes it easier to serve.
The chilling step is totally optional, but seriously, if you have 10-15 minutes, do it. It just firms up the butter slightly so it’s less prone to melting into a soft mess if it sits out for a bit. Plus, it helps the flavors meld a little. I usually forget this step because I’m always rushing, but every time I remember, I’m glad I did. It just holds up better.
And serving immediately! Don’t make it too far in advance, especially if your kitchen runs warm. Butter, you know, melts. I learned that the hard way when I left a beautiful board out on the counter for over an hour before guests arrived on a summer day. It looked great for about 15 minutes, then slowly transformed into a very sad, shiny puddle. Keep it in the fridge until just before people are ready to eat.
Honestly, this Easy Butter Board Recipe has become one of my favorite things to make when friends are coming over. It’s funny how something so simple can feel so fancy and make everyone gather around. I love watching people ooh and aah over it, picking their perfect bite. It’s definitely a comfort food in the sense that it just feels good and celebratory. I’ve even made it for family movie nights, setting it out with popcorn and other snacks – though I’d probably skip the fancy herbs then and just do some honey and cinnamon for the kids. It’s not really a meal prep kind of thing, unless you count having the butter softened and toppings prepped, but that kind of takes the fun out of the spontaneous assembly.
My biggest mistake, even now, is still trying to get too creative with the toppings and making it too busy. Sometimes less really is more. I tried adding sun-dried tomatoes once, thinking it would be a savory twist, and while it wasn’t awful, the texture was a bit chewy and it didn’t quite blend with the creamy butter as well as I hoped. So now, I stick to the classics more often than not. It’s a crowd-pleaser and truly an easy appetizer once you get the hang of it. Plus, the leftovers, if there are any (which is rare!), can be scraped into a jar and used on toast the next morning. Talk about a happy accident!
Nutrition Info (per serving)
| Calories | Carbs | Fat | Protein |
|---|---|---|---|
| 300 | 10g | 30g | 2g |
Okay, let’s be real, no one is making a butter board because they’re on a strict diet, right? The nutrition info doesn’t exactly surprise me – it’s butter! It’s delicious, it’s rich, and it’s definitely a treat. I’ve thought about making it “healthier” by using less butter or trying vegan butter, but honestly, it just changes the whole experience. I mean, it’s a *butter* board. If you’re looking for a healthy swap, maybe a hummus board or a veggie platter would be a better choice. For special diets, I have tried it with high-quality vegan butter, and it *can* work, especially if you get one that’s designed for spreading. Just make sure it’s soft enough. For gluten-free folks, it’s super easy – just serve with gluten-free crackers or veggie sticks instead of bread.
Ingredient Swaps
| Ingredient | Substitution |
|---|---|
| Unsalted Butter | Salted butter (adjust added salt), high-quality vegan butter |
| Flaky Sea Salt | Kosher salt (use slightly less) |
| Honey/Maple Syrup | Hot honey, fig jam, balsamic glaze |
| Fresh Herbs | Dried herbs (use 1/3 amount), edible flowers, finely chopped green onions |
| Toasted Nuts | Toasted seeds (pumpkin, sunflower), toasted breadcrumbs |
| Lemon/Orange Zest | None (but you’ll miss the brightness!) |
| Red Pepper Flakes | Freshly ground black pepper, a tiny pinch of cayenne |
Alright, these ingredient swaps. Some of them work beautifully, and some… well, they’re not quite the same. If you use **salted butter**, you definitely need to reduce the amount of flaky sea salt you add, or it’ll be too salty. I’ve done that before, and it was almost inedible. Just taste a tiny bit of the butter first. **Vegan butter** can be a good substitute, but texture-wise, some brands are too firm or too oily. Miyoko’s Kitchen or Kite Hill tend to work better than others I’ve tried.
Using **Kosher salt** instead of flaky sea salt is fine in a pinch, but it just doesn’t give you that delightful crunch. It’s more about taste than texture at that point. I usually have kosher salt, so I’ve definitely done this, but I do miss the flakes.
**Hot honey** is actually a fantastic swap for regular honey if you like a little extra kick. It adds a whole new dimension of flavor! I’ve tried **fig jam** too, and that was a hit. It adds a lovely sweetness and a little bit of texture. But I tried a **balsamic glaze** once, and it just looked a bit too dark and intense, and the flavor was a little overpowering for the delicate butter. I think it depends on the balsamic.
**Dried herbs** are okay if you’re really desperate, but they just don’t have the fresh pop. If you’re using them, remember to use about a third of the amount of fresh herbs, because their flavor is concentrated. **Edible flowers** are gorgeous for presentation, but they don’t add much flavor, so they’re purely for looks. And yes, **green onions** are a great substitute for chives if that’s what you have.
**Toasted seeds** (like pumpkin or sunflower) are a perfect swap for nuts, especially if you have allergies in your group. They still give you that lovely crunch and nutty flavor. I once tried to use plain breadcrumbs thinking they’d add texture and… no. They just tasted like bland, slightly soggy crumbs. Definitely stick with toasted nuts or seeds.
And that **lemon/orange zest** swap? There isn’t really one. You can skip it, but you’ll notice. It’s that little bit of brightness that cuts through the richness and makes you want another bite. Don’t skip it if you can help it!
Tips
- **Room Temperature Butter is Key:** Let your butter sit out for at least an hour, maybe two, depending on how warm your kitchen is. It needs to be spreadable, not rock hard or melted.
- **Don’t Overcrowd Your Board:** Less is often more. Give your toppings some space so they don’t all fall off, and people can actually see what they’re scooping up.
- **Chill Before Serving (if possible):** A quick 10-15 minutes in the fridge helps everything firm up and the flavors settle. This is especially good if you live in a warm climate or your board will be sitting out for a while.
- **Vary Textures and Colors:** Think about what you’re putting on the board. A mix of crunchy nuts, soft herbs, and sticky honey makes for a more interesting bite.
- **Pre-Cut Your Dippers:** This makes serving so much easier for everyone. Little slices of baguette or pre-broken crackers prevent a traffic jam around the board.
Oh man, these tips are born from so many mistakes. That first one about **room temp butter**? I learned that the hard way, as I mentioned, trying to spread cold butter and tearing the parchment. It’s also important because if it’s too soft, almost melted, the toppings just sink into it. I once made a board in the summer, set it out, and within minutes, the herbs and nuts were just floating in a greasy puddle. Live and learn! Now, I plan ahead and take the butter out way before I need it.
**Don’t overcrowd the board** is a tip I still struggle with sometimes. My eyes are always bigger than the board! I once tried to put like, five different kinds of nuts, three different herbs, two drizzles, and some dried fruit on a board. It looked like a forest floor after a storm. It was impossible to scoop cleanly, and half the toppings ended up on the table. Now, I try to pick 3-5 distinct toppings and spread them out thoughtfully. It looks prettier and functions way better.
**Chilling before serving.** This is another one I usually skip because I’m always rushing, but every time I manage to do it, the board just looks better. It stops the butter from getting too soft too quickly, especially if you have warm hands reaching for it. My biggest regret was making a beautiful board for a summer BBQ, and by the time people got to it, it was just a melty mess. A quick chill could have saved it!
**Varying textures and colors** is what really elevates a butter board from just “butter with stuff” to something special. I remember making one with just nuts and a single herb, and it looked kind of bland. Then I added a little zest, some red pepper flakes, and a different colored nut, and suddenly it popped! It’s all about making each bite an experience, not just a blob of butter.
And **pre-cutting your dippers**? This is purely for sanity. My first few times, I just put out a whole baguette and some cracker boxes. Everyone was awkwardly trying to saw off pieces of bread, or breaking crackers and getting crumbs everywhere. Now, I always have a nice pile of neatly cut baguette slices and a bowl of crackers ready to go. It just makes the whole experience smoother and more polite.
FAQ
**Q: Can I make the butter board ahead of time?**
A: You totally can, but with a few caveats. I wouldn’t make it more than a few hours in advance, especially if you’re using very fresh herbs. The herbs can start to wilt and look a bit tired. If you do make it ahead, cover it loosely with plastic wrap (try not to let the wrap touch the toppings too much) and keep it in the fridge. Take it out about 15-20 minutes before serving so the butter can soften just a touch, making it easier to spread. I’ve left it overnight once, and the herbs were definitely sad.
**Q: What kind of bread or crackers are best for dipping?**
A: Oh, this is important! You need something sturdy. A crusty baguette, sliced thinly, is my absolute go-to. Ciabatta is great too. For crackers, look for something that won’t crumble easily. Water crackers or sourdough crackers work well. I once used these super delicate rice crackers and they just disintegrated in the butter. So frustrating! Apple slices or carrot sticks are also surprisingly good if you want something fresh and crunchy.
**Q: My butter is too hard/too soft! What do I do?**
A: Been there, done that a million times. If your butter is too hard, you can try grating it with a cheese grater (weird, but it works!) to help it soften faster, or cut it into small cubes and spread them out on the board. Just avoid the microwave unless you know exactly what you’re doing, because a melted puddle is harder to fix. If it’s too soft and oily, your best bet is to pop the board (or the bowl of butter) into the fridge for 5-10 minutes to let it firm up a bit. Don’t leave it too long though, or you’ll be back to square one!
**Q: How do you serve a butter board hygienically?**
A: This is a great question, especially for parties. I usually put out a few small butter knives or spreaders right on the board, so people can use a clean one each time they scoop. Or, you can just encourage folks to scoop once with their knife onto their own plate, then use their own utensil from there. For very casual gatherings, sometimes we just use the dippers themselves to scoop, but that’s definitely more of a “friends and family” thing. If you’re really worried, consider making a few smaller butter boards instead of one giant one.
**Q: Can I make a sweet or savory specific butter board?**
A: Absolutely! This recipe is a bit of a sweet and savory combo, but you can definitely lean one way or the other. For a purely sweet board, think cinnamon sugar, dried cranberries, chopped candied pecans, orange zest, and more honey. For savory, try roasted garlic, black pepper, chives, smoked paprika, sun-dried tomato bits, and maybe some parmesan cheese. I made a savory one once with everything bagel seasoning and it was divine! Just pick toppings that play well together.
That’s everything I know about making Easy Butter Board Recipe! Hope you give it a try. And if you mess it up, you’re in good company—I still do it sometimes.
Easy Butter Board Recipe
Transform simple butter into an impressive, customizable appetizer with this viral butter board recipe. Combining creamy, softened butter with a delightful array of sweet and savory toppings, it’s perfect for entertaining and surprisingly simple to assemble.
Ingredients
- 1 cup (2 sticks) unsalted butter, softened to room temperature
- 1/4 teaspoon flaky sea salt
- 2 tablespoons honey or maple syrup
- 1/4 cup fresh herbs, chopped (e.g., chives, dill, parsley, thyme)
- 2 tablespoons toasted nuts, roughly chopped (e.g., pecans, walnuts, pistachios)
- Zest of 1/2 lemon or orange (optional)
- Pinch of red pepper flakes (optional, for a little kick)
- Assorted dippers (e.g., crusty bread, crackers, pita bread, apple slices, carrot sticks)
Instructions
-
Choose a clean cutting board, platter, or large plate that is suitable for serving.
-
Evenly spread the softened butter across your chosen board. Use the back of a spoon or an offset spatula to create gentle swirls and peaks, which will hold the toppings well.
-
Generously sprinkle the flaky sea salt over the butter, ensuring an even distribution for flavor and texture.
-
Carefully drizzle the honey or maple syrup in decorative lines or swirls over the butter. Slightly warm the syrup if it’s too thick to drizzle easily.
-
Artfully sprinkle the fresh chopped herbs, toasted nuts, lemon or orange zest, and red pepper flakes (if using) over the butter, aiming for a balanced visual and flavor distribution.
-
(Optional but recommended) If time permits, place the board in the fridge for 10-15 minutes. This helps the butter firm up slightly and allows the flavors to meld.
-
Arrange your assorted dippers, such as pre-cut crusty bread slices, crackers, or fresh vegetable sticks, around the board and serve immediately.
Nutrition (Per Serving)