
How to Make Hot Chocolate Bombs
Oh man, hot chocolate bombs. Lemme tell ya, the first time I tried to make these, it was a disaster. It was right before Christmas a few years back, and I saw all these gorgeous bombs on Pinterest. I thought, “How hard can it be? It’s just chocolate!” Ha. Famous last words, right? I had visions of my kids’ eyes lighting up, cute little bombs exploding into marshmallowy goodness in their mugs. Instead, I ended up with seized chocolate, broken shells that looked like they’d been in a wrestling match, and a kitchen covered in cocoa powder. My husband walked in and just stared, bless his heart, while I was practically in tears, muttering about how I just wanted to make something magical. It was a messy, sticky, slightly traumatic experience, but you know what? We still ended up with something that vaguely resembled a hot chocolate bomb, and the kids, bless their innocent hearts, thought they were the coolest thing ever. So yeah, I kept at it, and now I’ve got this recipe down pat, and I’m here to save you from my early chocolate-induced meltdowns!
Recipe Card
| Recipe Title | How to Make Hot Chocolate Bombs |
|---|---|
| Servings | Makes 6-8 bombs (depending on mold size) |
| Prep Time | 45 minutes |
| Cooking Time | 5 minutes (for melting chocolate) |
| Calories | Approx. 250-350 per bomb (varies a lot!) |
Ingredients
- 12 ounces good quality melting chocolate (milk, semi-sweet, or white)
- 6-8 tablespoons hot cocoa mix (your favorite brand!)
- About 2 cups mini marshmallows
- Optional: Sprinkles, crushed candy canes, chocolate drizzle, espresso powder
- Silicone sphere molds (very important!)
Okay, let’s talk ingredients. The chocolate? This is NOT the time to cheap out or grab those random chocolate chips from the back of your pantry. My very first attempt used regular chocolate chips, and it was a sticky, frustrating mess. They just don’t melt as smoothly, and they get thick and hard to work with super fast, even after adding a bit of oil, which I thought was a genius hack. It was not. Trust me, get good quality melting chocolate wafers or bars designed for melting. It makes all the difference in the world for a smooth, glossy finish.
For the hot cocoa mix, you want your family’s favorite, or whatever you normally use. I’ve tried fancy stuff and just regular Hershey’s, and honestly, it all works great. Just don’t go too crazy with really lumpy mixes, as they might not dissolve as nicely. I once tried to put a really gourmet, chunky cocoa mix inside, and it just kind of sat at the bottom of the mug like a sad little sediment heap. Stick to the classic powder.
Mini marshmallows are non-negotiable. You could try regular-sized ones, I guess, but they’re not gonna fit inside the bomb unless you only put like, one. And who wants one marshmallow? The mini ones are perfect for filling up the bombs and floating to the top of your hot cocoa. I once grabbed a bag of “small” marshmallows thinking they were mini, and they were still too big. It was a whole thing. Learn from my mistakes!
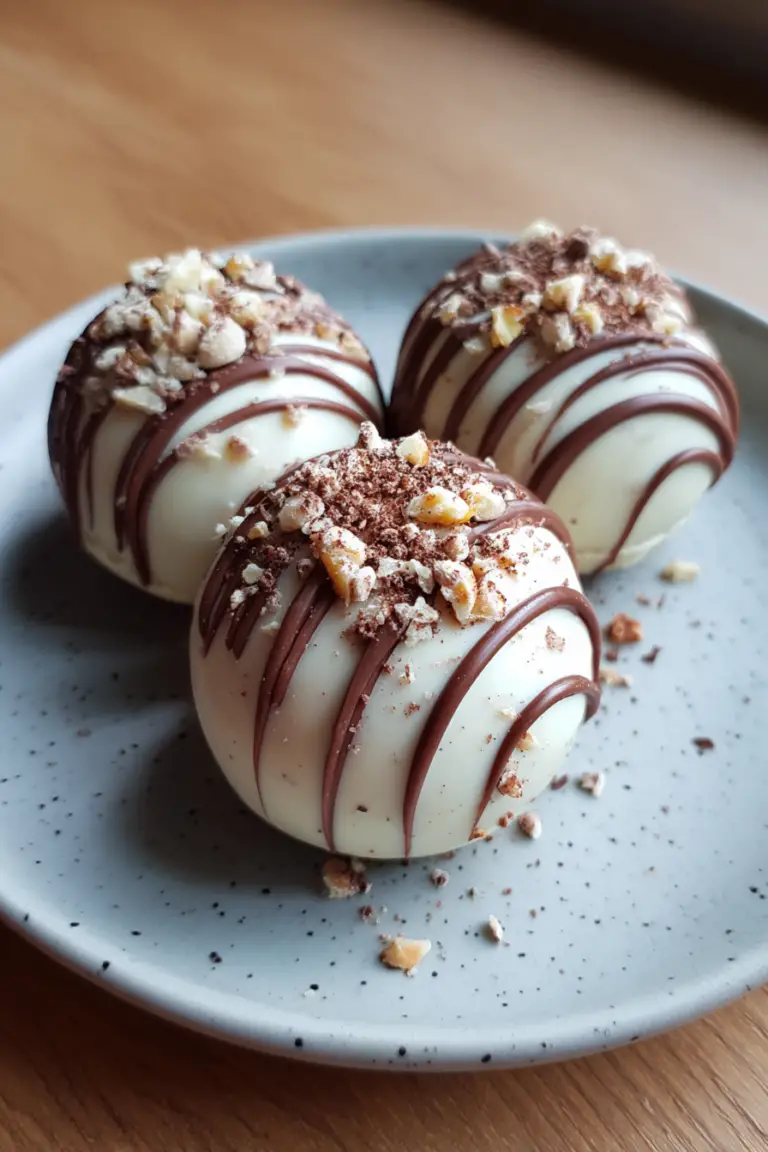
The optional toppings are where you can get creative, but don’t go overboard. A little drizzle or a few sprinkles are cute. I had one bomb where I crammed so many crushed candy canes inside, it looked like a peppermint explosion, but it also made the bomb taste a little *too* minty. Less is often more with these little guys. Oh, and espresso powder? A tiny pinch in the cocoa mix can deepen the chocolate flavor beautifully, but don’t overdo it, or you’ll be buzzing for hours.
And finally, the silicone molds. Oh my goodness, THESE ARE EVERYTHING. Do not, I repeat, DO NOT try to use those stiff plastic candy molds. I did that once. The chocolate stuck, cracked, and basically disintegrated when I tried to demold it. It was like peeling dried glue off a countertop – impossible. Get silicone sphere molds. They’re flexible, they pop out beautifully, and they’ll save you so much frustration. You’ll thank me later.
Directions
- Melt your chocolate using a double boiler or microwave. If using a microwave, heat in 30-second intervals, stirring well each time, until smooth.
- Spoon a generous tablespoon of melted chocolate into each cavity of your silicone mold.
- Using the back of the spoon, spread the chocolate up the sides of the mold until it’s evenly coated and forms a shell. Make sure it’s not too thin, or it’ll crack.
- Place the molds in the fridge or freezer for 10-15 minutes, or until the chocolate is firm.
- Once firm, carefully demold the chocolate half-spheres. Gently push from the bottom and peel the silicone away.
- Take half of your chocolate spheres and fill each one with about 1 tablespoon of hot cocoa mix and a handful of mini marshmallows.
- To seal the bombs, heat a plate in the microwave for 30-60 seconds until warm.
- Take an empty chocolate half-sphere and gently press its rim onto the warm plate for a few seconds to slightly melt the edge.
- Immediately place the melted rim on top of a filled half-sphere and gently press together to seal. Smooth out any seams with your finger or a little extra melted chocolate.
- Decorate with extra chocolate drizzle, sprinkles, or crushed candy canes, if desired. Let them set completely before storing.
Alright, let’s talk about those directions, ’cause there are a few places where I’ve messed up big time. Step 1, melting the chocolate. My very first mistake was overheating it in the microwave. I thought, “Faster is better!” and just blasted it. Nope. Chocolate seizes up when it gets too hot, turning into a thick, gritty, unworkable paste. It’s like trying to sculpt with mud. Use short bursts, like 30 seconds max, and stir, stir, stir in between. Or better yet, a double boiler. It’s gentler and gives you more control. Also, for the love of all that is holy, do NOT let any water get into your melted chocolate. Even a tiny drop can make it seize. I learned that the hard way when a little condensation from my lid dripped in. Tragic.
Step 3, spreading the chocolate. This is where I’d either go too thin or too thick. Too thin, and your bombs are super fragile and crack when you demold them, or worse, when you try to seal them. I once had a whole batch crumble into shards. Too thick, and they’re just clunky and not as pretty, plus you use a ton of chocolate. Aim for a nice, even coating. You should be able to see the color of the chocolate, not the clear mold through it. If you see light spots, add a bit more chocolate and spread it up.
Step 5, demolding. Patience is key here. If they’re not fully chilled, they’ll stick and break. I used to get so impatient and try to pop them out too early, and then I’d have half a sphere in my hand and the other half still stuck in the mold. It was infuriating. Make sure they’re solid. And be gentle! Those silicone molds are awesome, but you still need a delicate touch. Push from the bottom, and carefully peel the mold away from the chocolate edge. Don’t yank it.
Step 8 and 9, sealing the bombs. This was my biggest hurdle. For ages, I tried to “glue” them together with more melted chocolate, and it was always a disaster. It was messy, the seams were ugly, and half the time the glue didn’t hold. Then, I saw a tip about warming a plate, and it was a total game-changer. Seriously, a warm plate. It melts the very edge of the chocolate perfectly, creating a smooth, strong seal. The first time I did it, I felt like a genius. This little trick will save you so much frustration, I promise you. Just be quick about it, melt the edge, and press it right onto your filled half. Smooth it out with your finger and boom, perfect seam every time.
After all the melting, filling, and sealing, there’s always a moment of quiet satisfaction. My funniest memory was during that first disastrous Christmas batch. One of the “bombs” (it was more of a misshapen chocolate blob with a marshmallow stuck to the outside) somehow fell into my husband’s coffee mug instead of a hot chocolate one. He didn’t notice until he took a sip and got a mouthful of melted marshmallow. We still laugh about it.
I really love making these hot chocolate bombs because once you get the hang of it, they’re surprisingly simple and SO impressive. They make fantastic gifts during the holidays, or just a fun treat for a snowy afternoon. My kids get such a kick out of watching them melt and the marshmallows float up. It’s become a little family favorite for cozy nights. Plus, you can make a big batch ahead of time and store them, which is perfect for busy holiday seasons. It’s definitely comfort food in a fun, interactive package.
If I were to change anything next time, I’d probably experiment more with different flavored cocoas, maybe a salted caramel or a peppermint one, and try to incorporate some edible glitter for an extra “wow” factor. I’m also still trying to perfect a white chocolate shell that doesn’t look streaky. It’s a process, but a delicious one!
Nutrition Info (per serving)
| Calories | Carbs | Fat | Protein |
|---|---|---|---|
| 300 | 35g | 18g | 3g |
Okay, so that nutrition info kinda makes you raise an eyebrow, right? A hot chocolate bomb is definitely a treat, not a health food. The calories and fat mostly come from the chocolate, and the carbs from both the chocolate and the cocoa mix sugar. If you’re looking to make it a little lighter, you can definitely use sugar-free chocolate (just make sure it’s good for melting!) and a sugar-free cocoa mix. You could also skip the extra drizzles and sprinkles. For people with special diets, just be mindful of ingredients. For example, use dairy-free chocolate and cocoa if you need it to be vegan or lactose-free. Always check your labels, especially for hidden dairy in cocoa mixes.
Ingredient Swaps
| Ingredient | Substitution |
|---|---|
| Milk Chocolate | Dark chocolate, semi-sweet chocolate, white chocolate |
| Hot Cocoa Mix | Flavored cocoa mixes (peppermint, salted caramel), espresso powder (for mocha bombs) |
| Mini Marshmallows | Small candies (like crushed peppermint, mini M&M’s, chocolate chips) |
| Sprinkles | Drizzled chocolate, crushed nuts, coconut flakes |
When it comes to ingredient swaps, you’ve got some wiggle room, but some work better than others. Dark chocolate and semi-sweet chocolate shells work great, giving a richer, less sweet hot chocolate. White chocolate can be a bit trickier to work with sometimes; it can seize faster and be more finicky about temperature, so proceed with caution if you’re a beginner. My white chocolate bombs sometimes look a bit streaky, which isn’t the prettiest, but they still taste good!
Swapping out the hot cocoa mix for flavored ones is awesome! Peppermint cocoa makes a super festive bomb, and adding a little espresso powder to regular cocoa mix makes a fantastic mocha bomb—just don’t overdo the espresso, or it’ll be too bitter. As for the mini marshmallows, you can totally swap those for other little candies. Crushed peppermints are great for a minty kick, or a few mini chocolate chips add extra chocolatey goodness. I’ve tried putting M&M’s in, and they’re fun, but sometimes they don’t fully melt if the liquid isn’t hot enough. Don’t try to put anything too big or that won’t melt easily, or you’ll have crunchy bits at the bottom of your mug!
Tips
- Use good quality melting chocolate, not regular chocolate chips.
- Don’t overheat your chocolate; melt slowly in short bursts or a double boiler.
- Ensure your molds are completely clean and dry before adding chocolate.
- Chill your chocolate shells thoroughly before demolding.
- Use the warm plate method for sealing your bombs—it’s a game-changer!
Okay, let’s dive into these tips because these are the things I wish someone had told me from the start. That first tip about good quality melting chocolate? Yeah, that one comes from many, many ruined batches of lumpy, unspreadable chocolate. I used to think chocolate was chocolate, but there’s a real difference in how it melts and sets. Using the good stuff makes for a smooth, glossy shell that’s a joy to work with, not a frustrating battle.
The second tip, not overheating, is also huge. My earliest attempts at making hot chocolate bombs involved a lot of seized chocolate. It turns into this crumbly, gritty mess that is utterly unfixable once it happens. I learned the hard way that a little patience with the microwave (or just using a double boiler) saves you from throwing out a whole bowl of chocolate. Stirring every 30 seconds really is key; it helps distribute the heat and prevents burning.
And the warm plate method for sealing? Gosh, I cannot stress this one enough. Before I knew about it, I was trying to pipe melted chocolate around the edges, creating the most hideous, lumpy seams you can imagine. My bombs looked like they’d been patched together by a five-year-old. The warm plate melts the edges perfectly and creates a seamless, professional-looking seal. It’s the one tip that instantly leveled up my hot chocolate bomb game from “hot mess” to “homemade magic.” Seriously, try it!
FAQ
Q: Why is my chocolate seizing or getting lumpy when I try to melt it?
A: Oh man, I’ve been there so many times! It’s almost always one of two things: either your chocolate got too hot, or a tiny bit of water snuck into it. Chocolate is super sensitive. When microwaving, heat it in short bursts (30 seconds!) and stir well after each. Don’t rush it. And for the love of chocolate, make sure your bowl and utensils are bone dry, and no steam or water drips in if you’re using a double boiler. Once it seizes, it’s pretty much done for, sadly.
Q: My chocolate shells are cracking when I try to demold them or when I’m sealing them. What am I doing wrong?
A: Cracking is usually because your chocolate layer is too thin in spots. When you’re spreading the chocolate up the sides of the mold, make sure you have a nice, even coating. You shouldn’t be able to see through it in any areas. Also, make sure they’re thoroughly chilled before you try to pop them out. If they’re still a little soft, they’ll break. Be gentle when demolding—peel the silicone away from the chocolate, don’t force it.
Q: My hot chocolate bomb didn’t “explode” properly in the mug. It just kind of sat there. Help!
A: This has happened to me, and it’s a bit of a bummer! Usually, it’s because your liquid wasn’t hot enough. You need really hot milk (or water, if that’s your thing) to melt the chocolate shell and let all the goodies burst out. Make sure it’s steaming hot! Also, if you packed your bomb *too* full, or if the cocoa mix got a bit compacted, it can prevent a quick “explosion.” Sometimes, a little swirl of the spoon helps it along too.
That’s everything I know about making How to Make Hot Chocolate Bombs! Hope you give it a try. And if you mess it up, you’re in good company—I still do it sometimes.
How to Make Hot Chocolate Bombs
Unlock the magic of homemade hot chocolate bombs with this foolproof guide! Perfect for cozy evenings or festive gifts, these delightful chocolate spheres melt into a rich, marshmallowy beverage, saving you from common melting mishaps.

Ingredients
- 12 ounces good quality melting chocolate (milk, semi-sweet, or white)
- 6-8 tablespoons hot cocoa mix (your favorite brand)
- About 2 cups mini marshmallows
- Optional: Sprinkles, crushed candy canes, chocolate drizzle, espresso powder
Instructions
-
Melt your chocolate using a double boiler or microwave. If microwaving, heat in 30-second intervals, stirring well each time, until smooth and fully melted.
-
Spoon a generous tablespoon of melted chocolate into each cavity of your silicone sphere mold.
-
Using the back of the spoon, spread the chocolate evenly up the sides of the mold to form a shell. Ensure the layer is not too thin to prevent cracking.
-
Place the molds in the fridge or freezer for 10-15 minutes, or until the chocolate is completely firm.
-
Once firm, carefully demold the chocolate half-spheres. Gently push from the bottom and peel the silicone away, handling with care.
-
Take half of your chocolate spheres and fill each one with about 1 tablespoon of hot cocoa mix and a generous handful of mini marshmallows.
-
To seal the bombs, heat a plate in the microwave for 30-60 seconds until it is warm to the touch.
-
Take an empty chocolate half-sphere and gently press its rim onto the warm plate for a few seconds to slightly melt the edge.
-
Immediately place the melted rim on top of a filled half-sphere and gently press together to seal. Smooth out any seams with your finger or a tiny bit of extra melted chocolate.
-
Decorate with extra chocolate drizzle, sprinkles, or crushed candy canes, if desired. Let them set completely before storing.
Nutrition (Per Serving)

