

Decadent Chocolate M&Ms Cookie Dough Ice Cream Cake
Oh man, this cake. This Decadent Chocolate M&Ms Cookie Dough Ice Cream Cake. It’s truly a labor of love, but let me tell you, it’s worth every single messy, sticky minute. The first time I ever attempted it was for my nephew Leo’s 7th birthday. He’s obsessed with M&Ms and anything chocolate, so I thought, “How hard can an ice cream cake be?” Famous last words, right? I had chocolate ice cream melting all over my counter, the cookie dough layer was frozen solid then suddenly too soft, and I definitely didn’t freeze it enough between layers. It looked like a delicious, lopsided chocolate avalanche, but bless Leo’s heart, he loved it anyway and proclaimed it the best cake ever. That memory of his chocolate-smeared grin is why I keep making it, and why I’ve gotten so much better at it over the years.
Recipe Card
| Recipe Title | Decadent Chocolate M&Ms Cookie Dough Ice Cream Cake |
|---|---|
| Servings | 12-16 hungry folks |
| Prep Time | About 45 minutes (plus lots of freezing time!) |
| Cooking Time | None, just chilling! |
| Calories | Around 650-700 per slice (this isn’t health food, honey!) |
Ingredients
- 1 ½ sleeves (about 25) Oreo cookies, crushed
- 6 tablespoons unsalted butter, melted
- 2 pints good quality chocolate ice cream, softened slightly
- 1 recipe edible chocolate chip cookie dough (recipe below)
- 1 cup hot fudge topping, cooled to room temperature
- 1 large (16 oz) container frozen whipped topping (like Cool Whip), thawed
- ¾ cup M&M’s candies, plus more for garnish
- Optional: Chocolate syrup for drizzling
You know, for the crust. I once tried to skimp and use only one sleeve, thinking it would be fine, but the crust was so thin and broke apart when I tried to serve it. Learn from my mistake – don’t mess with the Oreo ratio.
This is what holds that Oreo crust together. I remember one time I melted it in the microwave for too long and it spattered everywhere, making a huge mess. Always melt gently, folks!
The “softened slightly” part is key. Not melted, not rock hard. It needs to be scoopable and spreadable. I’ve ruined layers by trying to spread ice cream that was too soft (it just melted into the crust) or too hard (it tore the crust right up).
This is the heart of the Decadent Chocolate M&Ms Cookie Dough Ice Cream Cake! Making it edible is super important, no raw eggs or flour here. I once forgot the heat-treated flour and just hoped for the best – nobody got sick, but I spent the whole party worrying.
Make sure it’s cooled! I used to just nuke it in the microwave and pour it on, only to watch my beautiful ice cream layer turn into a chocolate soup. Room temp, people, room temp.
This stuff is my go-to for ease. I tried making homemade whipped cream once, and it looked gorgeous for about an hour, then slowly deflated, leaving me with a sad, flat cake. Frozen whipped topping holds its shape like a champ.
The namesake! The crunch, the color. Don’t be shy with these. My kids always want extra. Just make sure to add them mostly at the end, so they don’t get soggy or disappear into the ice cream.
Because why not add more chocolate? This is totally optional, but it makes it look extra fancy for celebrations. I love a good drizzle.
Edible Chocolate Chip Cookie Dough
- ½ cup unsalted butter, softened
- ¼ cup granulated sugar
- ½ cup packed light brown sugar
- 2 tablespoons milk
- 1 teaspoon vanilla extract
- 1 cup all-purpose flour, heat-treated (see tip below)
- ½ teaspoon salt
- ¾ cup mini chocolate chips
The edible cookie dough is a game changer for safety. I learned the hard way about heat-treating flour after reading way too many warnings about raw flour and bacteria. Now I just pop it in the microwave for a minute or two or spread it on a baking sheet and bake it for 5 minutes. It’s a small extra step but gives such peace of mind.
Directions
- Make the edible cookie dough: In a medium bowl, cream together the softened butter, granulated sugar, and brown sugar until light and fluffy.
- Stir in the milk and vanilla extract.
- Add the heat-treated flour and salt, mixing until just combined. Fold in the mini chocolate chips. Set aside.
- Prepare the crust: In a bowl, combine the crushed Oreos and melted butter. Press firmly into the bottom of a 9-inch springform pan. Freeze for 15-20 minutes.
- First ice cream layer: Scoop half of the slightly softened chocolate ice cream over the frozen crust. Spread it out evenly with an offset spatula or the back of a spoon. Freeze for 30 minutes.
- Cookie dough layer: Take about half of your edible cookie dough and crumble it over the first ice cream layer. You can press it down gently if you like a more solid layer, or just leave it crumbly. Freeze for 30 minutes.
- Hot fudge layer: Carefully pour the cooled hot fudge topping over the cookie dough layer. Gently spread it out, trying not to disturb the cookie dough too much. Freeze for at least 1 hour, or until firm.
- Second ice cream layer: Scoop the remaining chocolate ice cream over the hot fudge layer and spread evenly. Freeze for at least 1-2 hours, or until very firm. This step is crucial for stability.
- Whipped topping layer: Once the cake is completely firm, spread the thawed whipped topping over the top of the second ice cream layer.
- Garnish: Sprinkle the ¾ cup M&M’s candies over the whipped topping. If desired, drizzle with extra chocolate syrup.
- Final freeze: Cover the cake loosely with plastic wrap and freeze for at least 4 hours, or preferably overnight. This cake needs serious chill time!
- To serve: Remove the cake from the freezer about 15-20 minutes before serving to allow it to soften slightly. Run a sharp knife under hot water, wipe it clean, and slice.
Phew! That’s a lot of steps, but honestly, none of them are super tricky on their own. The *real* trick is patience and freezing. I can’t tell you how many times I’ve tried to rush a layer only to have it melt into the one below, or get all squishy and uneven. Once, I was so eager to get to the hot fudge layer that I poured it on when the ice cream beneath wasn’t fully firm. The hot fudge just created a crater in the ice cream, and everything slid around when I tried to spread it. It still tasted good, but it was not pretty! Always make sure each layer is firm before moving on, even if it means an extra 20 minutes in the freezer. That hot water trick for the knife for serving is also a game-changer; I used to struggle to cut clean slices, but a warm knife just glides through.
Okay, so about this cake. It’s truly a celebration in dessert form. It’s a huge hit for birthdays, potlucks, or just a really indulgent Friday night. What I love about it is how it combines so many textures: the crunchy Oreo crust, the creamy chocolate ice cream, the chewy cookie dough, and the satisfying M&M crunch. It’s not a quick “easy dinner” type of recipe, but it’s a fantastic “comfort food” project. I love that I can make it days ahead, which makes party planning way less stressful. Plus, there are almost always “leftovers,” which is just a fancy word for “more cake for me tomorrow.”
Nutrition Info (per serving)
| Calories | Carbs | Fat | Protein |
|---|---|---|---|
| ~675 | ~85g | ~35g | ~8g |
Yeah, I know. Looking at those numbers, it’s pretty clear this Decadent Chocolate M&Ms Cookie Dough Ice Cream Cake isn’t a health food. Does it surprise me? Not really, with all that ice cream, cookie dough, and fudge! I wouldn’t recommend this for people on super strict diets or trying to watch their calories, but sometimes, you just gotta treat yourself. I’ve never tried to make a “lighter” version of this because honestly, I feel like you’d lose what makes it so decadent. This is a splurge, plain and simple, and I embrace it fully when I make it.
Ingredient Swaps
| Ingredient | Substitution |
|---|---|
| Oreo cookies | Graham cracker crumbs, chocolate wafer cookies |
| Chocolate ice cream | Vanilla ice cream, coffee ice cream, mint chocolate chip ice cream |
| Edible chocolate chip cookie dough | Store-bought edible cookie dough, brownie batter (eggless) |
| Hot fudge topping | Caramel sauce, peanut butter sauce (cooled) |
| Frozen whipped topping | Homemade whipped cream (use gelatin for stability!) |
| M&M’s candies | Other chocolate candies, chopped candy bars, chocolate chips |
I’ve tried quite a few of these swaps over the years. Graham cracker crust totally works, but it’s a lot sweeter and loses that deep chocolatey crunch of the Oreos. Vanilla ice cream is a classic, but sometimes feels a little plain next to the strong cookie dough flavor; coffee ice cream, though, is amazing if you like that mocha vibe! Store-bought edible cookie dough is a fantastic shortcut if you’re short on time – just make sure it’s the kind made to be eaten raw. Caramel sauce is a pretty awesome swap for the hot fudge, it gives a nice salty-sweet contrast. I tried homemade whipped cream once and like I mentioned, it just didn’t hold up in the freezer as well as the store-bought stuff. If you do go homemade, a little gelatin will help, but it’s still a bit fussier. As for the M&Ms, feel free to use your favorite candy – chopped Reese’s cups or Snickers would be epic. I once used chopped up chocolate-covered pretzels, and the salty crunch was a surprisingly good touch!
Tips
- **Work Fast with Ice Cream:** Have all your tools and ingredients ready to go. The less time the ice cream is out, the better. Your freezer is your best friend.
- **Freeze in Stages:** This is not a “whip it up in an hour” kind of dessert. Each layer needs solid freezer time to set properly. Patience is key!
- **Use a Springform Pan:** Seriously, don’t try this in a regular cake pan unless you want a serving nightmare. The springform pan makes it so easy to release the cake.
- **Heat-Treat Your Flour for Cookie Dough:** To make it safe to eat raw, spread your flour on a baking sheet and bake at 300°F (150°C) for 5 minutes, or microwave on high for 1-2 minutes, stirring every 30 seconds, until it reaches 160°F (71°C). Let it cool completely before using.
- **Warm Your Knife for Slicing:** Dip a sharp knife in hot water and wipe it clean before each slice. This makes for super clean cuts and easy serving.
Oh boy, have I learned these tips the hard way! The biggest one for me was “Freeze in Stages.” I’m not a patient person, especially when I’m excited about dessert. I remember one time, I was trying to impress some new friends with this cake. I rushed the hot fudge layer, poured it on before the cookie dough was solid, and the whole thing just collapsed on itself when I tried to spread the next ice cream layer. It looked like a melted, chunky, chocolate mess. It was still delicious, but I was so embarrassed! From that day on, I learned that a little extra waiting time in the freezer makes all the difference between a pretty, multi-layered cake and a delicious, but ugly, puddle. And the springform pan? Absolute essential. My first attempts were in a regular cake pan, and trying to dig out a slice was just… a disaster. Trust me on these; they’ll save you a lot of grief.
FAQ
**Q: Can I make this Decadent Chocolate M&Ms Cookie Dough Ice Cream Cake ahead of time?**
A: YES! You absolutely should. This cake is actually better if you make it at least the day before, or even two days ahead. The freezing time helps all the layers meld together and firm up perfectly. I always make mine the day before a party, so it’s rock solid and ready to go. It reduces so much stress on party day!
**Q: How long does this cake last in the freezer?**
A: If wrapped really well in plastic wrap and then foil, it can last up to 2 weeks in the freezer. However, in my house, it rarely makes it past 3-4 days. The ice cream can start to get a little bit of freezer burn after a while, but honestly, it’s usually devoured long before that becomes an issue. Just make sure it’s sealed tight!
**Q: My ice cream is melting too fast while I’m trying to spread it! What am I doing wrong?**
A: You’re not doing anything *wrong*, necessarily, it’s just tricky! A few things can help: make sure your ice cream is only *slightly* softened, not melted. Work quickly, and if your kitchen is warm, try turning down the AC or even having a fan blowing away from your workspace. If a layer gets too soft, just pop the whole pan back in the freezer for 10-15 minutes before continuing. I’ve definitely had to pause and refreeze in the middle of a layer multiple times, and that’s totally okay!
**Q: Do I really need to heat-treat the flour for the cookie dough?**
A: Yes, please do! Raw flour can sometimes contain harmful bacteria, just like raw eggs. It’s a small extra step (microwave for a minute or bake for 5) but it gives you total peace of mind that your edible cookie dough is safe to eat raw. You wouldn’t want to risk anyone getting sick, especially with something so fun and celebratory.
**Q: How do I get clean slices without the layers squishing?**
A: This is a common struggle! First, make sure the cake has had ample time to freeze, preferably overnight. When you’re ready to serve, take it out of the freezer and let it sit at room temperature for about 15-20 minutes. This lets it soften just enough to cut, but not melt. Then, use that warm knife trick! Dip a sharp knife in hot water, wipe it completely dry, and then make your cut. Repeat for each slice. It makes a world of difference for pretty presentation!
That’s everything I know about making Decadent Chocolate M&Ms Cookie Dough Ice Cream Cake! Hope you give it a try. And if you mess it up, you’re in good company—I still do it sometimes, but it always tastes good!
Decadent Chocolate M&Ms Cookie Dough Ice Cream Cake
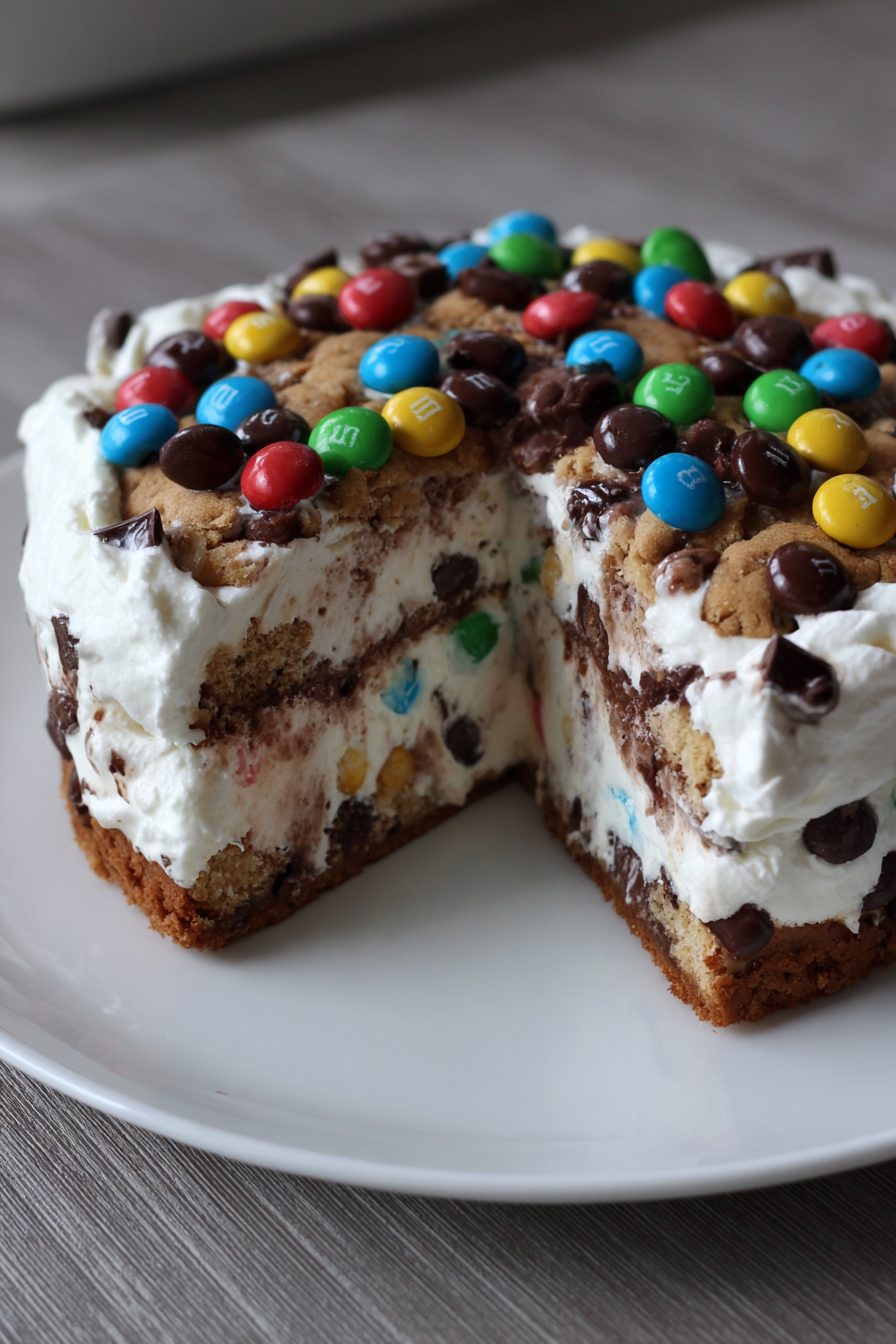
Prepare for a truly indulgent experience with this show-stopping ice cream cake, featuring a crunchy Oreo crust, layers of creamy chocolate ice cream, irresistible edible cookie dough, and hot fudge. Topped with fluffy whipped topping and vibrant M&Ms, this labor of love is worth every patient step for a decadent celebration dessert.
Ingredients
- 1 ½ sleeves (about 25) Oreo cookies, crushed
- 6 tablespoons unsalted butter, melted
- 2 pints good quality chocolate ice cream, softened slightly
- 1 recipe edible chocolate chip cookie dough (see below for ingredients)
- 1 cup hot fudge topping, cooled to room temperature
- 1 large (16 oz) container frozen whipped topping (like Cool Whip), thawed
- ¾ cup M&M’s candies, plus more for garnish
- Optional: Chocolate syrup for drizzling
- **For the Edible Chocolate Chip Cookie Dough:**
- ½ cup unsalted butter, softened
- ¼ cup granulated sugar
- ½ cup packed light brown sugar
- 2 tablespoons milk
- 1 teaspoon vanilla extract
- 1 cup all-purpose flour, heat-treated (see tips for instructions)
- ½ teaspoon salt
- ¾ cup mini chocolate chips
Instructions
-
Make the edible cookie dough: In a medium bowl, cream together the softened butter, granulated sugar, and brown sugar until light and fluffy.
-
Stir in the milk and vanilla extract.
-
Add the heat-treated flour and salt, mixing until just combined. Fold in the mini chocolate chips. Set aside.
-
Prepare the crust: In a bowl, combine the crushed Oreos and melted butter. Press firmly into the bottom of a 9-inch springform pan. Freeze for 15-20 minutes.
-
First ice cream layer: Scoop half of the slightly softened chocolate ice cream over the frozen crust. Spread it out evenly with an offset spatula or the back of a spoon. Freeze for 30 minutes.
-
Cookie dough layer: Take about half of your edible cookie dough and crumble it over the first ice cream layer. You can press it down gently if you like a more solid layer, or just leave it crumbly. Freeze for 30 minutes.
-
Hot fudge layer: Carefully pour the cooled hot fudge topping over the cookie dough layer. Gently spread it out, trying not to disturb the cookie dough too much. Freeze for at least 1 hour, or until firm.
-
Second ice cream layer: Scoop the remaining chocolate ice cream over the hot fudge layer and spread evenly. Freeze for at least 1-2 hours, or until very firm. This step is crucial for stability.
-
Whipped topping layer: Once the cake is completely firm, spread the thawed whipped topping over the top of the second ice cream layer.
-
Garnish: Sprinkle the ¾ cup M&M’s candies over the whipped topping. If desired, drizzle with extra chocolate syrup.
-
Final freeze: Cover the cake loosely with plastic wrap and freeze for at least 4 hours, or preferably overnight. This cake needs serious chill time!
-
To serve: Remove the cake from the freezer about 15-20 minutes before serving to allow it to soften slightly. Run a sharp knife under hot water, wipe it clean, and slice.
Nutrition (Per Serving)

