

Easy Peppermint Bark Recipe
Oh man, peppermint bark. This stuff holds a special place in my heart, and in my holiday memories, let me tell you. The very first time I tried to make Easy Peppermint Bark Recipe, it was a disaster of epic proportions, truly. I was maybe 10 or 11, trying to be a “helper” for Christmas, and I decided to melt the chocolate *directly* in a saucepan on high heat. No double boiler, no microwave, just full-on stovetop chaos.
What I ended up with was a thick, burnt, lumpy mess that smelled faintly of despair and singed sugar. My mom still talks about it, laughing, and how she had to scrape the pan with a chisel practically. But you know what? We still made *some* bark that year, thanks to her swift rescue mission, and it tasted like pure magic. Every holiday since then, making peppermint bark has become our family’s little tradition, a sweet reminder of that charred beginning. It’s a truly easy recipe, once you get past my initial…enthusiasm.
Recipe Card
| Recipe Title | Easy Peppermint Bark Recipe |
|---|---|
| Servings | About 24 squares |
| Prep Time | 20 minutes |
| Cooking Time | 5 minutes (plus chilling) |
| Calories | 150 per square (approx.) |
You know, looking at those times, it really hits home how fast this recipe comes together. I used to think homemade treats took hours, but this one is such a quick win. It’s perfect when you’ve got friends coming over last minute or you just need a little something sweet without all the fuss. Don’t let the chilling time scare you; that’s just passive waiting, giving you time to put on some holiday music or, you know, do dishes.
Ingredients
- 16 oz good quality white chocolate (bars or chips)
- 10 oz good quality semi-sweet or dark chocolate (bars or chips)
- 1 tsp peppermint extract
- 1.5 cups candy canes, crushed
- 1 tsp vegetable shortening or coconut oil (optional, for melting)
Okay, let’s talk ingredients, because getting these right makes all the difference. That “good quality” part for the white chocolate? Super important. I once tried to cheap out and bought some waxy, candy-coating stuff, and it just wouldn’t melt smooth. It seized up and tasted artificial. Don’t make my mistake; good chocolate means good bark.
For the semi-sweet or dark chocolate, same deal. You want something that tastes good on its own, because that flavor is gonna shine through. I’ve gone with bittersweet before when I wanted something a little less sweet, and it was fantastic, adding a nice depth to the finished bark.
Peppermint extract is potent! One time, I thought “a little extra can’t hurt,” and my bark ended up tasting like toothpaste. Seriously. Just stick to the teaspoon, maybe a tiny bit more if you like a super strong mint, but be careful. You can always add more, but you can’t take it out.
Crushed candy canes are the signature. I’ve tried crushing them in a bag with a rolling pin, which is great for stress relief but sometimes leaves big chunks and fine powder. My best trick now is pulsing them quickly in a food processor, like two or three quick pulses, just to get a good mix of textures. Just don’t over-process them into dust!
The vegetable shortening or coconut oil is totally optional, but it’s a little secret weapon. If your chocolate is being stubborn and not melting quite as smoothly as you’d like, just a tiny bit of this helps thin it out and makes it super glossy. I only learned this after a few batches of chocolate that just felt… thick. It really helps achieve that perfect snap.
Directions
- Line a baking sheet (approx. 9×13 inch) with parchment paper.
- Crush your candy canes. Place them in a Ziploc bag and gently crush with a rolling pin or use a food processor. Set aside.
- Melt the semi-sweet or dark chocolate. You can do this in the microwave in 30-second intervals, stirring well after each, until smooth. Or use a double boiler.
- Stir in 1/2 tsp of the peppermint extract into the melted dark chocolate. If using, stir in 1/2 tsp shortening/coconut oil.
- Pour the dark chocolate onto the prepared baking sheet and spread it into an even layer using an offset spatula or the back of a spoon.
- Let the dark chocolate chill in the fridge for about 10-15 minutes, or until just firm to the touch.
- While the dark chocolate is chilling, melt the white chocolate using the same method as the dark chocolate.
- Stir in the remaining 1/2 tsp of peppermint extract into the white chocolate. If using, stir in 1/2 tsp shortening/coconut oil.
- Pour the melted white chocolate over the chilled dark chocolate layer and spread evenly.
- Immediately sprinkle the crushed candy canes over the white chocolate, gently pressing some in if needed.
- Chill the bark in the fridge for at least 30 minutes, or until completely firm.
- Once firm, break or cut the bark into pieces.
Okay, let’s talk through some of these steps, because I’ve definitely had my share of oopsies here. That first step, lining the baking sheet? Don’t skip it, and use parchment paper, not wax paper. I once thought “they’re basically the same, right?” Wrong. The wax paper stuck to my bark, and it was a sticky, flaky mess trying to peel it off. Parchment is your best friend here, trust me.
Melting the chocolate is where a lot of people go wrong, including my younger self with the burnt pan incident. Microwave is fine, but those 30-second intervals are non-negotiable. Seriously, it looks like nothing’s happening, then suddenly it’s seized and grainy. Stir, stir, stir, even if it looks like solid chocolate. Residual heat does a lot of the work.
When you’re spreading the dark chocolate, try to get it as even as possible. One time, I had a really thick spot and a super thin spot. The thin spot broke apart too easily, and the thick spot was just too much chocolate in one bite. Take your time, get it even, it makes a difference in every piece.
Layering the white chocolate over the dark is crucial. You want that dark layer to be firm enough that it won’t mix with the white chocolate when you pour, but not so cold that the white chocolate immediately sets and you can’t spread it. That 10-15 minute chill is a sweet spot. I’ve rushed it and ended up with swirly, muddy looking bark. Still tasted good, but it wasn’t the classic look.
And when you sprinkle those candy canes? Do it right away. If you wait, even a couple of minutes, the white chocolate will start to set, and the candy canes won’t stick. Then they just fall off when you break the bark, which is just sad. I’ve learned the hard way that immediacy is key for that perfect peppermint crunch.
So, why do I keep making this Easy Peppermint Bark Recipe year after year? Honestly, it’s just so darn reliable and a total crowd-pleaser. Every time I bring a tray of it to a holiday party or give it as a gift, people just light up. It’s got that festive look and feel, and the cool peppermint crunch with rich chocolate is just classic comfort food.
It’s also become a favorite family activity, especially with my nieces and nephews. They love crushing the candy canes (supervised, of course, after a few too many rogue pieces flew across the kitchen). It’s a simple enough project that everyone can pitch in without things getting too messy or complicated, making it a true family favorite.
If I were to change anything next time, maybe I’d try a different kind of chocolate on the bottom, like milk chocolate for a super sweet version, or even swirl in some food coloring to the white chocolate for a pink or green holiday twist. But for now, the classic is just too good to mess with too much. It’s truly a keeper.
Nutrition Info (per serving)
| Calories | Carbs | Fat | Protein |
|---|---|---|---|
| 150 | 18g | 8g | 1g |
Looking at these numbers, it’s probably no surprise that peppermint bark isn’t exactly a health food, right? It’s chocolate and sugar, after all! I usually don’t even look at the nutrition because it’s a holiday treat, meant for enjoyment. I’ve never really tried to make it “lighter” because I feel like you’d sacrifice too much of what makes it special. If you’re on a special diet, maybe just enjoy a smaller piece, or save it for a truly special occasion. It’s all about moderation, I guess.
Ingredient Swaps
| Ingredient | Substitution |
|---|---|
| Semi-sweet chocolate | Milk chocolate, bittersweet chocolate, or even white chocolate (for an all-white bark) |
| Peppermint extract | Vanilla extract (for a non-peppermint bark), almond extract |
| Candy canes | Crushed starlight mints, sprinkles, chopped nuts, mini M&Ms |
| White chocolate | Dark chocolate (for a reversed bark), or even candy melts (though I don’t recommend) |
I’ve tried a few of these swaps, and some work much better than others. Using milk chocolate for the bottom layer actually works really well if you want a sweeter, creamier bark. Bittersweet is great too, for a more intense chocolate flavor. Vanilla extract instead of peppermint? Absolutely, that makes a delicious vanilla bark, almost like a white chocolate fudge base. But if you’re making peppermint bark, stick with peppermint extract, obviously!
Crushed starlight mints instead of candy canes? Yep, that works too and gives a very similar vibe. Sprinkles are fun for kids, but they don’t give the same crunch. Chopped nuts I tried once, but it just felt a little…wrong for peppermint bark. The candy canes are really integral to that classic taste and texture. I also tried candy melts instead of good quality white chocolate once, thinking it would be easier. Big mistake. It tasted fake and didn’t have that satisfying snap. Stick to real chocolate, it’s worth it.
Tips
- **Use good quality chocolate:** Don’t skimp here; it really makes or breaks the flavor and texture.
- **Don’t overheat the chocolate:** Slow and low is the way to go, especially with white chocolate which is prone to seizing.
- **Chill each layer properly:** This prevents mixing and helps achieve clean layers and a good snap.
- **Have all your ingredients prepped:** Once the chocolate is melted, you gotta move fast!
- **Don’t over-crush the candy canes:** A mix of fine powder and small chunks is ideal for texture.
Okay, these tips? These are hard-won lessons, let me tell you. That “good quality chocolate” tip, I mentioned it earlier, but it’s worth repeating. I once thought “chocolate is chocolate,” and bought some super cheap white baking chips. They melted into a grainy, thick mess that never quite smoothed out, even with shortening. It just didn’t taste right, and the texture was off. That batch went mostly uneaten, which is a rare, sad occasion in my house.
And seriously, don’t overheat! My first microwave attempt with white chocolate resulted in a solid, un-stir-able lump that smelled faintly of burnt milk. I was so frustrated. Now, I always go 30 seconds, stir, 30 seconds, stir, and often the last 10% of melting happens just from stirring the warm chocolate. Patience, my friend, patience.
FAQ
Q: My chocolate seized up when melting! What happened?
A: Oh no, that’s the worst! This usually happens if chocolate gets too hot too fast, or if even a tiny drop of water gets into it. White chocolate is especially finicky. If it’s just a little bit seized, sometimes you can add a tiny bit of shortening or vegetable oil (like 1/2 tsp) and stir vigorously to try and smooth it out. If it’s super chunky and pasty, it might be a lost cause for bark, but sometimes you can still use it for something else, like a crispy treat coating.
Q: Can I use different types of chocolate for the layers?
A: Absolutely! I often use semi-sweet on the bottom and white on top, but you could do dark chocolate on the bottom, or even all white chocolate with colored candy canes. Just remember that different chocolates have different melting points, so pay extra attention when melting them separately. It’s your bark, make it how you like it!
Q: How do I store peppermint bark, and how long does it last?
A: Peppermint bark is pretty sturdy! I keep mine in an airtight container at room temperature for up to 2 weeks, or in the fridge for even longer, like 3-4 weeks. If you store it in the fridge, let it sit out for a few minutes before serving so it’s not super hard. It also freezes really well for months – perfect for making ahead for the holidays. Just make sure it’s wrapped tightly!
Q: My candy canes are melting into the chocolate, what am I doing wrong?
A: This can happen if the chocolate is too warm when you sprinkle them on, or if the bark is stored in a very humid environment. The sugar in the candy canes can absorb moisture and get sticky. Make sure your white chocolate isn’t scorching hot when you add the candy canes, and chill it quickly. If you live somewhere super humid, an airtight container is key, maybe even stored in the fridge.
That’s everything I know about making Easy Peppermint Bark Recipe! Hope you give it a try. And if you mess it up, you’re in good company—I still do it sometimes.
Easy Peppermint Bark Recipe
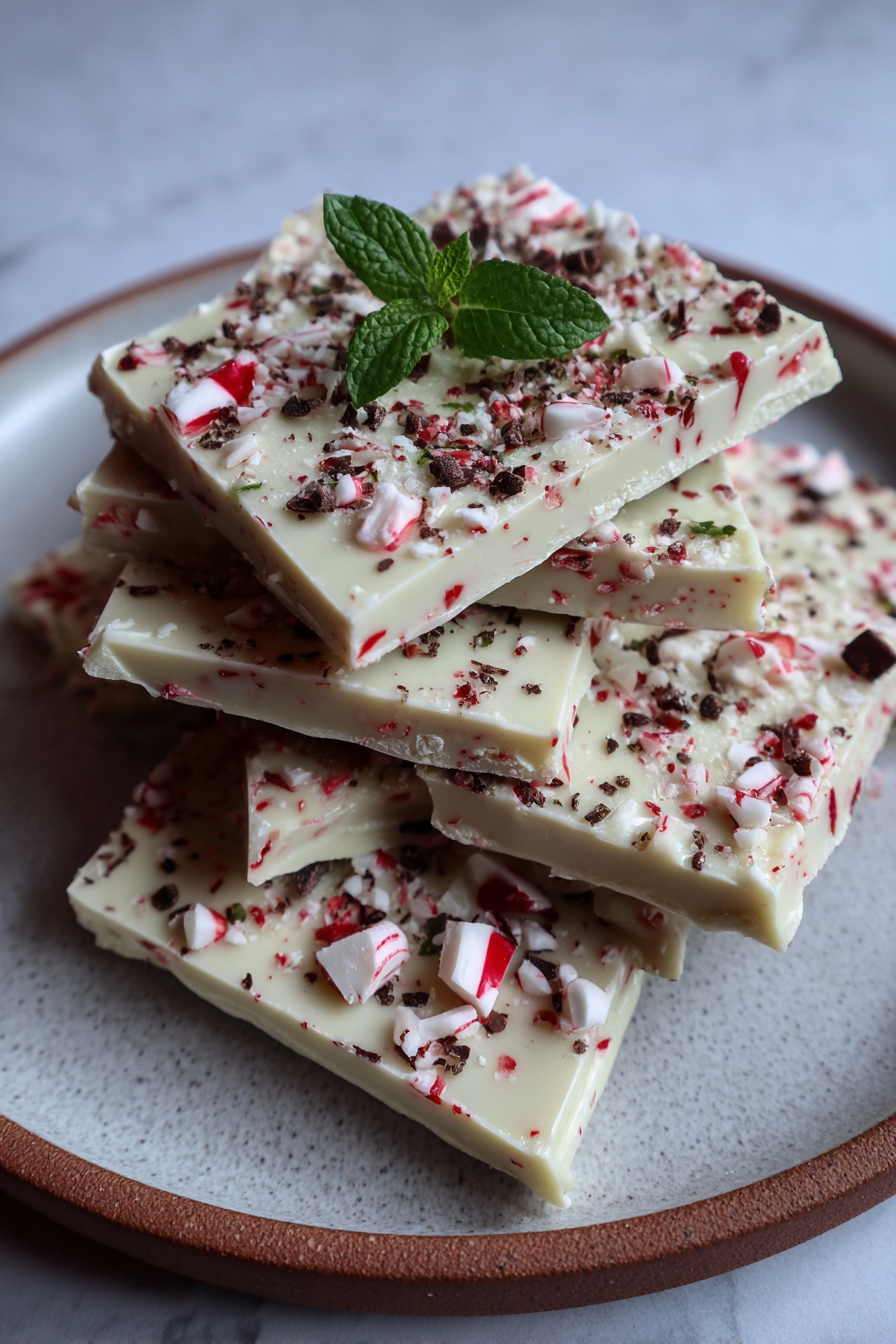
This classic holiday treat features layers of rich dark and crisp white chocolate, generously infused with refreshing peppermint extract and topped with crushed candy canes. It’s a surprisingly simple and delightful confection perfect for gifting or sharing during the festive season.
Ingredients
- 16 oz good quality white chocolate (bars or chips)
- 10 oz good quality semi-sweet or dark chocolate (bars or chips)
- 1 tsp peppermint extract
- 1.5 cups candy canes, crushed
- 1 tsp vegetable shortening or coconut oil (optional, divided)
Instructions
-
Line a baking sheet (approx. 9×13 inch) with parchment paper.
-
Crush your candy canes. Place them in a Ziploc bag and gently crush with a rolling pin or use a food processor (2-3 quick pulses). Set aside.
-
Melt the semi-sweet or dark chocolate. You can do this in the microwave in 30-second intervals, stirring well after each, until smooth. Alternatively, use a double boiler.
-
Stir in 1/2 tsp of the peppermint extract into the melted dark chocolate. If using, stir in 1/2 tsp shortening/coconut oil.
-
Pour the dark chocolate onto the prepared baking sheet and spread it into an even layer using an offset spatula or the back of a spoon.
-
Let the dark chocolate chill in the fridge for about 10-15 minutes, or until just firm to the touch.
-
While the dark chocolate is chilling, melt the white chocolate using the same method as the dark chocolate (30-second intervals in microwave or double boiler).
-
Stir in the remaining 1/2 tsp of peppermint extract into the white chocolate. If using, stir in the remaining 1/2 tsp shortening/coconut oil.
-
Pour the melted white chocolate over the chilled dark chocolate layer and spread evenly.
-
Immediately sprinkle the crushed candy canes over the white chocolate, gently pressing some in if needed to ensure they stick.
-
Chill the bark in the fridge for at least 30 minutes, or until completely firm.
-
Once firm, break or cut the bark into pieces. Store in an airtight container at room temperature for up to 2 weeks, or in the fridge for 3-4 weeks.
Nutrition (Per Serving)

