Keto Crunchwraps: Delicious Guilt Free Recipe
Oh my goodness, you guys! I remember the exact moment I first tried to make a Keto Crunchwrap. It was like, two years ago, I was deep into my keto journey and really, *really* missing Taco Bell. You know that craving that just hits you outta nowhere? Mine was for a Crunchwrap Supreme, but obviously, that was a big no-go. So, I saw a recipe online, thought “how hard can it be?” and totally winged it. My first attempt? A disaster. The tortilla tore, the filling spilled out everywhere, and it ended up looking like a sad, deconstructed taco salad on my pan. My husband, bless his heart, tried to be supportive, but even he couldn’t hide his laugh. But I refused to give up, and after a few tries (and a lot of spilled beef), I finally nailed it. Now, these Keto Crunchwraps are practically a weekly staple at our house, and I’m so excited to share my perfected, truly delicious, guilt-free version with you!
Recipe Card
| Recipe Title | Keto Crunchwraps: Delicious Guilt Free Recipe |
|---|---|
| Servings | 2 |
| Prep Time | 20 minutes |
| Cooking Time | 15 minutes |
| Calories | ~450 (approx. per serving) |
Ingredients
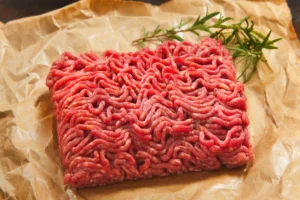
- 1 lb Ground Beef (80/20 or 85/15)
- 2 tbsp Taco Seasoning (ensure it’s sugar-free, or make your own!)
- 1/4 cup Water
- 2 Large Low-Carb Tortillas (I usually go for Mission Carb Balance or Mama Lupe’s)
- 2 Small Low-Carb Tortillas (or cut larger ones down, about 5-6 inches diameter)
- 1 cup Shredded Cheddar Cheese (or a Mexican blend)
- 1/4 cup Sour Cream (full fat, of course!)
- 2 tbsp Cream Cheese, softened
- 1/2 cup Crushed Keto Nacho Chips (like Quest Tortilla Style Protein Chips or homemade cheese crisps)
- 1/2 cup Shredded Lettuce
- 1/4 cup Diced Tomato
- 1/4 cup Diced Onion (optional, but I love the crunch!)
- 1/2 Avocado, sliced or mashed for guacamole
- 1-2 tbsp Avocado Oil or Olive Oil, for cooking
Okay, so each of these ingredients plays a pretty big part in making these Keto Crunchwraps just right. For the ground beef, I usually grab 80/20. One time, I tried using super lean ground turkey to be extra healthy, but it just didn’t give that rich, satisfying flavor I wanted, and it felt a little dry. Stick to the beef, trust me on this one.
Taco seasoning is where you gotta be careful. I once grabbed a packet from the back of my pantry without checking, and after I cooked everything, I realized it had added sugar. Ugh! Always read those labels or just whip up your own with chili powder, cumin, garlic powder, onion powder, and a pinch of cayenne. It’s super easy and you know exactly what’s in it.
The low-carb tortillas are the absolute backbone of this whole operation. I’ve had some brands that are just too brittle and tear the second you try to fold them. Finding a flexible, durable large tortilla is key. For the small ones, sometimes I just cut a larger tortilla into a smaller circle if I don’t have smaller ones on hand; just try to be neat so you don’t end up with weird corners poking out.
Shredded cheese is pretty straightforward, but I’ve found that pre-shredded cheese doesn’t always melt as smoothly as freshly shredded. If you have the time, shredding a block of cheddar really makes a difference in that gooey factor. Plus, I accidentally bought a low-fat cheese once, and it tasted like plastic – never again!
Sour cream and cream cheese together make this amazing, tangy, creamy sauce. One time, I forgot to soften the cream cheese, and it was a lumpy mess in the sour cream. I tried to microwave it to smooth it out, and it just turned into a hot liquid. Learn from my mistake: soften it first! It blends so much nicer.
Keto nacho chips are my secret weapon for the “crunch” in Crunchwrap. I tried using pork rinds once, and while they gave a crunch, the flavor was just… off. It was too porky, not cheesy enough. Stick to the Quest chips or make your own cheese crisps if you’re feeling ambitious. Don’t skip this, it’s what makes it a *crunch*wrap!
Fresh lettuce, tomato, and onion are totally non-negotiable for me. I once used some slightly wilted lettuce from the back of the fridge, and it just made the whole thing feel less fresh and appealing. Take the extra minute to chop fresh veggies; it’s worth it. And the avocado? I’ve forgotten it a couple of times, and the crunchwrap just felt incomplete. It adds that essential creamy, rich texture.
Lastly, the oil for cooking. Avocado oil is my go-to for high heat, but olive oil works too. Just make sure you have enough to get a good crisp on those tortillas, but not so much that they get greasy. I’ve definitely had a few crunchwraps swimming in oil because I got a little heavy-handed. It’s a delicate balance!
Directions
- Brown the ground beef in a large skillet over medium-high heat. Drain any excess fat.
- Add the taco seasoning and water to the beef. Stir well and simmer for 5-7 minutes, until most of the liquid has absorbed and the flavors have melded. Set aside.
- In a small bowl, mix the softened cream cheese and sour cream until smooth. This is your creamy “sauce.”
- Prepare your crunchwrap assembly station: Lay out a large low-carb tortilla flat on a clean surface.
- Spread a thin layer of the sour cream/cream cheese mixture in the center of the large tortilla.
- Spoon about half of the seasoned ground beef onto the center of the tortilla, over the cream cheese mixture.
- Sprinkle half of the shredded cheddar cheese over the beef.
- Place one small low-carb tortilla directly on top of the cheese.
- Spread a little more of the cream cheese mixture onto the small tortilla.
- Evenly scatter half of the crushed keto nacho chips on top of the small tortilla.
- Layer half of the shredded lettuce, diced tomato, diced onion (if using), and sliced avocado on top of the chips.
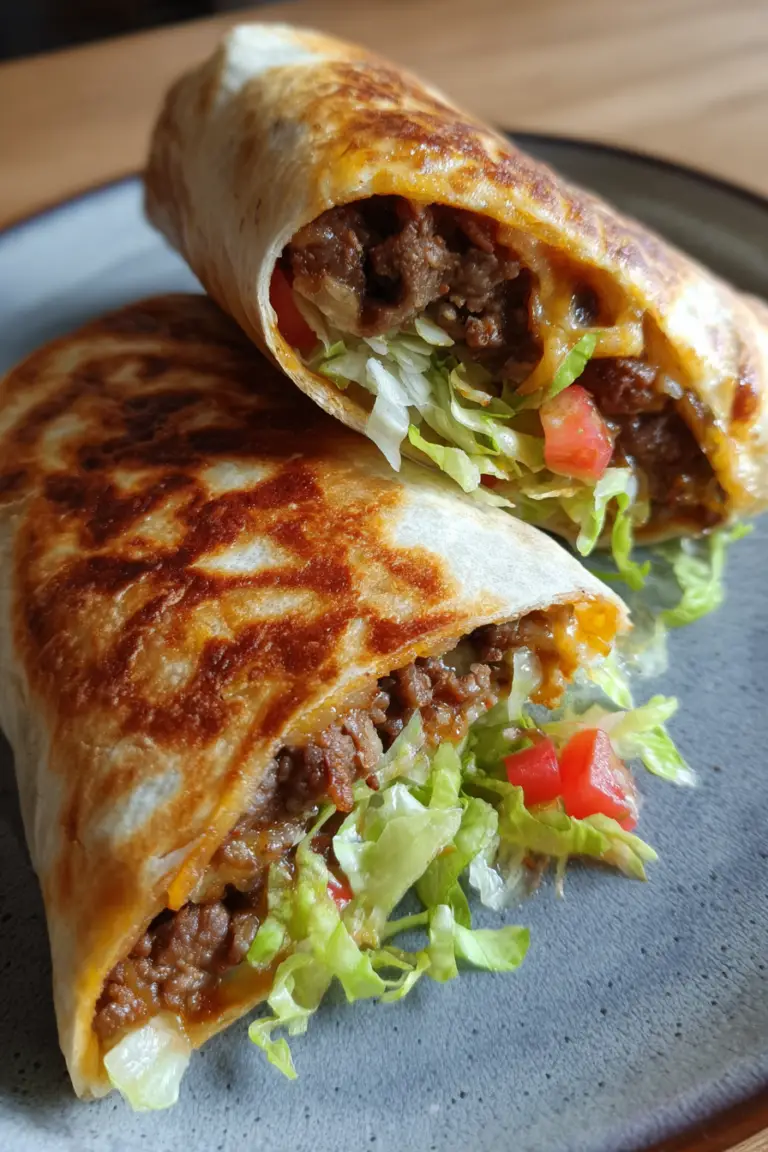
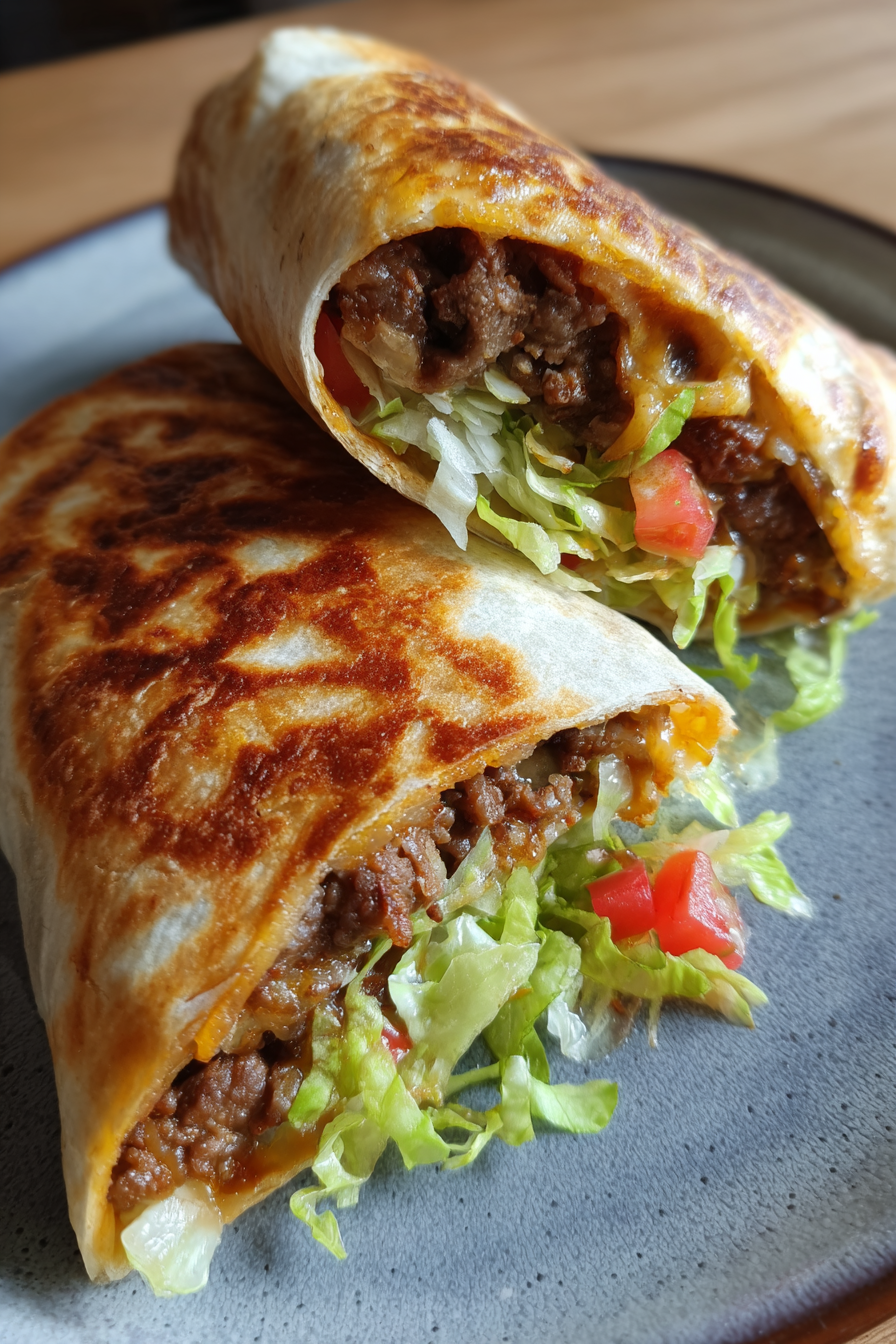
- Now for the tricky part: folding! Starting from one edge, fold the large tortilla tightly over the filling, working your way around in a circle, creating pleats until the entire filling is enclosed. You want it tight so nothing falls out.
- Heat 1 tbsp of avocado or olive oil in a large skillet or grill pan over medium heat.
- Carefully transfer one folded crunchwrap, seam-side down, into the hot pan.
- Cook for 4-6 minutes per side, or until golden brown and crispy. Use a spatula to gently press down on the crunchwrap while it cooks to help it crisp up and hold its shape.
- Remove from pan, let it rest for a minute, then slice in half and serve immediately. Repeat for the second crunchwrap.
Alright, so the directions sound simple enough, right? But oh, have I had some epic fails at almost every step! Browning the beef, for example. The first time, I didn’t drain the fat well enough, and everything just felt super greasy. Another time, I got distracted, and the beef almost turned into jerky. Just cook it until it’s browned, then drain that fat like your life depends on it! The taco seasoning needs that simmer time. I once rushed it, and the flavor just wasn’t as deep and delicious. Let it do its thing for those 5-7 minutes.
The real make-or-break moment is always the folding. My first few attempts were legendary for their messiness. I’d try to cram too much filling in, thinking “more is more,” but it just makes it impossible to fold. The tortilla would tear, and the beef would spill out, cheese would ooze. It was like a food massacre on my cutting board. The trick is to not overfill and to really tuck those pleats in tightly. Don’t be afraid to stretch the tortilla gently as you fold. I also learned the hard way to make sure my filling isn’t piled too high in the center before I start folding. A flatter, wider mound is easier to enclose. And when you flip it into the pan, make sure that seam-side is down first, always. It helps seal it as it cooks, preventing more spillage. If it rips a little, don’t panic! Just patch it up as best you can and cook it seam-side down really well. You’ll get the hang of it, I promise!
Making these Keto Crunchwraps has honestly been such a game-changer for my keto diet. When you’re trying to eat healthy, you sometimes feel like you’re missing out on all the fun, comfort food stuff. This recipe completely fixes that! It’s become such a family favorite, even my kids, who aren’t on keto, beg for “Mom’s special crunch-tacos.” The best part is how easy dinner it feels, even with a few steps. It’s also a fantastic way to use up leftover taco meat, making it an awesome healthy swap for those Taco Tuesday cravings. Seriously, I get to enjoy that familiar fast-food flavor without all the guilt. It’s a little messy, definitely not a one-pot meal, but the satisfaction you get from biting into that crispy, savory, crunchy goodness is totally worth every single dish. Next time, I might try experimenting with some spicier cheese or a different keto chip flavor, just to shake things up a bit.
Nutrition Info (per serving)
| Calories | Carbs | Fat | Protein |
|---|---|---|---|
| 450 | 8g | 35g | 28g |
*Please note these are approximate values and can vary based on specific brands and portion sizes.*
Looking at those numbers, it still surprises me how well this fits into a keto diet! The carbs are super low thanks to the tortillas and chips, and the fat content keeps you full and satisfied. I often make it a little lighter by using 90/10 ground beef, but honestly, the flavor payoff from the slightly fattier beef is usually worth the extra few grams of fat. For people with special diets, like dairy-free, you could try using a dairy-free cheese alternative and a dairy-free sour cream/cream cheese substitute, though I haven’t personally tested those. Just be sure to check the carb counts on those alternatives, as they can sometimes vary.
Ingredient Swaps
| Ingredient | Substitution |
|---|---|
| Ground Beef | Ground chicken or turkey |
| Cheddar Cheese | Monterey Jack, Pepper Jack, or a blend |
| Keto Nacho Chips | Pork rinds (crushed), homemade cheese crisps |
| Sour Cream/Cream Cheese Sauce | Sugar-free salsa, guacamole, or a creamy avocado lime dressing |
| Lettuce/Tomato/Onion | Bell peppers, jalapeños, olives, or any other keto-friendly veggies |
Okay, let’s talk swaps because sometimes you just gotta work with what you have, right? I’ve swapped ground beef for ground chicken or turkey, and it *works*, but it’s not quite the same. The flavor is a bit milder, and the texture can be a little drier if you’re not careful. I usually add a bit more seasoning and maybe a splash of chicken broth if I go with poultry. As for cheese, feel free to play around! Pepper Jack gives it a nice little kick, which I love.
The keto chip swap is where I’ve had the most ups and downs. I tried crushed pork rinds once, and while they added crunch, the flavor profile was just too distinct and kinda overwhelmed the other taco flavors. Homemade cheese crisps are actually a fantastic swap if you have the time; they get super crispy and have a great cheesy flavor. For the creamy sauce, I’ve used straight-up guacamole or even a spicy sugar-free salsa when I was out of sour cream. It changes the flavor, but it’s still delicious! Just keep in mind that swapping out the key components can change the entire vibe of your Keto Crunchwrap, so be ready for a slightly different experience.
Tips
- Don’t Overfill Your Tortilla: Seriously, this is the number one mistake I made and learned the hard way. Less is more when it comes to folding.
- Get Your Pan Hot: A hot pan is crucial for a perfectly crispy, golden-brown crust.
- Press Down While Cooking: Use a spatula to gently but firmly press the crunchwrap while it’s cooking. This helps flatten it, crisp it evenly, and hold its shape.
- Prep Your Ingredients Ahead: Chop all your veggies, make your beef mixture, and mix your sauce before you start assembling. It makes the whole process smoother and less stressful.
- Use a Larger Tortilla Than You Think You Need: Especially for the base. A little extra tortilla means more room for error when folding and a more secure wrap.
Oh man, these tips come from years (okay, maybe just a couple) of personal kitchen blunders. That “Don’t Overfill” tip? That’s probably my biggest, most tear-inducing lesson. I once made a batch for a dinner party, thinking I was a pro, and decided to really load them up. Every single one tore during the folding process, and I ended up serving what looked like gourmet taco salads. I was so embarrassed! Now I know to be conservative; you can always add a little more filling on the side if you want.
Getting your pan hot is another one. I’ve been impatient so many times and put the crunchwrap into a lukewarm pan. What do you get? A sad, soggy tortilla that barely browns. It’s gotta be hot enough to sizzle when you put that baby in. And pressing down? That’s what gives it that iconic flat shape and ensures maximum crispiness. I remember forgetting to do that once, and they came out looking like puffy, deflated balloons, not at all like the beautiful, flat crunchwraps I was aiming for. Trust me on these. They’ll save you a lot of headache and messy cleanups!
FAQ
**Q: Can I make these ahead of time?**
A: You totally can, but with a few caveats! I’d recommend preparing all the fillings (cook the beef, mix the sauce, chop veggies) and storing them separately in the fridge. Then, when you’re ready to eat, just assemble and cook. If you assemble them completely and then try to store them uncooked, the tortillas can get soggy from the moisture in the fillings, and you won’t get that great crispy texture. I’ve tried it, and it was a flub. However, you can assemble them fully, then pan-fry until golden, and let them cool completely. Then wrap them tightly and freeze them. Reheat in a dry skillet or air fryer for a few minutes until warmed through and crispy.
**Q: My tortilla keeps tearing when I try to fold it. What am I doing wrong?**
A: Ah, the age-old crunchwrap dilemma! There are a few culprits here. First, are you overfilling it? That’s the most common reason. Try using a bit less filling. Second, is your large tortilla big enough? Sometimes going for an extra-large low-carb tortilla helps. Third, some brands of low-carb tortillas are just more prone to tearing. Experiment with different brands until you find one that’s flexible. I also find warming the large tortilla slightly (like 10-15 seconds in the microwave) can make it a little more pliable and less likely to crack. I learned this after tearing three tortillas in a row one night!
**Q: How do I get it really crispy like a real Crunchwrap Supreme?**
A: This is all about the cooking method! Make sure your pan or grill is good and hot *before* you put the crunchwrap in. Use a little oil – avocado or olive oil works great – to help with the browning and crisping. And don’t be shy about pressing down on it with your spatula. That pressure helps maximize contact with the hot surface and ensures a consistent crisp. Cook it for a good 4-6 minutes per side, maybe even a little longer if needed, until it’s golden brown and you can visibly see the crispiness. Patience is key for that perfect crunch!
**Q: Can I bake these instead of pan-frying?**
A: You can, but honestly, it’s not quite the same experience. Baking will warm it through and might give it a bit of a crisp on the outside, but it usually won’t achieve that super crispy, almost fried texture you get from pan-frying. If you’re really avoiding oil, preheat your oven to 400°F (200°C), place the assembled crunchwraps on a baking sheet, and bake for 15-20 minutes, flipping halfway. Just don’t expect the same level of crunch. I tried baking once when my stovetop was full, and while edible, it definitely lacked that signature “crunch.”
That’s everything I know about making Keto Crunchwraps: Delicious Guilt Free Recipe! Hope you give it a try. And if you mess it up, you’re in good company—I still do it sometimes.
Keto Crunchwraps: Delicious Guilt Free Recipe
Indulge in this perfected guilt-free Keto Crunchwrap recipe, a delicious and satisfying take on the fast-food favorite, designed to keep you on track with your keto journey without sacrificing flavor.
Ingredients
- 1 lb Ground Beef (80/20 or 85/15)
- 2 tbsp Taco Seasoning (ensure it’s sugar-free, or make your own!)
- 1/4 cup Water
- 2 Large Low-Carb Tortillas (Mission Carb Balance or Mama Lupe’s recommended)
- 2 Small Low-Carb Tortillas (or cut larger ones down, about 5-6 inches diameter)
- 1 cup Shredded Cheddar Cheese (or a Mexican blend)
- 1/4 cup Sour Cream (full fat)
- 2 tbsp Cream Cheese, softened
- 1/2 cup Crushed Keto Nacho Chips (like Quest Tortilla Style Protein Chips or homemade cheese crisps)
- 1/2 cup Shredded Lettuce
- 1/4 cup Diced Tomato
- 1/4 cup Diced Onion (optional)
- 1/2 Avocado, sliced or mashed for guacamole
- 1-2 tbsp Avocado Oil or Olive Oil, for cooking
Instructions
-
Brown the ground beef in a large skillet over medium-high heat. Drain any excess fat.
-
Add the taco seasoning and water to the beef. Stir well and simmer for 5-7 minutes, until most of the liquid has absorbed and the flavors have melded. Set aside.
-
In a small bowl, mix the softened cream cheese and sour cream until smooth. This is your creamy ‘sauce.’
-
Prepare your crunchwrap assembly station: Lay out a large low-carb tortilla flat on a clean surface.
-
Spread a thin layer of the sour cream/cream cheese mixture in the center of the large tortilla.
-
Spoon about half of the seasoned ground beef onto the center of the tortilla, over the cream cheese mixture.
-
Sprinkle half of the shredded cheddar cheese over the beef.
-
Place one small low-carb tortilla directly on top of the cheese.
-
Spread a little more of the cream cheese mixture onto the small tortilla.
-
Evenly scatter half of the crushed keto nacho chips on top of the small tortilla.
-
Layer half of the shredded lettuce, diced tomato, diced onion (if using), and sliced avocado on top of the chips.
-
Now for the tricky part: folding! Starting from one edge, fold the large tortilla tightly over the filling, working your way around in a circle, creating pleats until the entire filling is enclosed. You want it tight so nothing falls out.
-
Heat 1 tbsp of avocado or olive oil in a large skillet or grill pan over medium heat.
-
Carefully transfer one folded crunchwrap, seam-side down, into the hot pan.
-
Cook for 4-6 minutes per side, or until golden brown and crispy. Use a spatula to gently press down on the crunchwrap while it cooks to help it crisp up and hold its shape.
-
Remove from pan, let it rest for a minute, then slice in half and serve immediately. Repeat for the second crunchwrap.
Nutrition (Per Serving)