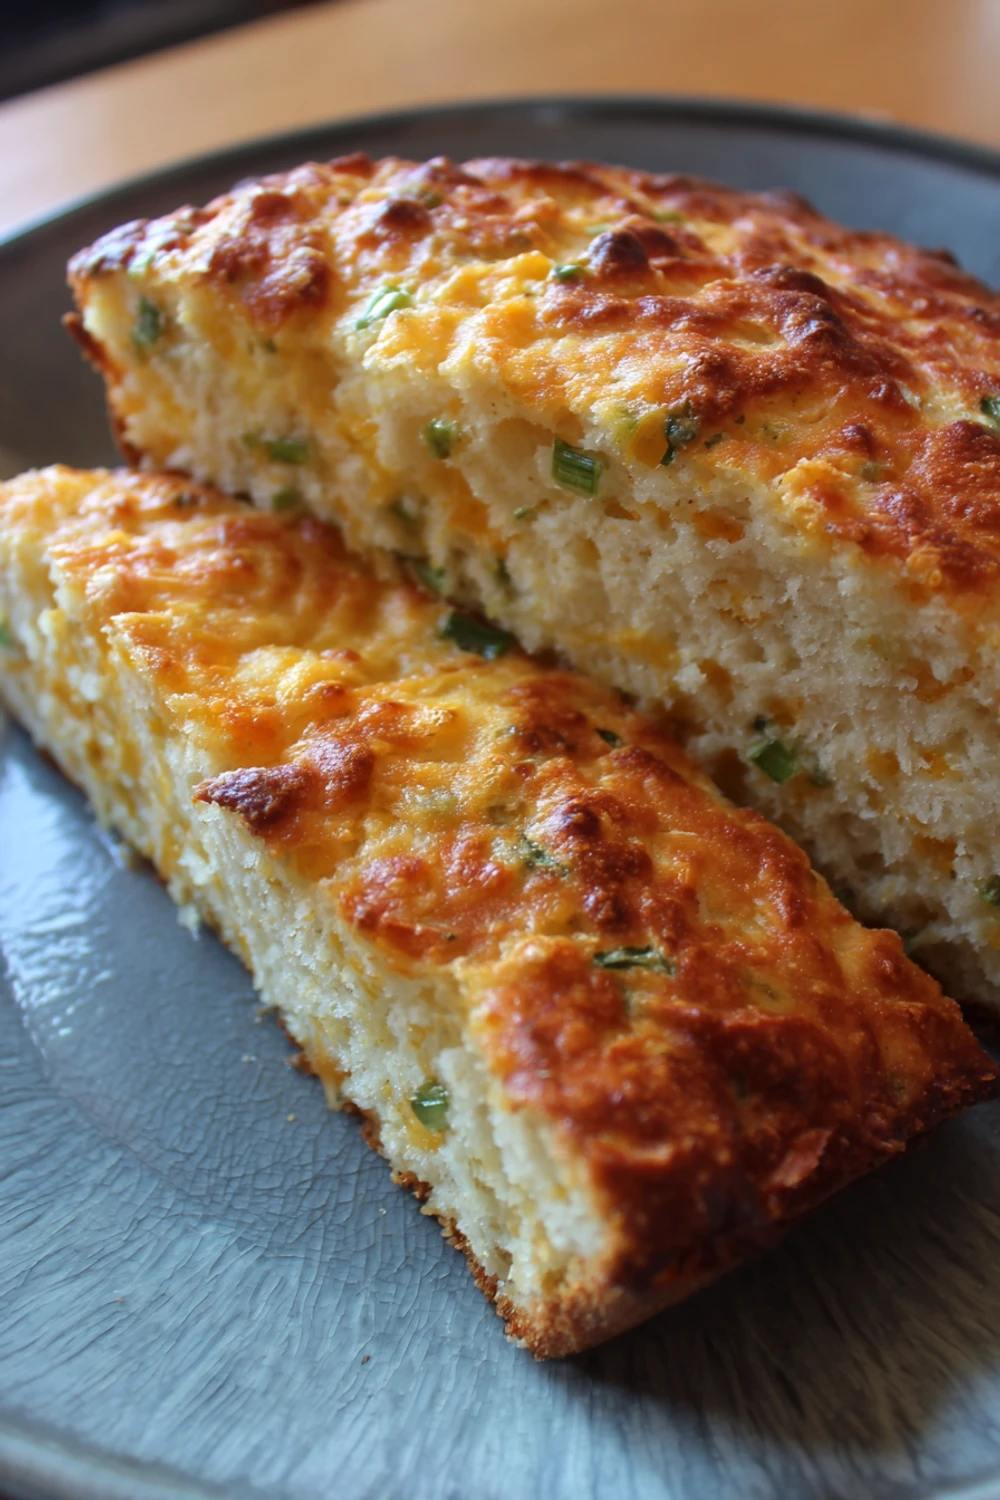
No-Knead Cheddar Jalapeno Bread Recipe
I’ll never forget the first time I tried to make this No-Knead Cheddar Jalapeno Bread Recipe. I was so proud of myself, thinking I was a baking genius. I pulled it out of the oven, it looked gorgeous, and I immediately sliced into it. Big mistake. The inside was basically still raw dough. My family still teases me about serving ‘lava bread’ because the outside was rock hard and the inside was a gooey mess. I’ve since nailed it down, but man, that first attempt was a real humbler.
Recipe Card
| Recipe Title | No-Knead Cheddar Jalapeno Bread Recipe |
|---|---|
| Servings | 1 loaf (about 10 slices) |
| Prep Time | 15 minutes (plus 12-18 hours resting) |
| Cooking Time | 45 minutes |
| Calories | Approx. 210 per slice |
Ingredients
- 3 cups all-purpose flour
- 1 ½ tsp kosher salt
- ½ tsp instant yeast
- 1 ½ cups shredded sharp cheddar cheese
- 2-3 fresh jalapeños, finely diced (seeds removed for less heat)
- 1 ½ cups warm water (around 100-110°F)
The flour is key, and I once used bread flour by accident thinking it would be better. It made the dough way too tough and chewy. All-purpose is the way to go for that perfect rustic texture. And for the jalapeños, I learned the hard way that not removing the seeds makes the bread seriously spicy. My brother took one bite and had to drink a whole glass of milk!
Directions
- In a large bowl, whisk together the flour, salt, and yeast.
- Stir in the shredded cheddar and diced jalapeños until they’re evenly distributed.
- Pour in the warm water and mix with a wooden spoon until a shaggy, sticky dough forms. It will look messy, that’s perfect.
- Cover the bowl tightly with plastic wrap and let it sit at room temperature for 12 to 18 hours. Overnight is easiest.
- The next day, the dough will be bubbly and doubled in size. Flour your hands and a work surface generously.
- Dump the dough onto the floured surface and fold it over onto itself just a few times to form a rough ball.
- Place the dough ball seam-side down onto a floured piece of parchment paper. Let it rest for 30 minutes.
- While it rests, put your Dutch oven with the lid on into your cold oven. Preheat everything to 450°F.
- Once hot, carefully remove the Dutch oven. Lift the dough by the parchment paper and plop it right into the hot pot.
- Put the lid back on and bake for 30 minutes. Then, remove the lid and bake for another 15 minutes until deep golden brown.
- Remove the bread from the pot and let it cool completely on a wire rack before slicing. I know, it’s hard to wait!
The biggest lesson I learned was with the Dutch oven. I didn’t preheat it once and just put the dough in a cold pot. The result was a pale, sad loaf that didn’t get that amazing crackly crust. Preheating that pot is non-negotiable for that bakery-style finish. Also, slicing it warm is so tempting but it really does make the inside gummy. Letting it cool is a test of willpower but so worth it.
This bread has become my go-to comfort food for family gatherings. It’s the star of the show every time and makes the whole house smell incredible. I love that it’s basically a one-pot wonder with minimal cleanup, which is a huge win for a busy home cook like me. The leftovers, if there are any, make the most unbelievable grilled cheese sandwiches the next day.
I’ve made this recipe so many times I’ve lost count, and I still have off days. Sometimes my kitchen is colder and the dough doesn’t rise as much, so now I just let it go a few extra hours. It’s a very forgiving recipe once you get the feel for it. It’s our absolute family favorite, and my kids now demand it for their school lunch sandwiches.
If I were to change one thing next time, I might try adding a little cooked, crumbled bacon into the dough. I think the smoky flavor would pair amazingly with the cheddar and jalapeño. I’ll report back if it’s a success or a total disaster! It’s such an easy dinner side, but honestly, we often just eat it with a pat of butter as a meal itself.
Nutrition Info (per serving)
| Calories | Carbs | Fat | Protein |
|---|---|---|---|
| 210 | 28g | 7g | 8g |
Okay, so it’s not a health food, but it’s real food made from scratch, and that counts for something, right? I’ve tried making it lighter by using half whole-wheat flour, and it works pretty well, though the texture is a bit denser. For my gluten-free friends, I haven’t found a swap that works for this specific method yet, sadly. It’s a treat, and we enjoy it as one.
Ingredient Swaps
| Ingredient | Substitution |
|---|---|
| Cheddar Cheese | Pepper Jack, Gouda, or Monterey Jack |
| Fresh Jalapeños | 1/4 cup of pickled jalapeños (drained well) or 1 tsp crushed red pepper flakes |
| All-Purpose Flour | Up to 1.5 cups can be swapped for whole wheat flour |
I used pre-shredded bagged cheese once because I was in a hurry. Don’t do it! It has a coating that prevents melting, and my bread had weird little un-melted cheese specks throughout. Block cheese you shred yourself is 100% the way to go. Pickled jalapeños work in a pinch, but you gotta drain them really well or the extra moisture will mess with your dough.
Tips
- Use a kitchen scale to measure your flour. Cups can be so inaccurate! 3 cups should be about 360 grams.
- Don’t skip the second rest after you shape the loaf. It gives the gluten one last chance to relax so your bread isn’t tough.
- If you don’t have a Dutch oven, a heavy oven-safe pot with a tight-fitting lid will work. I’ve even used a deep casserole dish with foil tightly crimped over the top.
I used to just scoop flour right out of the bag with my measuring cup. I ended up with way too much flour and a dense, dry brick of a loaf. Weighing your ingredients, especially the flour, is the single best tip I can give you. It feels fussy but it makes such a huge difference in getting a consistent, perfect loaf every single time.
FAQ
My dough didn’t rise much overnight. What did I do wrong?
This happened to me when my kitchen was super cold. Yeast is sensitive to temperature! If it’s chilly, just let it go for a few more hours. Also, make sure your yeast isn’t expired. I’ve made that mistake too.
Can I speed up the rise time?
You can try putting the covered bowl in your oven with just the light on. It creates a nice warm environment. But honestly, the long, slow rise is what develops the amazing flavor, so I try to be patient.
The bottom of my bread burned! How do I prevent that?
Oh yeah, I’ve done this. If your Dutch oven is really thin, it can happen. Try placing a baking sheet on the rack underneath your Dutch oven to act as a heat shield. It helps a ton.
That’s everything I know about making No-Knead Cheddar Jalapeno Bread Recipe! Hope you give it a try, and if you mess it up, you’re in good company—I do it all the time. Text me a picture if you make it!
No-Knead Cheddar Jalapeno Bread Recipe
An incredibly easy, no-knead bread with sharp cheddar cheese and spicy jalapeños, featuring a crispy crust and a soft, cheesy interior.
Ingredients
- 3 cups (360g) all-purpose flour
- 1 ½ tsp kosher salt
- ½ tsp instant yeast
- 1 ½ cups shredded sharp cheddar cheese
- 2-3 fresh jalapeños, finely diced (seeds removed)
- 1 ½ cups warm water (100-110°F)
Instructions
-
In a large bowl, whisk together the flour, salt, and yeast.
-
Stir in the shredded cheddar and diced jalapeños until evenly distributed.
-
Pour in the warm water and mix with a wooden spoon until a shaggy, sticky dough forms.
-
Cover the bowl tightly with plastic wrap and let it sit at room temperature for 12 to 18 hours.
-
The next day, flour your hands and a work surface. Dump the dough onto the surface and fold it over a few times to form a rough ball.
-
Place the dough ball seam-side down onto a floured piece of parchment paper. Let it rest for 30 minutes.
-
While it rests, place your Dutch oven with the lid on into your cold oven. Preheat everything to 450°F.
-
Once hot, carefully remove the Dutch oven. Lift the dough by the parchment paper and place it into the hot pot.
-
Put the lid back on and bake for 30 minutes. Then, remove the lid and bake for another 15 minutes until deep golden brown.
-
Remove the bread from the pot and let it cool completely on a wire rack before slicing.
Nutrition (Per Serving)