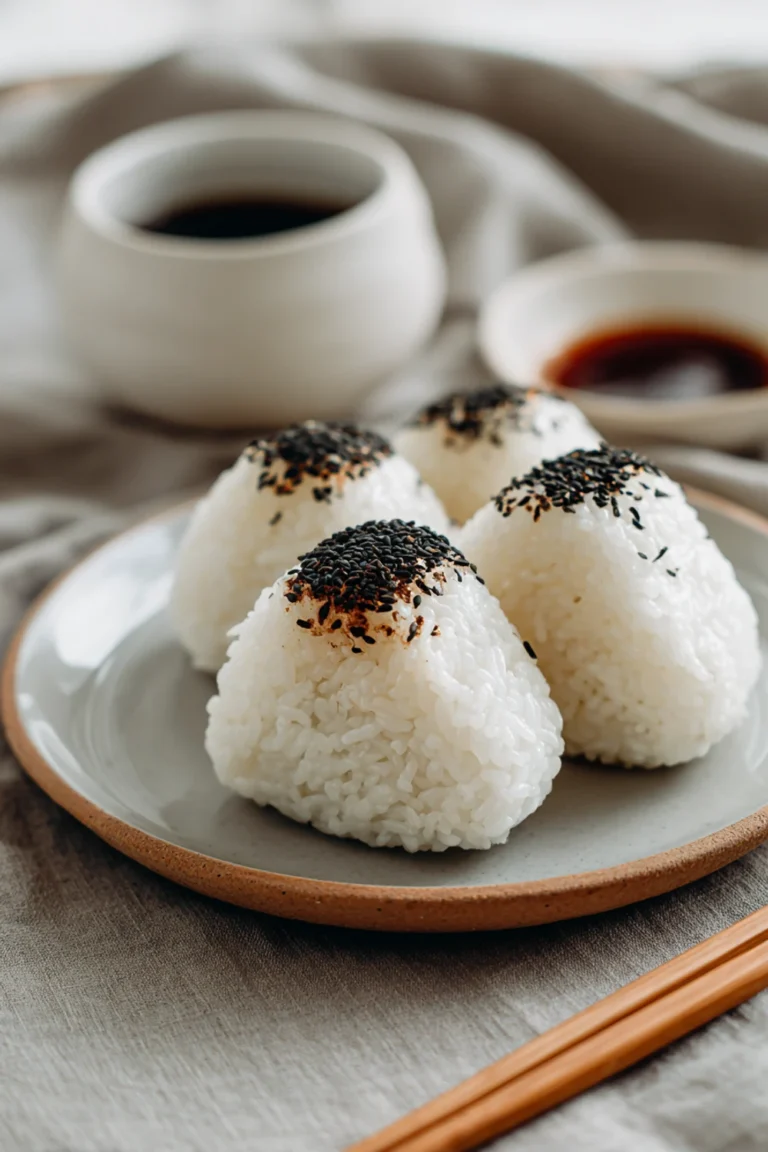
Easy onigiri recipe for quick lunches
The first time I tried making onigiri, I was convinced it would be a breeze—rice, filling, shape, done. How hard could it be? Well, let’s just say my first batch looked more like sad, lumpy snowballs than the cute triangles I’d seen online. I used way too much filling, and the rice stuck to my hands like glue. My husband still teases me about the “onigiri disaster of 2020.” But after a lot of trial and error (and a few more failed attempts), I finally got the hang of it. Now, these little rice balls are my go-to for quick lunches, picnics, and even sneaky veggie-packed snacks for the kids.
Recipe Card
| Recipe Title | Easy onigiri recipe for quick lunches |
|---|---|
| Servings | 4 |
| Prep Time | 15 mins |
| Cooking Time | 20 mins |
| Calories | 180 per onigiri |
Ingredients
- 2 cups short-grain rice (trust me, don’t use long-grain—it’s a texture nightmare)
- 2 cups water
- 1 tsp salt
- 1 sheet nori (seaweed), cut into strips
- 1/2 cup filling of choice (tuna mayo, salmon, or even pickled plum if you’re feeling adventurous)
- Optional: sesame seeds, furikake, or a little soy sauce for extra flavor
I once tried using basmati rice because it was all I had, and let’s just say the onigiri fell apart faster than my patience that day. Short-grain is stickier and holds together way better. Also, don’t skip the salt—it’s not just for flavor, it helps the rice bind. And if you’re like me and forgot to buy nori once, roasted seaweed snacks from the grocery store work in a pinch!
Directions
- Rinse the rice under cold water until the water runs clear. This removes excess starch so your rice isn’t gummy.
- Cook the rice with water in a rice cooker or pot. If using a pot, bring to a boil, then simmer covered for 15 mins. Let it sit off heat for 5 mins.
- While the rice is warm, mix in salt gently. Let it cool slightly so you don’t burn your hands.
- Wet your hands with water (or a little salt water) to prevent sticking. Grab a handful of rice, flatten it, add a teaspoon of filling, and shape into a triangle or ball.
- Wrap with a strip of nori or sprinkle with sesame seeds. Serve immediately or wrap for later.
Here’s where I messed up big time: I didn’t wet my hands enough, and the rice stuck to me like I was some kind of rice magnet. My first few onigiri were more like rice pancakes. Also, overstuffing the filling is a rookie mistake—it’ll burst out the sides when you shape it. Less is more, unless you want a tuna mayo explosion (which, honestly, still tastes good but looks messy).
Another thing I learned the hard way: don’t skip the rice-cooling step. I once tried shaping piping-hot rice and ended up with blisters. Not fun. Now I let it cool just enough to handle, but still warm enough to stick together.
And if your shapes aren’t perfect? Who cares! Mine still look a little wonky sometimes, but they taste just as good. My kids actually prefer the “funny-shaped” ones because they think they’re more fun to eat.
Nutrition Info (per serving)
| Calories | Carbs | Fat | Protein |
|---|---|---|---|
| 180 | 38g | 1g | 4g |
I was surprised how light these are while still being filling! For a healthier twist, I’ve used brown rice (though it’s harder to shape) or added grated carrots to the rice. If you’re watching sodium, go easy on the salt or use low-sodium fillings. And for gluten-free folks, just check your nori—some brands add wheat.
Ingredient Swaps
| Ingredient | Substitution |
|---|---|
| Short-grain rice | Sushi rice (works great) or brown rice (trickier but doable) |
| Nori | Roasted seaweed snacks or omit entirely |
| Tuna mayo filling | Shredded chicken, avocado, or even scrambled egg |
I once ran out of nori and tried using lettuce wraps instead. Verdict? Not the same, but still edible in a “desperate lunch” kind of way. Brown rice works if you’re patient, but it won’t hold as well. And my kids love when I use leftover teriyaki chicken as filling—it’s a great way to use up leftovers without it feeling like “leftovers.”
Tips
- Keep a bowl of water nearby to rewet your hands between shaping—it’s a game-changer.
- If packing for lunch, wrap the nori separately so it stays crispy.
- Press firmly when shaping, but don’t squish the rice into glue.
- Use plastic wrap to shape if you’re really struggling with sticky hands.
- Make a big batch and freeze them! Just thaw overnight in the fridge.
The plastic wrap trick saved me during my “sticky hands” phase. I’d get frustrated and end up with rice everywhere. Now I just lay a piece of wrap down, plop the rice on, and shape it through the wrap—no mess, no stress. And freezing them? Total lifesaver. I’ll make a dozen on Sunday and have lunches sorted for the week. Just don’t microwave them too long or they get weirdly hard.
FAQ
Q: Can I make these ahead of time?
A: Absolutely! They keep in the fridge for 2 days, or freeze for up to a month. Just don’t add the nori until you’re ready to eat, or it’ll get soggy. I’ve learned this the hard way—nothing sadder than limp nori.
Q: My onigiri keep falling apart. Help!
A: Too much filling or not enough pressure when shaping. Also, make sure your rice is sticky enough—if it’s too dry, add a tiny bit of water. My first few batches were more “deconstructed onigiri salad” than actual rice balls.
Q: What’s the weirdest filling you’ve tried?
A: Peanut butter and banana. Don’t judge me! It was a desperate “kid lunch” experiment, and honestly? Not terrible. But stick to savory fillings unless you’re feeling wild.
That’s everything I know about making easy onigiri for quick lunches! Hope you give it a try, and if you mess it up, you’re in good company—I still have the occasional rice disaster. But hey, even the ugly ones taste delicious.
Easy onigiri recipe for quick lunches
Simple and delicious Japanese rice balls perfect for quick lunches, picnics, or snacks. Learn from my mistakes to make perfect onigiri every time!

Ingredients
- 2 cups short-grain rice
- 2 cups water
- 1 tsp salt
- 1 sheet nori (seaweed), cut into strips
- 1/2 cup filling of choice (tuna mayo, salmon, or pickled plum)
- Optional: sesame seeds, furikake, or soy sauce
Instructions
-
Rinse the rice under cold water until the water runs clear to remove excess starch.
-
Cook the rice with water in a rice cooker or pot. If using a pot, bring to a boil, then simmer covered for 15 minutes. Let it sit off heat for 5 minutes.
-
While the rice is warm, gently mix in salt. Let it cool slightly to avoid burning your hands.
-
Wet your hands with water (or salt water) to prevent sticking. Take a handful of rice, flatten it, add a teaspoon of filling, and shape into a triangle or ball.
-
Wrap with a strip of nori or sprinkle with sesame seeds. Serve immediately or wrap for later.
Nutrition (Per Serving)