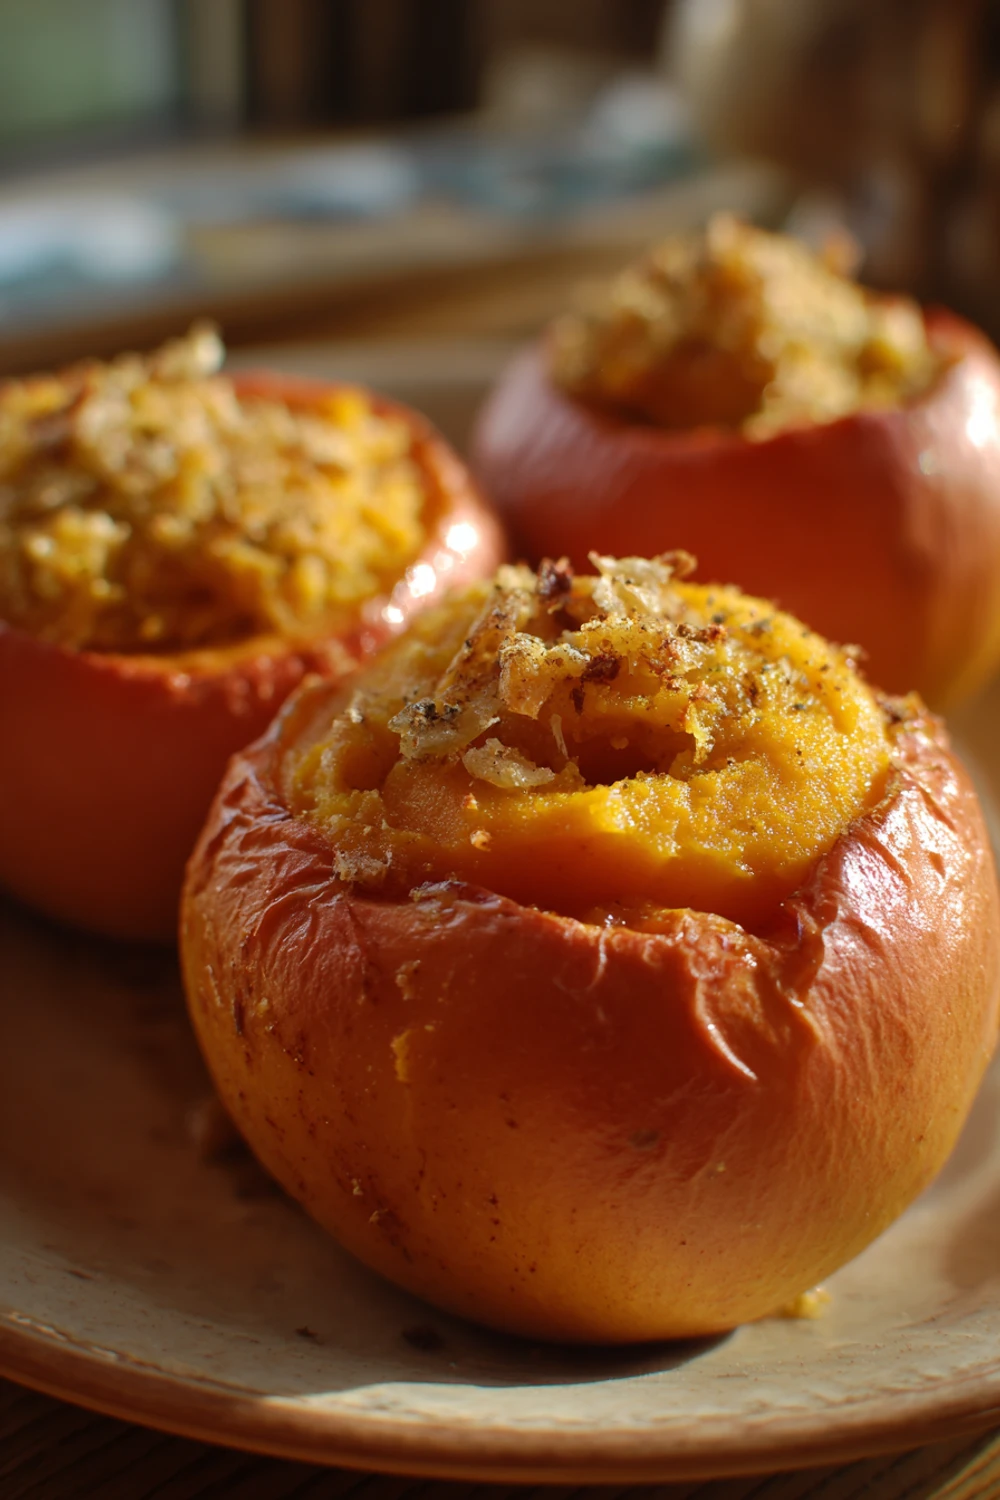
Delicious Pumpkin Pie Stuffed Baked Apples
The first time I tried making these, I was so excited for a cozy fall dessert. I basically just shoved some canned pumpkin into an apple and hoped for the best. It turned into a soupy, sad mess that leaked all over my oven. My husband, god love him, took a bite and said, “It’s… very moist!” We ended up ordering pizza that night. But I was determined to get it right, and after a bunch of tries, I finally nailed the perfect Delicious Pumpkin Pie Stuffed Baked Apples. Now it’s our go-to treat when the leaves start to change.
Recipe Card
| Recipe Title | Delicious Pumpkin Pie Stuffed Baked Apples |
|---|---|
| Servings | 4 |
| Prep Time | 20 minutes |
| Cooking Time | 45-55 minutes |
| Calories | About 320 per apple |
Ingredients
- 4 large, firm baking apples (like Granny Smith or Honeycrisp)
- 1 cup canned pure pumpkin puree (not pumpkin pie filling!)
- 1/4 cup brown sugar, packed
- 1 large egg
- 1 teaspoon vanilla extract
- 1 teaspoon pumpkin pie spice
- 1/4 teaspoon salt
- 2 tablespoons all-purpose flour
- 1/4 cup chopped pecans or walnuts (optional)
- 2 tablespoons unsalted butter, cut into small pieces
- 1/2 cup water, for the baking dish
Let’s talk about the apples for a sec. I once used Red Delicious because they were on sale. Big mistake. They turned to complete mush. You really need a firm apple that can hold its shape. And that note about the pumpkin puree? I learned that the hard way too. I grabbed the pie filling by accident once and it was way too sweet and just weird. The puree is what gives you that real pumpkin flavor.
Directions
- Preheat your oven to 375°F (190°C).
- Slice the tops off the apples, about a half-inch down. Use a small spoon or a melon baller to carefully scoop out the cores and seeds, creating a nice hollow cavity. Be careful not to go through the bottom!
- In a medium bowl, whisk together the pumpkin puree, brown sugar, egg, vanilla, pumpkin pie spice, and salt until it’s really smooth.
- Gently stir in the flour and the chopped nuts if you’re using them. This is your pumpkin pie filling.
- Place the hollowed-out apples in a baking dish that they fit snugly in. A pie dish or an 8×8 square pan usually works.
- Spoon the pumpkin filling into each apple, dividing it evenly. You can mound it a little over the top.
- Dot the tops of each filled apple with the little pieces of butter.
- Pour the 1/2 cup of water into the bottom of the baking dish, around the apples (not over them!).
- Bake for 45 to 55 minutes, until the apples are tender when poked with a fork and the filling is set.
- Let them cool in the pan for at least 15 minutes before serving. They are molten lava hot right out of the oven!
The step about not going through the bottom of the apple is crucial. I was a little overzealous once and carved right through. The filling just poured out into the dish while it baked. It still tasted fine, but it looked like a pumpkin apple swamp. Go slow when you’re scooping! And that water in the bottom of the pan? That’s to create steam and help the apples cook without burning. I forgot it once and the bottoms of the apples got really tough and chewy.
I love how this recipe makes the whole house smell incredible. It’s such a great comfort food for a chilly weekend. The first time I got it right, I felt like a kitchen genius. It’s become a real family favorite, especially because it feels fancy but is secretly pretty simple. The leftovers are actually amazing cold the next day, straight from the fridge.
You can totally play around with it, too. Sometimes I’ll add a handful of raisins or dried cranberries to the filling for a little chewy surprise. It’s a great one-pot dessert, meaning you just have the one baking dish to clean up. I’ve even made it a bit healthier by using a sugar substitute, and it worked out just fine.
If I were to change one thing next time, I might try drizzling a little caramel sauce over the top right before serving. I think that would take it over the top. But honestly, as it is, it’s pretty perfect. It’s the kind of easy dinner party dessert that always impresses people.
Nutrition Info (per serving)
| Calories | Carbs | Fat | Protein |
|---|---|---|---|
| 320 | 55g | 12g | 4g |
I was actually surprised it wasn’t higher in calories when I first calculated it. The apples and pumpkin are doing a lot of the work! I’ve made a lighter version by skipping the nuts and using a light butter spread, and it was still really good. For my gluten-free friends, just use a GF flour blend or even oat flour in the filling. It works great.
Ingredient Swaps
| Ingredient | Substitution |
|---|---|
| All-purpose flour | Oat flour or gluten-free flour |
| Brown Sugar | Maple syrup or coconut sugar |
| Pecans/Walnuts | Oats or sunflower seeds |
| Butter | Coconut oil |
I’ve tried most of these swaps. The maple syrup instead of brown sugar is fantastic, it gives a deeper flavor. Using coconut oil instead of butter works, but it doesn’t get that same golden, buttery crust on top. I tried using oats instead of nuts for a friend with an allergy, and the texture was a bit more mushy, but still tasty. The key is to not change more than one or two things at a time.
Tips
- Pick apples that can stand up to heat. Granny Smith and Honeycrisp are my heroes.
- Let the filling sit for a minute after you mix it. It thickens up a bit and is less runny, which means less leaking.
- Don’t skip the water in the pan! It’s the secret to perfectly tender apples.
- Let them cool! I know it’s hard, but the filling sets as it cools and the flavor gets even better.
That tip about letting the filling sit? I learned that after my third attempt. I was always in such a rush to get them in the oven that the filling was super thin. Letting it rest for just five minutes after mixing lets the flour absorb the moisture and makes it so much easier to handle. It’s the little things that make the biggest difference.
FAQ
Can I make these ahead of time?
Oh yeah, for sure. You can hollow out the apples and even mix the filling a few hours ahead. Just keep them separate in the fridge until you’re ready to assemble and bake. I wouldn’t stuff them the night before, though, as the apple might start to brown and get soggy.
My filling spilled out everywhere! What did I do wrong?
Welcome to the club! This usually happens for one of two reasons. Either you carved too deep and poked a hole in the bottom of the apple, or you overfilled it. Leave a little space at the top because the filling will puff up a bit as it bakes. It’s better to have a little less filling than a messy pan.
How do I know when they’re done baking?
This took me a few tries to get right. The filling should look set and not jiggle much if you tap the dish. The best test is to poke the side of the apple with a fork or a sharp knife. If it slides in easily, the apple is tender and it’s done. If it’s still hard, give it another 5-10 minutes.
That’s everything I know about making Delicious Pumpkin Pie Stuffed Baked Apples! Hope you give it a try, and if you mess it up, you’re in good company—I do it all the time. Let me know how it goes!
Delicious Pumpkin Pie Stuffed Baked Apples
A cozy fall dessert featuring baked apples filled with authentic pumpkin pie filling, creating the perfect autumnal treat that makes your house smell incredible.
Ingredients
- 4 large, firm baking apples (like Granny Smith or Honeycrisp)
- 1 cup canned pure pumpkin puree (not pumpkin pie filling)
- 1/4 cup brown sugar, packed
- 1 large egg
- 1 teaspoon vanilla extract
- 1 teaspoon pumpkin pie spice
- 1/4 teaspoon salt
- 2 tablespoons all-purpose flour
- 1/4 cup chopped pecans or walnuts (optional)
- 2 tablespoons unsalted butter, cut into small pieces
- 1/2 cup water, for the baking dish
Instructions
-
Preheat oven to 375°F (190°C)
-
Slice tops off apples about 1/2 inch down and hollow out cores using a spoon or melon baller, being careful not to puncture the bottom
-
In a medium bowl, whisk together pumpkin puree, brown sugar, egg, vanilla, pumpkin pie spice, and salt until smooth
-
Gently stir in flour and optional chopped nuts
-
Place hollowed apples snugly in a baking dish
-
Spoon pumpkin filling into each apple, dividing evenly and mounding slightly over the top
-
Dot tops with butter pieces
-
Pour 1/2 cup water into bottom of baking dish around the apples
-
Bake for 45-55 minutes until apples are tender and filling is set
-
Cool in pan for at least 15 minutes before serving
Nutrition (Per Serving)