
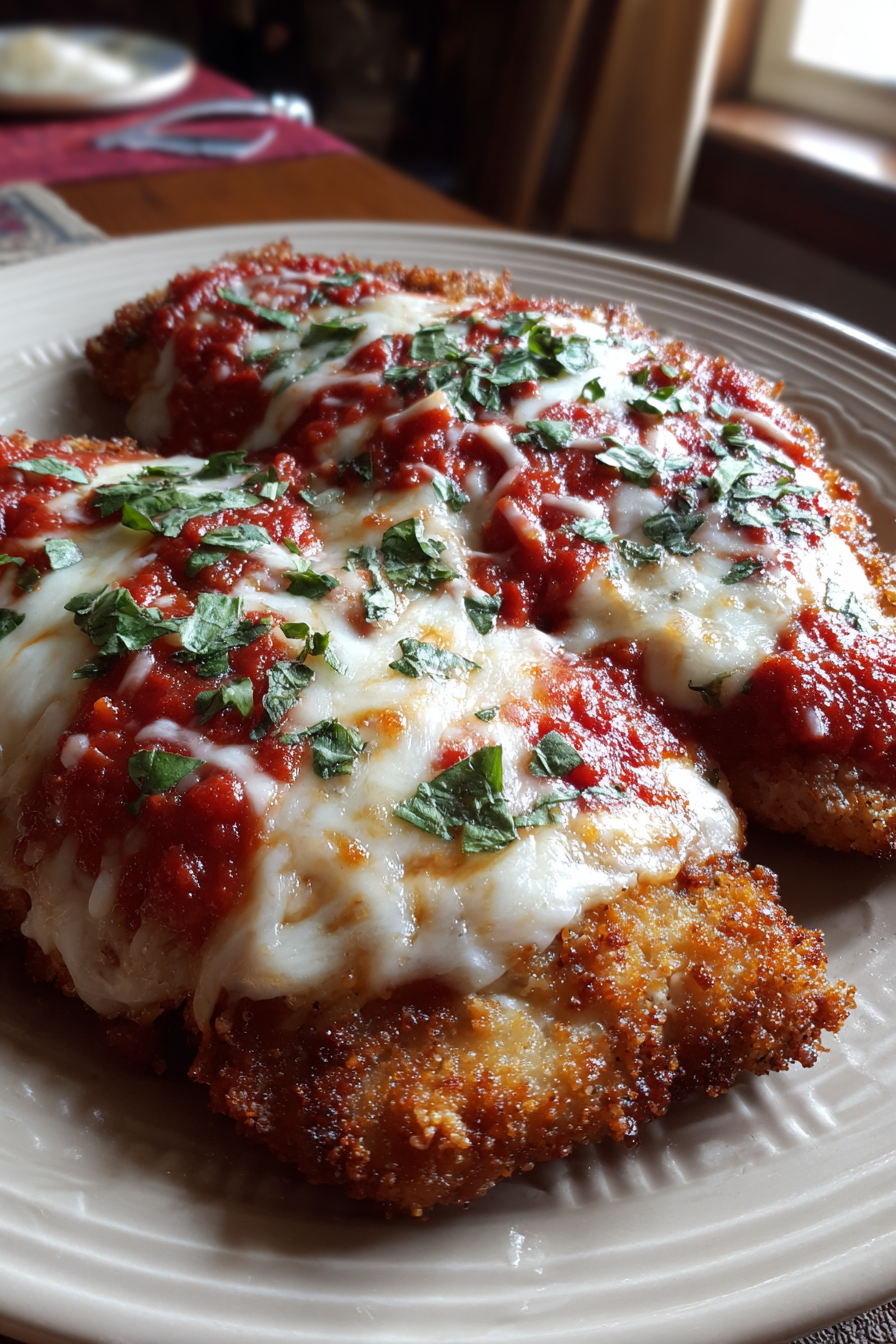
Easy Chicken Parmesan Recipe
You know, the first time I ever tried to make Chicken Parm, it was for a potluck, and I thought, “How hard can it be?” Famous last words, right? I was picturing this golden, crispy chicken, oozing with cheese, everyone swooning.
What actually happened was less swoon-worthy and more… well, a little chaotic. My kitchen looked like a flour bomb went off, the chicken was either burnt on the outside or raw in the middle, and the cheese just kinda slid off. My friend, bless her heart, politely said it had “character.”
But you know what? That disastrous first attempt didn’t deter me. It just made me more determined to nail it. Fast forward a few years and a *lot* of trial and error, and this Easy Chicken Parmesan Recipe has become my absolute go-to.
It’s what I whip up when friends are coming over, or when I just need a big, comforting hug on a plate. It’s no longer a culinary battlefield, it’s a confident, delicious success, and I’m gonna share all my secrets, fails, and wins with you.
Recipe Card
| Recipe Title | Easy Chicken Parmesan Recipe |
|---|---|
| Servings | 4 |
| Prep Time | 20 minutes |
| Cooking Time | 30 minutes |
| Calories | 580 |
Ingredients
- 2 large boneless, skinless chicken breasts
- 1/2 cup all-purpose flour
- 1 teaspoon salt
- 1/2 teaspoon black pepper
- 1/2 teaspoon garlic powder
- 2 large eggs
- 1 tablespoon milk (any kind works)
- 1 cup panko breadcrumbs
- 1/2 cup grated Parmesan cheese (the dry kind for mixing)
- 1/4 cup fresh parsley, finely chopped (optional, for breading)
- 1/2 cup olive oil (for frying)
- 2 cups marinara sauce (your favorite jarred kind works great!)
- 1 1/2 cups shredded mozzarella cheese
- Fresh basil leaves, for garnish
- Cooked pasta, for serving
For the chicken breasts, I usually grab a pack of two big ones. The absolute biggest thing here is getting them thin and even. I used to just eyeball it and whack ’em with a pan, but seriously, get a meat mallet and go easy.
My first disaster, some pieces were thick as a brick and totally undercooked, while others were paper-thin and dried out like jerky. Now I slice them lengthwise first, then pound those halves until they’re all about 1/2 inch thick.
The flour is your first step for that perfect breading. Don’t skip seasoning it! I once just used plain flour, thinking the salt and pepper in the panko would be enough. Nope. Bland city. Season every layer, my friends.
Eggs are your glue. I’ve definitely had times where I didn’t have enough egg wash, and by the last piece of chicken, the breading was barely sticking. A splash of milk makes it a little thinner and easier to coat evenly.
Panko breadcrumbs are a game changer. Seriously. Regular breadcrumbs just don’t give you that amazing crunch. I tried to use regular once because I was out of panko, and the chicken came out kinda soggy and sad. Never again!
That 1/2 cup of grated Parmesan in the breading? Don’t skip it. It adds so much savory, salty depth. I forgot it once, and the chicken just tasted… flat. It’s like the secret weapon for that classic taste.
Garlic powder, salt, and pepper go into the flour. Italian seasoning can go in the panko if you like, but I keep it simple. Seasoning everything, and I mean *everything*, from the chicken itself to the flour and the breadcrumbs, builds flavor.
For the olive oil, you need enough to coat the bottom of your pan generously, maybe a 1/2 inch deep. Don’t be stingy, but don’t drown it either. And please, please, please don’t let it get smoking hot before your chicken goes in, or you’ll burn the breading instantly.
Marinara sauce is where personal preference comes in. I’ve used everything from fancy imported stuff to the store-brand jar on sale. Find one you love! My biggest mistake was using a watery, bland sauce that just didn’t stand up to the richness of the chicken.
Shredded mozzarella is the crown jewel. Fresh mozzarella is amazing if you have it, but for an “easy” recipe, pre-shredded works just fine. Just make sure it’s not too low-fat or it won’t melt as nicely.
Fresh basil is for garnish, and it brightens everything up. Don’t skip it if you can help it. And of course, cooked pasta for serving – spaghetti or linguine are my favorites to soak up all that yummy sauce.
Directions
- Pat chicken breasts dry with paper towels. Slice each breast in half horizontally (to make 4 thinner cutlets), then place between two pieces of plastic wrap and pound to about 1/2-inch thick.
- Set up your breading station: In a shallow dish, mix flour, salt, pepper, and garlic powder. In another shallow dish, whisk eggs and milk. In a third shallow dish, combine panko breadcrumbs, grated Parmesan cheese, and optional chopped parsley.
- Dredge each chicken cutlet first in the seasoned flour, shaking off excess. Then dip in the egg wash, letting excess drip off. Finally, press firmly into the panko mixture, ensuring it’s fully coated on both sides.
- Heat olive oil in a large oven-safe skillet (cast iron works great!) over medium-high heat. Once shimmering, carefully place 2 chicken cutlets in the hot oil. Don’t overcrowd the pan!
- Fry for 3-4 minutes per side, until golden brown and cooked through. Remove chicken to a plate lined with paper towels to drain. Repeat with remaining chicken, adding more oil if needed.
- Preheat your oven to 400°F (200°C).
- Pour a thin layer of marinara sauce into the bottom of your skillet. Arrange the fried chicken cutlets over the sauce. Top each piece of chicken with a generous spoonful of marinara sauce, then sprinkle with shredded mozzarella cheese.
- Bake for 10-15 minutes, or until the cheese is melted, bubbly, and slightly golden.
- Garnish with fresh basil and serve immediately with your favorite cooked pasta.
That step where you’re frying the chicken? That’s where I used to mess up the most. One time, I got impatient and tried to cram all four cutlets into a medium-sized pan. Total rookie mistake! The oil temperature dropped, the chicken steamed instead of fried, and the breading ended up pale and mushy instead of golden and crisp. It was such a bummer after all that effort.
Now, I always do it in batches, usually two at a time, making sure there’s plenty of space between them. And I listen to the oil; it should be shimmering and lively, not smoking or barely bubbling. If it’s too hot, the breading burns before the chicken cooks. If it’s not hot enough, you get that sad, soggy situation. It’s a delicate balance, but totally worth getting right for that perfect crunch.
Honestly, this Easy Chicken Parmesan Recipe is my MVP. It’s got everything you want in a comfort food – crispy, cheesy, saucy, and deeply satisfying. It’s hearty enough for a cold winter night, but surprisingly easy enough to pull together for a weeknight family dinner. I used to think Chicken Parm was this fancy, difficult restaurant dish, but nope, it’s completely doable at home, even for us regular cooks.
One time, my son, who’s usually picky about *everything*, devoured two pieces and asked for more. That’s when I knew I’d really nailed it. It’s become a family favorite, and the best part is that it makes pretty good leftovers too. I usually bake an extra piece or two just for my lunch the next day. Sometimes I even make a big batch of the breaded chicken cutlets ahead of time, then just fry and assemble when I’m ready. It’s not quite one-pot, but it feels pretty streamlined.
I guess the biggest takeaway for me is that even if a recipe seems intimidating, with a little practice and learning from your mistakes (and trust me, there will be mistakes!), you can absolutely conquer it. This dish just proves that a simple recipe, made with love and a few hard-won lessons, can become something truly special.
Nutrition Info (per serving)
| Calories | Carbs | Fat | Protein |
|---|---|---|---|
| 580 | 45g | 32g | 38g |
Okay, so it’s probably no surprise that this isn’t exactly diet food! All that breading and cheese and oil definitely adds up. But hey, sometimes you just need to indulge, right? It totally surprises me how much protein is packed in there though, that’s a win!
If you’re looking to lighten it up a bit, you can definitely bake or air-fry the chicken instead of pan-frying. You lose a little of that golden crispiness, but it still tastes delicious. You could also use a lighter mozzarella or go easy on the sauce. For special diets, unfortunately, the breading makes it tricky for gluten-free, but you can definitely use gluten-free panko and flour!
Ingredient Swaps
| Ingredient | Substitution |
|---|---|
| Panko breadcrumbs | Regular breadcrumbs (results in less crispy chicken) |
| Parmesan cheese (in breading) | Grana Padano or omit (flavor will be less sharp) |
| Mozzarella cheese | Provolone cheese (adds a sharper, saltier flavor) |
| Olive oil | Vegetable oil (neutral flavor, higher smoke point) |
| Chicken breast | Chicken thighs (richer, more forgiving, but less traditional) |
| Marinara sauce | Crushed tomatoes seasoned with garlic, onion, basil, oregano |
I’ve tried a few of these swaps, and some work way better than others. Using regular breadcrumbs instead of panko was my big soggy chicken disaster I mentioned earlier – the texture just isn’t the same, and it absorbs more oil, making it greasy. I mean, it’s *okay* if that’s all you have, but it’s definitely not the same show-stopping crunch.
Swapping provolone for mozzarella gives it a much sharper, saltier kick, which some people love. I’m a classic mozzarella girl myself, but it’s a fun change if you’re feeling adventurous. And using chicken thighs? They stay super moist and are way more forgiving if you overcook them slightly, but for me, Chicken Parm is all about that lean, pounded chicken breast. It’s a completely different vibe, but still tasty!
Tips
- **Pound your chicken evenly:** Seriously, this is key for even cooking. Aim for about 1/2 inch thick all the way across.
- **Season every layer:** Don’t just season the panko. The flour, the chicken itself – everything needs a little salt and pepper love.
- **Don’t overcrowd the pan:** This is probably my most important frying tip. Give those cutlets space to breathe and get crispy.
- **Use good quality marinara sauce:** It really makes a difference when it’s one of the main flavors. Invest in a jar you love.
- **Let it rest a minute:** After baking, let the chicken sit for a minute or two before serving. The cheese sets a little, and it’s less messy.
I wish I had known about pounding the chicken evenly from day one. Oh man, the amount of lopsided, half-dry, half-raw chicken parm I ate in my early cooking days is frankly embarrassing. I used to just haphazardly smack it around, thinking “thin is thin,” but no! One side would be paper-thin and basically disintegrate, while the other side was still plump and taking ages to cook through, resulting in a burnt exterior and a raw interior.
It wasn’t until a friend pointed out my uneven technique that I really started paying attention. Now, I take my time, starting from the middle and working my way out, gentle but firm. It makes such a huge difference, ensuring every bite is perfectly cooked and tender, with that ideal crispy coating. It truly elevated my Chicken Parm from “character” to “chef’s kiss.”
FAQ
**Q: Can I make the chicken ahead of time?**
A: Absolutely! You can bread and fry the chicken cutlets a day ahead. Let them cool completely, then store them in an airtight container in the fridge. When you’re ready to bake, just follow steps 7 and 8. The breading might not be quite as crispy as fresh, but it’s still delicious, and it saves a ton of time on a busy weeknight.
**Q: How do I keep the chicken from getting soggy?**
A: This is a classic problem! A few things help: First, use panko breadcrumbs – they stay crisper. Second, don’t drown the chicken in sauce when assembling; a nice layer on the bottom and a spoonful on top is plenty. Third, ensure your chicken is nicely crispy from the frying step before it goes into the oven. Finally, don’t let it sit too long after baking; serve it up quick!
**Q: Can I bake the chicken instead of frying it?**
A: You totally can! For a healthier twist, after breading, you can spray the cutlets with cooking spray or lightly brush with olive oil. Bake them on a wire rack set over a baking sheet at 400°F (200°C) for about 20-25 minutes, flipping halfway, until golden and cooked through. They won’t be quite as crispy as fried, but they’re still delicious, and way less mess! I do this often when I’m feeling lazy.
**Q: What’s the best way to reheat leftovers?**
A: Don’t microwave it unless you like soggy breading and rubbery chicken – I’ve made that mistake too many times! The best way is to pop it in a toaster oven or regular oven at about 350°F (175°C) until it’s heated through and the cheese is bubbly again. It brings back some of that crispness and keeps the chicken from drying out.
That’s everything I know about making Easy Chicken Parmesan Recipe! Hope you give it a try. And if you mess it up, you’re in good company—I still do it sometimes.
Easy Chicken Parmesan Recipe
This Easy Chicken Parmesan recipe transforms a classic dish into a confident, delicious success, perfect for comforting weeknight dinners or impressing friends. Featuring crispy, golden chicken cutlets, rich marinara, and gooey melted mozzarella, it’s a deeply satisfying meal that’s surprisingly simple to master.
Ingredients
- 2 large boneless, skinless chicken breasts
- 1/2 cup all-purpose flour
- 1 teaspoon salt
- 1/2 teaspoon black pepper
- 1/2 teaspoon garlic powder
- 2 large eggs
- 1 tablespoon milk (any kind works)
- 1 cup panko breadcrumbs
- 1/2 cup grated Parmesan cheese (the dry kind for mixing)
- 1/4 cup fresh parsley, finely chopped (optional, for breading)
- 1/2 cup olive oil (for frying)
- 2 cups marinara sauce (your favorite jarred kind works great!)
- 1 1/2 cups shredded mozzarella cheese
- Fresh basil leaves, for garnish
- Cooked pasta, for serving
Instructions
-
Pat chicken breasts dry with paper towels. Slice each breast in half horizontally (to make 4 thinner cutlets), then place between two pieces of plastic wrap and pound to about 1/2-inch thick.
-
Set up your breading station: In a shallow dish, mix flour, salt, pepper, and garlic powder. In another shallow dish, whisk eggs and milk. In a third shallow dish, combine panko breadcrumbs, grated Parmesan cheese, and optional chopped parsley.
-
Dredge each chicken cutlet first in the seasoned flour, shaking off excess. Then dip in the egg wash, letting excess drip off. Finally, press firmly into the panko mixture, ensuring it’s fully coated on both sides.
-
Heat olive oil in a large oven-safe skillet (cast iron works great!) over medium-high heat. Once shimmering, carefully place 2 chicken cutlets in the hot oil. Don’t overcrowd the pan!
-
Fry for 3-4 minutes per side, until golden brown and cooked through. Remove chicken to a plate lined with paper towels to drain. Repeat with remaining chicken, adding more oil if needed.
-
Preheat your oven to 400°F (200°C).
-
Pour a thin layer of marinara sauce into the bottom of your skillet. Arrange the fried chicken cutlets over the sauce. Top each piece of chicken with a generous spoonful of marinara sauce, then sprinkle with shredded mozzarella cheese.
-
Bake for 10-15 minutes, or until the cheese is melted, bubbly, and slightly golden.
-
Garnish with fresh basil and serve immediately with your favorite cooked pasta.
Nutrition (Per Serving)


r45ok1
f4l5mv