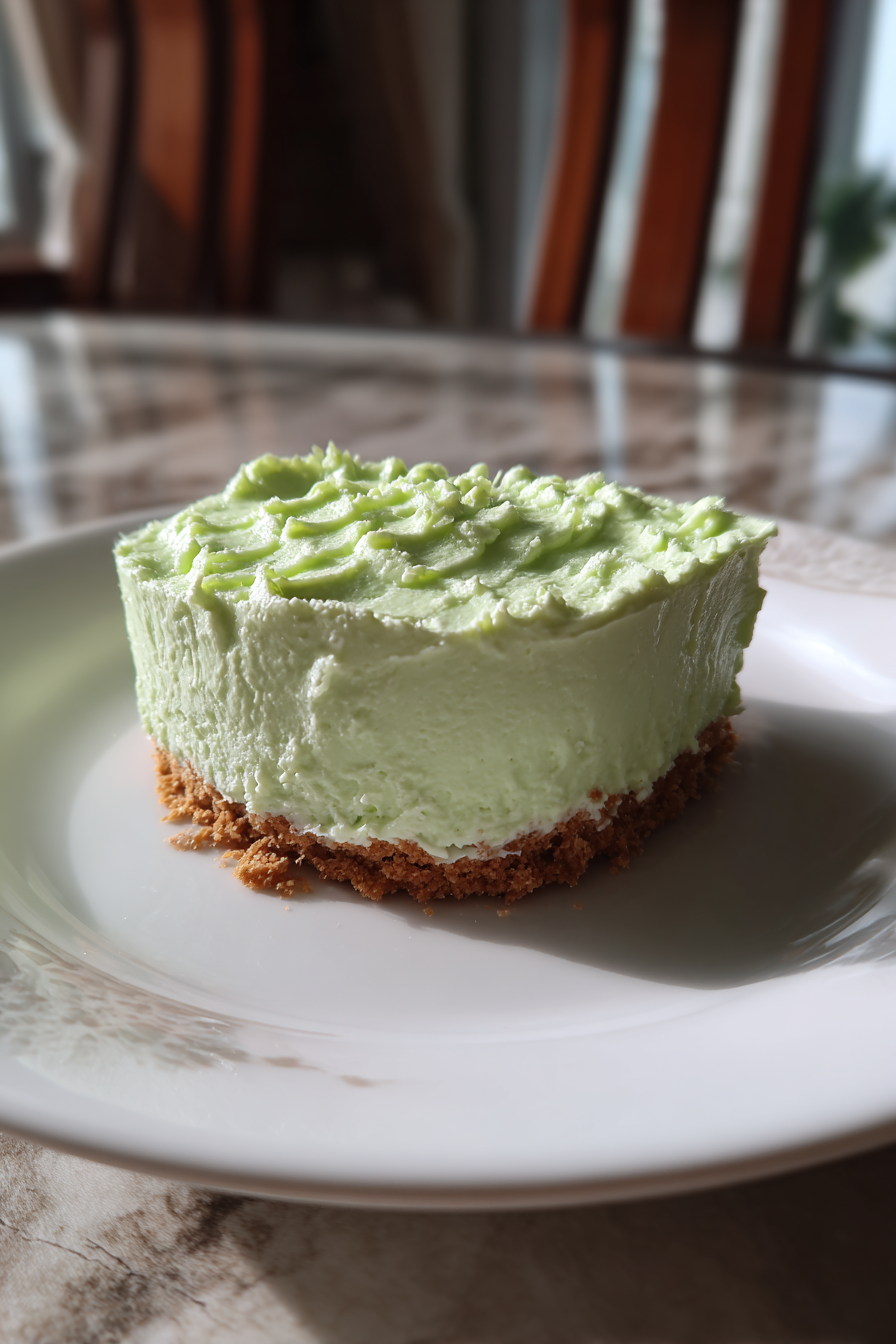
Easy No Bake Grinch Pie Recipe
Oh man, the first time I tried to make this Easy No Bake Grinch Pie Recipe was a total disaster, but also kinda hilarious. It was for my sister’s holiday party, a potluck, and I wanted to bring something festive and fun. I figured “no bake” meant “no fail,” right? Wrong. I didn’t read the whole recipe carefully, got super excited, and didn’t let the cream cheese soften enough.
When I started mixing, it was just lumps, I mean, huge chunks of cream cheese staring back at me. I tried to whip it harder, thinking it would magically smooth out. Nope. Then I added the green food coloring and it looked like chunky, curdled swamp monster sludge. My niece, bless her heart, asked if it was “Grinch puke pie.” I just laughed, scraped it all out, and started over, this time with properly softened cream cheese.
Recipe Card
| Recipe Title | Easy No Bake Grinch Pie Recipe |
|---|---|
| Servings | 8 |
| Prep Time | 20 minutes |
| Cooking Time | 0 minutes (plus 4 hours chilling) |
| Calories | 420 |
Ingredients
- 1 (8 ounce) package cream cheese, softened
- 1 cup powdered sugar
- 1 (12 ounce) container frozen whipped topping, thawed (like Cool Whip)
- 1 teaspoon vanilla extract
- Green food coloring (gel works best!)
- 1 (9 inch) pre-made Oreo cookie crust
- 1/2 cup miniature chocolate chips (optional, for decoration)
- Red sprinkles or small red candies (for decoration)
Okay, let’s talk about these ingredients, because I’ve messed up with almost every single one at some point. That cream cheese, for example, is the absolute bedrock of this pie. If it’s not properly softened, you’re gonna get lumps, and trust me, nobody wants a lumpy pie, especially not a Grinch pie! I once tried to microwave it to speed things up and ended up with a slightly melted, curdled mess that just wouldn’t blend right. Don’t do it! Just leave it out on the counter for an hour or two.
Powdered sugar is super important for that smooth texture and sweetness. Don’t try to use granulated sugar; it won’t dissolve correctly and your pie will be gritty. I once grabbed the wrong bag from the pantry in a hurry, and my pie had a weird crunch. Not ideal!
The frozen whipped topping (Cool Whip or similar) is your secret weapon for that airy, light texture. Make sure it’s thawed but still cold. I made the mistake of leaving it out too long once, and it became a soupy mess that made the whole pie too thin. On the flip side, if it’s still frozen, you’ll just break your mixer trying to get it incorporated.
Vanilla extract adds that classic sweet aroma. Don’t skip it, even if you think it’s a small amount. I once ran out and tried to substitute with almond extract, thinking “it’s still an extract, right?” It was… interesting. Not bad, but definitely not the familiar taste everyone expects from this pie. It had a weird, slightly bitter aftertaste.
Green food coloring – this is where the fun really starts! Gel food coloring is my go-to because it’s super concentrated and you need less to get a vibrant color. Liquid food coloring can make your mixture a bit too thin if you use a lot. I learned this the hard way trying to get a super dark green with liquid drops – it started getting runny and had a weird aftertaste. Start with a few drops, mix, and add more until you get that perfect Grinchy shade.
The pre-made Oreo cookie crust is a lifesaver for a “no bake” recipe. Don’t try to make your own from scratch unless you really want to add an extra step and possible bake time. I tried once, and it ended up too crumbly and didn’t hold together well when I sliced the pie. Trust the store-bought goodness here.
Miniature chocolate chips and red sprinkles are just for fun, but they really tie the whole Grinch theme together. The mini chips for the Grinch’s “heart” and the red sprinkles for his Santa hat. Don’t skip these; they make it feel extra festive and worth the minimal effort. Plus, who doesn’t love a little extra crunch and color?
Directions
- In a large bowl, beat the softened cream cheese until smooth and creamy.
- Gradually add the powdered sugar, mixing until fully incorporated and smooth.
- Gently fold in the thawed whipped topping until no white streaks remain.
- Add vanilla extract and several drops of green food coloring. Mix until you reach your desired Grinchy green shade.
- Pour the cream cheese mixture into the pre-made Oreo crust and spread evenly.
- Refrigerate for at least 4 hours, or preferably overnight, until firm.
- Before serving, sprinkle the miniature chocolate chips in a heart shape in the center of the pie, then add red sprinkles or candies around it to resemble a Santa hat.
- Slice and serve cold.
Let me tell you, that chilling step, number 6, is the MOST important step. I know it says “at least 4 hours,” but I’ve been impatient more times than I can count. The first time I only chilled it for about two hours because we were in a rush, and when I tried to slice it, it was just a gloppy mess. It tasted good, but it didn’t hold its shape at all. My slice just kind of slumped onto the plate like a sad green puddle.
Another time, I thought I could just pop it in the freezer for an hour to speed things up. Bad idea. The texture got a bit icy and weird, and then as it thawed on the plate, it became watery. So, resist the urge to rush it! Pop it in the fridge, go watch a movie, or get some other holiday prep done. The longer it chills, the better it will set, and you’ll get those perfect, clean slices. Overnight really is best. Trust me on this one.
Honestly, this Easy No Bake Grinch Pie Recipe has become a holiday staple for our family. It’s funny because after that initial “Grinch puke pie” incident, everyone expects me to bring it now. It’s such an easy dessert to whip up when you’re already stressed with a million other things, like trying to get the turkey just right or wrapping all those presents. It’s just pure, festive comfort food.
I love that it’s a family favorite because even the kiddos can help. My youngest loves to drop the food coloring in and watch it swirl green, and my older one is the designated “heart” maker with the mini chocolate chips. It makes for great memories, and honestly, the process is usually more fun than stressful, which is a rare thing during the holidays. Plus, it always gets a giggle out of people when they see the Grinchy design.
One thing I’ve learned is that it actually tastes even better the next day, which makes it fantastic for meal prep, if you can even call a dessert “meal prep.” It’s perfect for making ahead for a party, so you have one less thing to worry about on the day of. And let’s be real, who doesn’t love having some leftovers of a delicious, easy-to-grab dessert? Just make sure to cover it tightly with plastic wrap so it doesn’t pick up any fridge smells.
Nutrition Info (per serving)
| Calories | Carbs | Fat | Protein |
|---|---|---|---|
| 420 | 45g | 25g | 5g |
Yeah, looking at those calories and fat, it’s definitely not a “health food,” is it? But hey, it’s a holiday treat! I actually tried to make a “lighter” version once by using light cream cheese and sugar-free whipped topping. It was… fine. But it didn’t have that rich, creamy decadence that makes the original so good. The texture was a little off, too – less substantial. My family immediately noticed the difference, and let’s just say it wasn’t a hit. For special diets, you could try gluten-free Oreo crusts, but for low-sugar or low-fat, I’d say just enjoy a smaller slice of the real thing! It’s all about balance, right?
Ingredient Swaps
| Ingredient | Substitution |
|---|---|
| Oreo cookie crust | Graham cracker crust |
| Whipped topping (Cool Whip) | Homemade whipped cream (use 2 cups heavy cream, 1/4 cup powdered sugar, 1 tsp vanilla) |
| Vanilla extract | Peppermint extract (use sparingly!) |
| Mini chocolate chips | Green or red M&Ms |
Okay, let’s get real about these swaps. The graham cracker crust for an Oreo one works totally fine. It changes the flavor profile a bit, making it less chocolatey and more classic cheesecake-y, which is still delicious, just different. I’ve done this when I couldn’t find an Oreo crust or when someone wasn’t a huge chocolate fan. It’s a good swap that doesn’t mess with the texture.
Now, homemade whipped cream instead of Cool Whip? You *can* do it, but it adds another step and honestly, the homemade stuff tends to deflate a bit faster, so your pie might not be quite as firm. It also changes the texture from that unique, stable Cool Whip fluffiness to something richer and softer. I tried it once for a fancier dinner, and while it tasted great, it wasn’t quite as “no bake and easy” as I wanted.
Swapping vanilla for peppermint extract? Oh boy. I tried this one year thinking “Grinch, winter, peppermint, perfect!” It was *very* potent. I only added half a teaspoon and it tasted like I was eating a candy cane pie. If you love peppermint, go for it, but be warned: a little goes a long, long way. It completely overshadows the cream cheese flavor.
And for the decorations, swapping mini chocolate chips for M&Ms is a fun one, especially if you can find green and red ones! It gives it a bit more crunch and a different pop of color. Totally works and looks just as festive. It’s an easy win for adding a bit of variety without changing the core recipe.
Tips
- Make sure your cream cheese is SUPER soft.
- Don’t overmix the whipped topping.
- Chill it overnight for best results.
- Use gel food coloring for vibrant color without thinning.
- Cover tightly in the fridge to prevent weird fridge tastes.
Seriously, that tip about not overmixing the whipped topping? I learned that the hard way, and it made my pie a total fail. I thought “more mixing, more fluffy, right?” Wrong. When you overmix the whipped topping into the cream cheese mixture, especially after it’s thawed, you start to break down its structure. It gets airy at first, then it starts to lose its stiffness, and eventually, it just becomes watery.
I remember one time, I was trying to get *every single speck* of green food coloring incorporated perfectly, and I just kept mixing and mixing with my electric mixer. When I poured it into the crust, it looked a lot thinner than usual. After chilling it, the pie wasn’t firm at all; it was more like a thick pudding. It tasted good, but it was impossible to get a neat slice, and it just kind of sagged. So, fold it gently, just until no white streaks are left, and then stop! Don’t be like me and think more mixing is always better.
FAQ
**Q: My pie didn’t set, it’s still runny. What went wrong?**
A: Oh man, I’ve been there so many times! Most likely, your cream cheese wasn’t soft enough and created lumps, or you didn’t chill it long enough. I’ve also found that if you overmix the whipped topping, it can break down and make the pie less firm. Just remember: softened cream cheese, gentle folding, and *long* chilling time. Like, really long.
**Q: Can I use fresh whipped cream instead of frozen whipped topping?**
A: You can, but it changes things a bit. Fresh whipped cream is lighter and can be a bit less stable than the frozen stuff. Your pie might not set up as firmly, and it might get a little watery if it sits too long. It’ll taste super rich, but don’t expect the exact same texture. I tried it once, and while delicious, it was a bit too delicate for my liking.
**Q: How long does this pie last in the fridge?**
A: If you cover it tightly with plastic wrap, it usually lasts about 3-4 days in my fridge. It actually tastes great on day 2 and 3, sometimes even better! The flavors really meld. Just make sure to keep it sealed up so it doesn’t dry out or pick up any funky fridge odors.
**Q: Can I freeze this Grinch Pie?**
A: Technically, yes, but I don’t really recommend it for this particular recipe. The texture of the cream cheese and whipped topping can get a bit icy and then watery when it thaws. It won’t be as smooth and creamy as when it’s just chilled in the fridge. I tried freezing half a pie once, and it just wasn’t the same when I pulled it out a week later. Stick to fridge chilling for the best experience!
That’s everything I know about making Easy No Bake Grinch Pie Recipe! Hope you give it a try. And if you mess it up, you’re in good company—I still do it sometimes.
Easy No Bake Grinch Pie Recipe
Whip up a festive and fun Easy No Bake Grinch Pie, perfect for holiday gatherings. This vibrant green dessert, made with a creamy filling and an Oreo crust, is surprisingly simple to make and always a crowd-pleaser.
Ingredients
- 1 (8 ounce) package cream cheese, softened
- 1 cup powdered sugar
- 1 (12 ounce) container frozen whipped topping, thawed (like Cool Whip)
- 1 teaspoon vanilla extract
- Green food coloring (gel works best!)
- 1 (9 inch) pre-made Oreo cookie crust
- 1/2 cup miniature chocolate chips (optional, for decoration)
- Red sprinkles or small red candies (for decoration)
Instructions
-
In a large bowl, beat the softened cream cheese until smooth and creamy.
-
Gradually add the powdered sugar, mixing until fully incorporated and smooth.
-
Gently fold in the thawed whipped topping until no white streaks remain.
-
Add vanilla extract and several drops of green food coloring. Mix until you reach your desired Grinchy green shade.
-
Pour the cream cheese mixture into the pre-made Oreo crust and spread evenly.
-
Refrigerate for at least 4 hours, or preferably overnight, until firm.
-
Before serving, sprinkle the miniature chocolate chips in a heart shape in the center of the pie, then add red sprinkles or candies around it to resemble a Santa hat.
-
Slice and serve cold.
Nutrition (Per Serving)