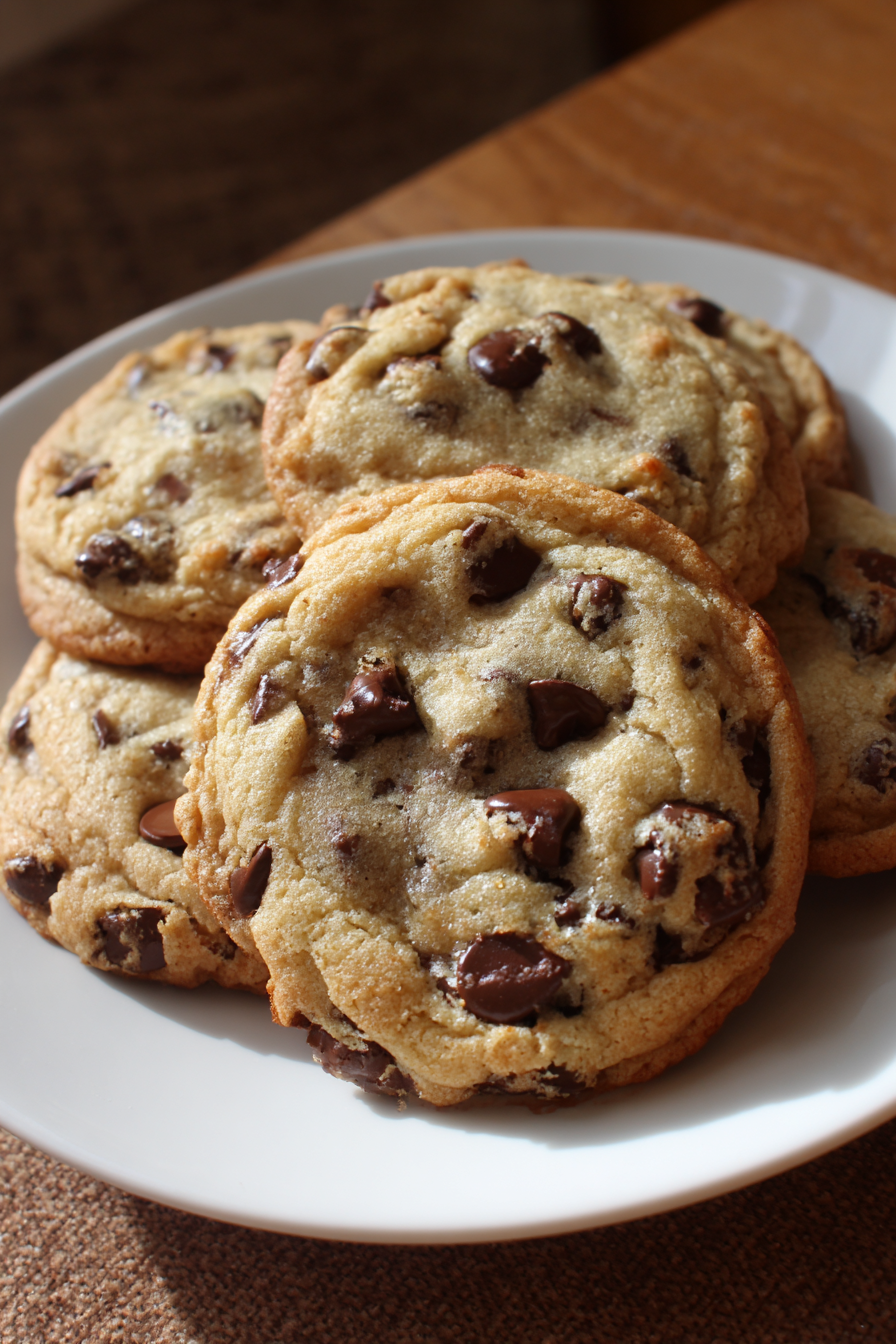
Easy World-Famous Chocolate Chip Cookies
Man, oh man, these cookies. My “Easy World-Famous Chocolate Chip Cookies” hold a special place in my heart, and honestly, a permanent spot in my recipe box. I first stumbled upon a version of this recipe back in college, trying to impress my then-roommate (now best friend!) with my non-existent baking skills. I remember that first attempt—the cookies came out flatter than a pancake, greasy, and somehow burnt on the edges while still raw in the middle. It was a disaster, a true culinary crime, and we ended up laughing so hard we almost cried.
But something about that spectacular failure just made me more determined. I tweaked, I baked, I failed, and I baked again, probably 50 times over the years. Now, this recipe, this *exact* version, is the one my friends literally beg me to make for every get-together. They call them world-famous, and who am I to argue with such high praise? These aren’t just cookies; they’re a warm hug, a nostalgia trip, and proof that even a messy home cook like me can make something truly delicious.
Recipe Card
| Recipe Title | Easy World-Famous Chocolate Chip Cookies |
|---|---|
| Servings | About 2-3 dozen, depending on scoop size |
| Prep Time | 15 minutes (plus at least 30 mins chill time, but ideally more!) |
| Cooking Time | 9-12 minutes per batch |
| Calories | Approx. 180-200 per cookie (just a rough guess, folks!) |
You know, these cookies have seen me through so much. They were there for my first big job interview (I brought a batch for the whole office, totally got the job!), and they were there for every single one of my kids’ school bake sales. There’s something so comforting about the smell of them baking, it just fills the whole house with happiness.
What I love most is how reliable they are now. Even if I’m tired or distracted, the muscle memory kicks in, and they almost always come out perfect. It’s definitely a family favorite, and the kids love helping with the mixing and, of course, the taste-testing of the raw dough (shhh, don’t tell!).
Honestly, the only thing I’d change next time is maybe doubling the batch from the start, because they disappear so fast, there are never any leftovers! I usually stash a few for myself, hidden behind the frozen peas. Don’t judge, you’d do the same.
Ingredients
- 2 ¼ cups (270g) All-Purpose Flour
- 1 teaspoon Baking Soda
- 1 teaspoon Salt
- 1 cup (226g) Unsalted Butter, softened
- ¾ cup (150g) Granulated Sugar
- ¾ cup (160g) Packed Light Brown Sugar
- 2 large Eggs
- 2 teaspoons Vanilla Extract
- 2 cups (about 340g) Chocolate Chips (I usually do a mix of semi-sweet and milk chocolate)
Okay, let’s break down these ingredients because each one plays a starring role, and I’ve messed up with every single one at some point.
The all-purpose flour is your structure. One time, I accidentally used self-rising flour because I wasn’t paying attention, and let me tell you, those cookies rose like crazy, then deflated into sad, crumbly lumps. Stick to all-purpose, it’s the reliable friend you can always count on.
Baking soda is key for that perfect lift and chewiness. I once skipped it, thinking “how important can one little teaspoon be?” Extremely important, apparently! The cookies were flat, dense discs that you could practically use as hockey pucks. Don’t skip it.
Salt is a flavor enhancer, not just for savory stuff. It balances the sweetness and really makes the chocolate sing. I forgot it once too, and the cookies tasted… flat. Like something was missing, even though they were sweet. It’s a tiny ingredient, but mighty.
Unsalted butter, softened, is non-negotiable. I used to think “softened” meant melted, or straight from the fridge. Nope! Melted butter makes greasy, flat cookies. Cold butter makes lumpy, hard-to-mix dough. Leave it out for an hour or two, or microwave it for like, 10 seconds at a time until it’s just soft to the touch, not liquidy. My first few batches were either swimming in butter or had butter chunks, a true beginner’s mistake.
Granulated sugar and light brown sugar – this combo is where the magic happens. Granulated sugar gives crisp edges, and brown sugar (with its molasses) adds chewiness and depth of flavor. One time I only had white sugar, and the cookies were okay, but they definitely lacked that signature chew and caramel-y note. Don’t skimp on the brown sugar!
Eggs bind everything together and add richness. Always large eggs, and make sure they’re at room temp too, just like the butter, so they mix in smoothly. I’ve used cold eggs before, and they just never fully incorporated, leaving little streaks of egg white in the dough. Not pretty, and not as evenly textured.
Vanilla extract is the secret weapon for warmth and aroma. Use good quality stuff if you can! I remember using some super cheap, imitation vanilla once, and the cookies tasted a bit… plastic-y. Splurge a little on the vanilla, it’s worth it for that comforting, familiar flavor.
And finally, chocolate chips! This is where you can have some fun. I like a mix of semi-sweet for classic flavor and milk chocolate for extra creaminess. You can use dark, white, chunks, mini chips, whatever your heart desires. Just make sure you use enough! I’ve definitely made batches where I was a bit stingy with the chips, and it just wasn’t the same. It’s called a *chocolate chip* cookie for a reason!
Directions
- Preheat your oven to 375°F (190°C). Line baking sheets with parchment paper.
- In a medium bowl, whisk together the flour, baking soda, and salt. Set aside.
- In a large bowl, using an electric mixer, cream together the softened butter, granulated sugar, and brown sugar until light and fluffy (about 2-3 minutes).
- Beat in the eggs, one at a time, mixing well after each addition. Stir in the vanilla extract.
- Gradually add the dry ingredients to the wet ingredients, mixing on low speed until just combined. Be careful not to overmix!
- Stir in the chocolate chips by hand until evenly distributed.
- Chill the dough for at least 30 minutes. This step is a game-changer!
- Drop rounded tablespoons of dough onto the prepared baking sheets, about 2 inches apart.
- Bake for 9-12 minutes, or until the edges are golden brown and the centers are still slightly soft.
- Let the cookies cool on the baking sheets for a few minutes before transferring them to a wire rack to cool completely.
Okay, so those directions look pretty straightforward, right? Well, I’ve managed to botch just about every single one of those steps at some point. The biggest culprit for me used to be overmixing the dough. I thought more mixing meant better cookies, but oh no, that just develops the gluten too much, making your cookies tough instead of tender and chewy. I learned the hard way with a batch of cookies that were more like hockey pucks than soft treats. Now, I always mix until *just* combined—as soon as I don’t see dry streaks of flour, I stop. Another major fail was skipping the chilling step. That first sad, flat batch of cookies? No chill time. The butter just melts too fast in the oven, spreading the cookies thin. Chilling solidifies the butter, helping the cookies hold their shape and stay thick and chewy. It’s a pain to wait, but totally worth it, trust me.
Nutrition Info (per serving)
| Calories | Carbs | Fat | Protein |
|---|---|---|---|
| 195 | 25g | 10g | 2g |
Okay, so looking at these numbers, yeah, they’re not exactly a health food, are they? But hey, it’s a cookie, not a kale salad! I’m honestly not super surprised by the calories or fat—all that butter and sugar tastes amazing for a reason. I have tried making them lighter before, like swapping some butter for applesauce, but honestly, the texture just wasn’t the same. It came out cakey and lost that classic chewy deliciousness. For people with special diets, these aren’t naturally gluten-free or dairy-free, but I have some thoughts on swaps in the next section if you’re feeling adventurous. Mostly, I just recommend enjoying one of these cookies as a treat, it’s all about balance, right?
Ingredient Swaps
| Ingredient | Substitution |
|---|---|
| All-Purpose Flour | Gluten-free all-purpose blend (with xanthan gum) |
| Unsalted Butter | Vegan butter sticks or shortening |
| Granulated Sugar | Coconut sugar (will change flavor slightly) |
| Light Brown Sugar | Dark brown sugar (deeper molasses flavor) |
| Chocolate Chips | Chopped nuts, dried fruit, or different chocolate types |
So, about these swaps—I’ve tried a few. The gluten-free flour blend actually works surprisingly well, especially if it has xanthan gum. The cookies might be a tiny bit denser, but still totally delicious for my gluten-sensitive friends. Vegan butter sticks are a decent swap for butter if you need dairy-free; I find Earth Balance sticks work best. They spread a little more, so make sure your dough is extra chilled. Coconut sugar for granulated sugar gives them a slightly caramel-y, less sweet flavor, which some people prefer, but it’s a noticeable change. Dark brown sugar instead of light is an easy win if you like a richer, chewier cookie. My favorite “swap” isn’t even a swap, it’s an addition: adding toasted pecans or walnuts alongside the chocolate chips. It adds a nice crunch and nutty flavor that’s just divine. But the applesauce for butter experiment? Never again. Just accept the butter, embrace the butter.
Tips
- **Room Temperature Ingredients:** Make sure your butter and eggs are at room temperature. This helps them cream together smoothly and emulsify properly, leading to a perfectly textured cookie.
- **Don’t Overmix:** As soon as the dry ingredients are just incorporated, stop mixing. Overmixing develops gluten, which can make your cookies tough.
- **Chill the Dough:** Seriously, don’t skip this! Chilling for at least 30 minutes (or even overnight) prevents spreading, deepens flavor, and leads to a chewier cookie.
- **Parchment Paper is Your Friend:** It prevents sticking, ensures even baking, and makes cleanup a breeze. Plus, it helps the cookies not spread quite as much.
- **Don’t Overbake:** Pull the cookies out when the edges are set and golden, but the centers still look a little soft and underdone. They’ll continue to bake on the hot sheet pan.
I cannot stress the “don’t overmix” tip enough. I learned that the hard way with a batch that was so tough, you practically needed a hammer to break them apart. I used to think I needed to beat the dough into submission, making sure every single speck of flour was completely gone and then some. What I wish I knew earlier was that “just combined” literally means just that – as soon as you can’t see dry flour, stop the mixer. That simple change made all the difference from dense bricks to soft, perfect cookies. And the chilling? Oh man. My first attempts were flat, crispy messes because the butter melted too quickly. Once I started chilling the dough, my cookies finally achieved that beautiful thickness and chewiness. It takes patience, which I sometimes lack, but it’s 100% worth it.
FAQ
**Q: My cookies came out flat! What did I do wrong?**
A: Oh man, I’ve been there so many times! This usually happens for a few reasons. Your butter might have been too soft (or melted!), your dough wasn’t chilled enough (or at all!), or you might have used too little flour. Make sure your butter is soft, but still holds its shape, chill that dough for at least 30 minutes, and use a kitchen scale for flour if you can to get the exact amount. That’s how I fixed my flat cookie woes!
**Q: Can I make the dough ahead of time?**
A: Absolutely, yes! In fact, I highly recommend it. You can chill the dough in the fridge for up to 3 days. The flavor actually gets even better as the ingredients meld together. Just make sure to wrap it tightly in plastic wrap so it doesn’t dry out. When you’re ready to bake, you might need to let it sit out for 10-15 minutes to soften just enough to scoop. This is my secret weapon for fresh-baked cookies any time!
**Q: What’s the best way to store these cookies?**
A: Once they’re completely cooled (and I mean completely, otherwise they’ll get soggy), store them in an airtight container at room temperature for up to 3-4 days. If you want to keep them longer, you can freeze them for up to a month! Just place them in a freezer-safe bag or container. You can also freeze the raw dough balls, then bake them straight from frozen for an extra minute or two. So handy!
**Q: My cookies are too hard/dry, not chewy. Help!**
A: This is usually a sign of overbaking. You want to pull them out when the edges are just golden, and the centers still look a little underdone or jiggly. They’ll firm up as they cool on the baking sheet. Every oven is a little different, so it might take a batch or two to figure out the sweet spot for your oven. Also, make sure you’re not overmixing your dough, as that can lead to a tougher cookie. Live and learn, friend!
That’s everything I know about making Easy World-Famous Chocolate Chip Cookies! Hope you give it a try, and if you mess it up, you’re in good company—I still do it sometimes, and they’re usually still delicious anyway. Happy baking!
Easy World-Famous Chocolate Chip Cookies
These “world-famous” chocolate chip cookies are the culmination of years of baking experiments, resulting in a perfectly chewy, sweet, and comforting treat that friends and family will adore.
Ingredients
- 2 ¼ cups (270g) All-Purpose Flour
- 1 teaspoon Baking Soda
- 1 teaspoon Salt
- 1 cup (226g) Unsalted Butter, softened
- ¾ cup (150g) Granulated Sugar
- ¾ cup (160g) Packed Light Brown Sugar
- 2 large Eggs
- 2 teaspoons Vanilla Extract
- 2 cups (about 340g) Chocolate Chips (mix of semi-sweet and milk chocolate)
Instructions
-
Preheat your oven to 375°F (190°C). Line baking sheets with parchment paper.
-
In a medium bowl, whisk together the flour, baking soda, and salt. Set aside.
-
In a large bowl, using an electric mixer, cream together the softened butter, granulated sugar, and brown sugar until light and fluffy (about 2-3 minutes).
-
Beat in the eggs, one at a time, mixing well after each addition. Stir in the vanilla extract.
-
Gradually add the dry ingredients to the wet ingredients, mixing on low speed until just combined. Be careful not to overmix!
-
Stir in the chocolate chips by hand until evenly distributed.
-
Chill the dough for at least 30 minutes. This step is a game-changer!
-
Drop rounded tablespoons of dough onto the prepared baking sheets, about 2 inches apart.
-
Bake for 9-12 minutes, or until the edges are golden brown and the centers are still slightly soft.
-
Let the cookies cool on the baking sheets for a few minutes before transferring them to a wire rack to cool completely.
Nutrition (Per Serving)