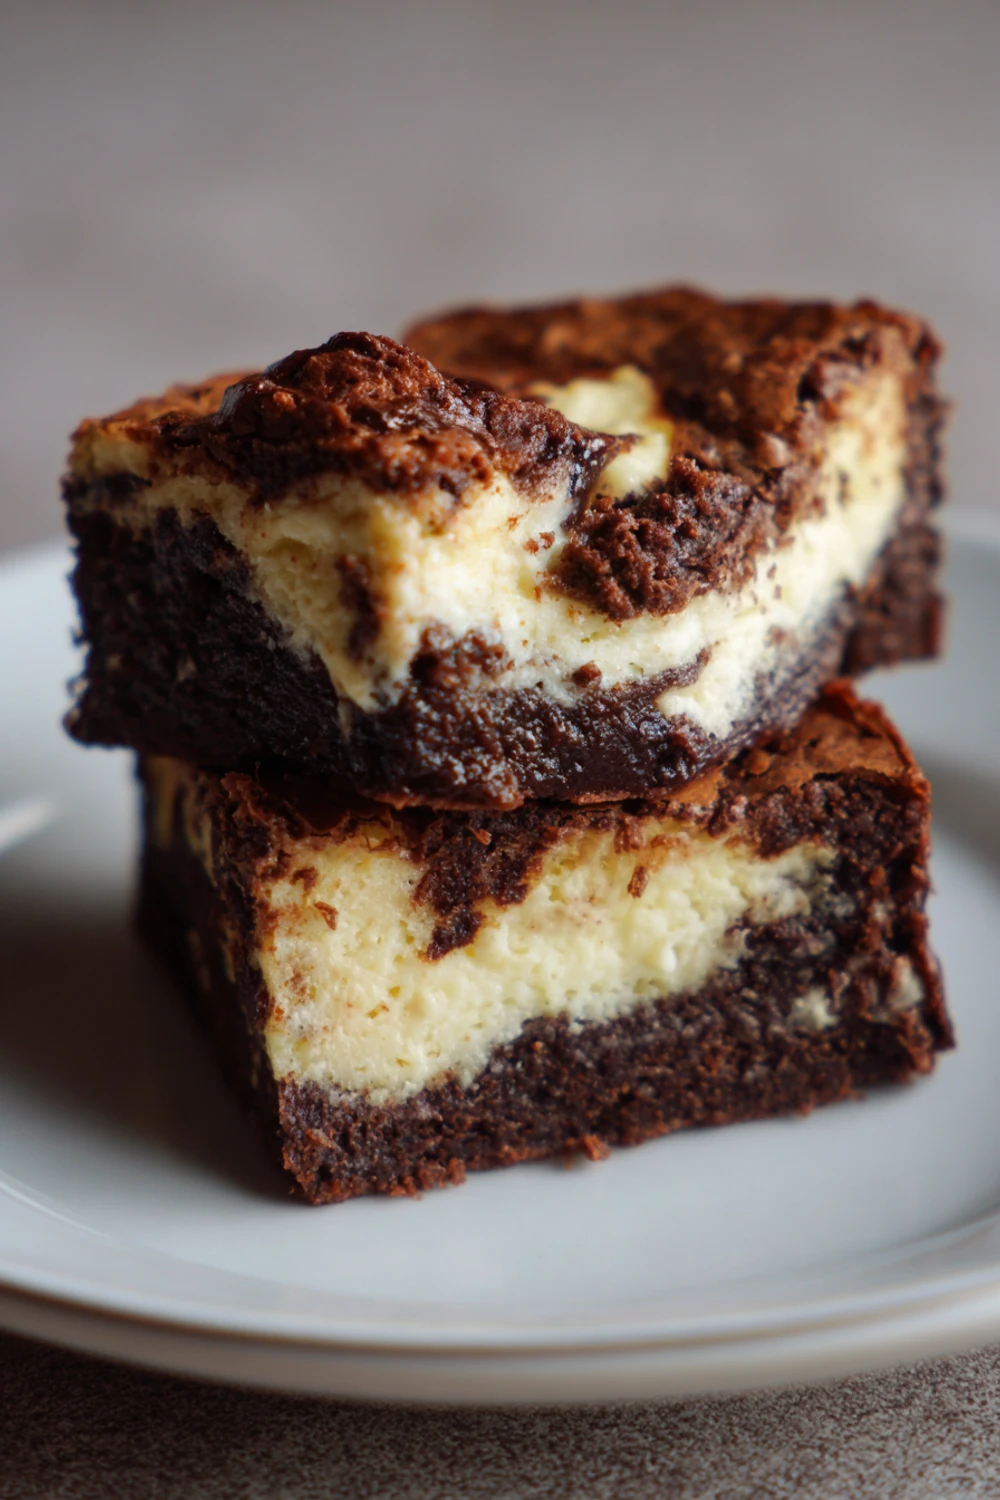
Ghost Cheesecake Brownies Recipe
The first time I tried making these ghost cheesecake brownies, it was a total disaster. I was so excited for a Halloween party that I rushed everything. My ghost faces looked more like sad, melting blobs than cute spooky spirits. My brother took one look and said they looked like they’d seen a ghost, which I guess was the point, but not like that. I’ve made them so many times since, and now they’re my go-to for any fall get-together.
Recipe Card
| Recipe Title | Ghost Cheesecake Brownies Recipe |
|---|---|
| Servings | 12 brownies |
| Prep Time | 25 minutes |
| Cooking Time | 35-40 minutes |
| Calories | Approx. 320 |
I learned the hard way that the cooking time can really vary. My old oven runs hot, so I always set a timer for 30 minutes and check. One year I got distracted and they came out dry. Don’t be like me, set that timer!
Ingredients
- 1 box of your favorite fudge brownie mix (plus the oil, water, and egg it calls for)
- 8 oz cream cheese, fully softened
- 1/4 cup granulated sugar
- 1 large egg
- 1/2 teaspoon vanilla extract
- 1/2 cup semi-sweet chocolate chips
- Black decorating gel or melted chocolate for the faces
That cream cheese needs to be seriously soft. I once tried to mix it straight from the fridge and ended up with lumpy cheesecake swirls. It was a textural nightmare. Now I leave it on the counter for a good two hours before I start.
Directions
- Preheat your oven to 350°F (or 325°F for a dark pan). Grease an 8×8 inch baking pan.
- Prepare the brownie batter according to the directions on the box. Pour it into your prepared pan.
- In a separate bowl, beat the softened cream cheese with an electric mixer until it’s smooth.
- Beat in the sugar, then the egg and vanilla, until everything is well combined and creamy.
- Dollop the cheesecake mixture over the top of the brownie batter.
- Use a knife or a skewer to gently swirl the two batters together. Don’t overmix!
- Sprinkle the chocolate chips evenly over the top.
- Bake for 35-40 minutes, or until the edges are set and the center only jiggles slightly.
- Let the brownies cool completely in the pan on a wire rack.
- Once cool, use the black gel to draw little ghost faces on the lighter cheesecake swirls.
- Chill in the fridge for at least an hour before slicing to get clean cuts.
The swirling step is where art and chaos meet. I once got carried away and mixed it so much the ghost batter just disappeared into the brownie. You want distinct swirls, so just a few gentle figure-eight motions with the knife is all you need.
After the recipe card, I have to tell you about the time I didn’t let these cool. I was impatient and tried to cut them warm. It was a gooey, delicious mess, but the ghost faces smeared everywhere. They looked like they were in a horror movie massacre. Letting them chill is non-negotiable if you want them to look nice.
This has become a real family favorite for us, especially in October. My kids love helping with the ghost faces, even if they get a little creative. It’s the perfect comfort food that feels festive without being too complicated. The leftovers, if you have any, are amazing straight from the fridge the next day.
If I were to change one thing next time, I might try a dark chocolate brownie mix for a richer flavor contrast. The semi-sweet is great, but I’m always experimenting. It’s a pretty forgiving recipe, which I love as a home cook who’s not a professional.
Nutrition Info (per serving)
| Calories | Carbs | Fat | Protein |
|---|---|---|---|
| 320 | 35g | 18g | 4g |
Okay, let’s be real, these are a treat. The nutrition info doesn’t surprise me, but I have tried a lighter version. I used Neufchâtel cheese and a sugar substitute blend once, and they were still pretty good! For anyone with dietary needs, a gluten-free brownie mix works perfectly here too.
Ingredient Swaps
| Ingredient | Substitution |
|---|---|
| Semi-sweet chocolate chips | White chocolate chips or peanut butter chips |
| Granulated Sugar | Light brown sugar for a deeper flavor |
| Black decorating gel | Melted chocolate in a plastic bag with the tip cut off |
I’ve tried most of these swaps. The white chocolate chips are fantastic, they look really cool against the dark brownie. The brown sugar in the cheesecake layer is my personal favorite swap, it gives it a caramel-like taste. The melted chocolate for faces works, but you have to be quick before it hardens!
Tips
- For picture-perfect ghost faces, pop the decorated brownies back in the fridge for 10 minutes to set the gel.
- Use a plastic knife to cut the chilled brownies. It sounds weird, but it gives you the cleanest slices without tearing.
- If your cheesecake layer is too thick to dollop, just spoon it on in little ghost-shaped blobs before you swirl.
I wish I’d known the plastic knife trick years ago. I used a big chef’s knife and squashed the first few brownies every single time. A cheap, thin plastic knife glides right through the fudgy texture. It’s a total game-changer for presentation.
FAQ
Can I make these ahead of time?
Absolutely! I make them the day before all the time. Just hold off on drawing the faces until you’re a few hours from serving, so the gel doesn’t bleed.
Why did my cheesecake layer sink?
This happened to me once when I over-mixed the brownie batter and incorporated too much air. Just mix the brownie batter until it’s *just* combined, no longer. A denser base helps hold up the cheesecake.
My ghosts look messy. Help!
Oh, I feel you. My first batch was a mess. The key is to let the brownies cool completely so the surface is firm. Then, use a light hand with the gel. Practice a few faces on a plate first if you’re nervous!
That’s everything I know about making ghost cheesecake brownies! Hope you give it a try, and if you mess it up, you’re in good company—I do it all the time.
Ghost Cheesecake Brownies
Spooky and delicious fudge brownies swirled with creamy cheesecake and decorated with adorable ghost faces – the perfect Halloween treat that’s surprisingly easy to make.
Ingredients
- 1 box fudge brownie mix (plus required oil, water, and egg)
- 8 oz cream cheese, fully softened
- 1/4 cup granulated sugar
- 1 large egg
- 1/2 teaspoon vanilla extract
- 1/2 cup semi-sweet chocolate chips
- Black decorating gel or melted chocolate for ghost faces
Instructions
-
Preheat oven to 350°F (325°F for dark pans). Grease an 8×8 inch baking pan.
-
Prepare brownie batter according to package directions. Pour into prepared pan.
-
In a separate bowl, beat softened cream cheese with electric mixer until smooth.
-
Beat in sugar until combined, then add egg and vanilla extract. Mix until creamy.
-
Dollop cheesecake mixture over brownie batter in pan.
-
Use a knife or skewer to gently swirl the two batters together with figure-eight motions – do not overmix.
-
Sprinkle chocolate chips evenly over the top.
-
Bake for 35-40 minutes until edges are set and center jiggles slightly.
-
Cool completely in pan on wire rack.
-
Once cooled, use black decorating gel to draw ghost faces on lighter cheesecake swirls.
-
Chill in refrigerator for at least 1 hour before slicing for clean cuts.
Nutrition (Per Serving)