Healthy Cauliflower Rice Recipe
Oh man, cauliflower rice. I swear, the first time I tried to make this, it was a disaster. I was all excited, trying to eat healthier, and saw this “amazing” healthy cauliflower rice recipe online. I didn’t have a food processor, so I tried to grate a whole head of cauliflower by hand. My knuckles were practically bleeding, and the “rice” was more like uneven, soggy cauliflower chunks. It smelled okay, but tasted like plain, steamed cauliflower mush. My husband, bless his heart, took one bite and said, “Honey, did you forget to actually cook this?” I almost gave up right then, but stubborn me decided to try again, and again, until I finally figured out the secrets to actually making it delicious.
Recipe Card
| Recipe Title | Healthy Cauliflower Rice Recipe |
|---|---|
| Servings | 4 |
| Prep Time | 15 mins |
| Cooking Time | 10 mins |
| Calories | 120 |
You know, those times and calorie counts are always estimates, right? My kitchen is usually a chaotic scene, so prep time often stretches a bit longer if I’m chatting on the phone or chasing a kid. Cooking time is usually pretty spot-on though, since overcooking cauliflower rice is a cardinal sin I learned the hard way.
Ingredients
- 1 large head of cauliflower (about 2 lbs)
- 1-2 tablespoons olive oil
- 1/2 small yellow onion, finely diced
- 2-3 cloves garlic, minced
- 1/2 teaspoon sea salt, or to taste
- 1/4 teaspoon black pepper, or to taste
- Optional: 1/2 teaspoon paprika, 1/4 teaspoon ground cumin, fresh cilantro for garnish, squeeze of lemon juice
That big head of cauliflower? It’s the star of the show, obviously. Don’t cheap out on a tiny one, because you’ll be sad when you only get one serving. I used to think smaller was better to fit in my food processor, but then I’d have to process it in like four batches, which was just extra work. Go big or go home, I say.
Olive oil is kinda crucial here. You need enough to coat the pan and help things cook evenly, but not so much that you’re frying the cauliflower instead of sautéing it. I once got a little heavy-handed trying to “make it crispy,” and ended up with a greasy mess that just sat in my stomach like a brick. Oops.
The onion and garlic? They’re flavor powerhouses. Honestly, I used to skip these when I was in a rush, thinking “it’s just cauliflower rice, who cares?” But believe me, they add so much depth. Just don’t burn the garlic like I did one time when I got distracted by a cat video – burnt garlic is a bitter, sad flavor nobody wants.
Salt and pepper are non-negotiable, in my humble opinion. Seasoning throughout the cooking process is key. I’ve definitely made the mistake of adding all the salt at the very end, and it just never quite “married” with the flavors like it does when you layer it in. Taste as you go, my friend!
For those optional spices like paprika and cumin, they really kick it up a notch. I especially love paprika for a hint of warmth and color. Once, I thought “more spice, more flavor!” and added way too much red pepper flakes, thinking it would be fun. My mouth was on fire for a good twenty minutes, and my kids refused to even look at it. Lesson learned: a little goes a long way.
Directions
- Wash and thoroughly dry the cauliflower head. Remove the green leaves and cut the florets into manageable chunks.
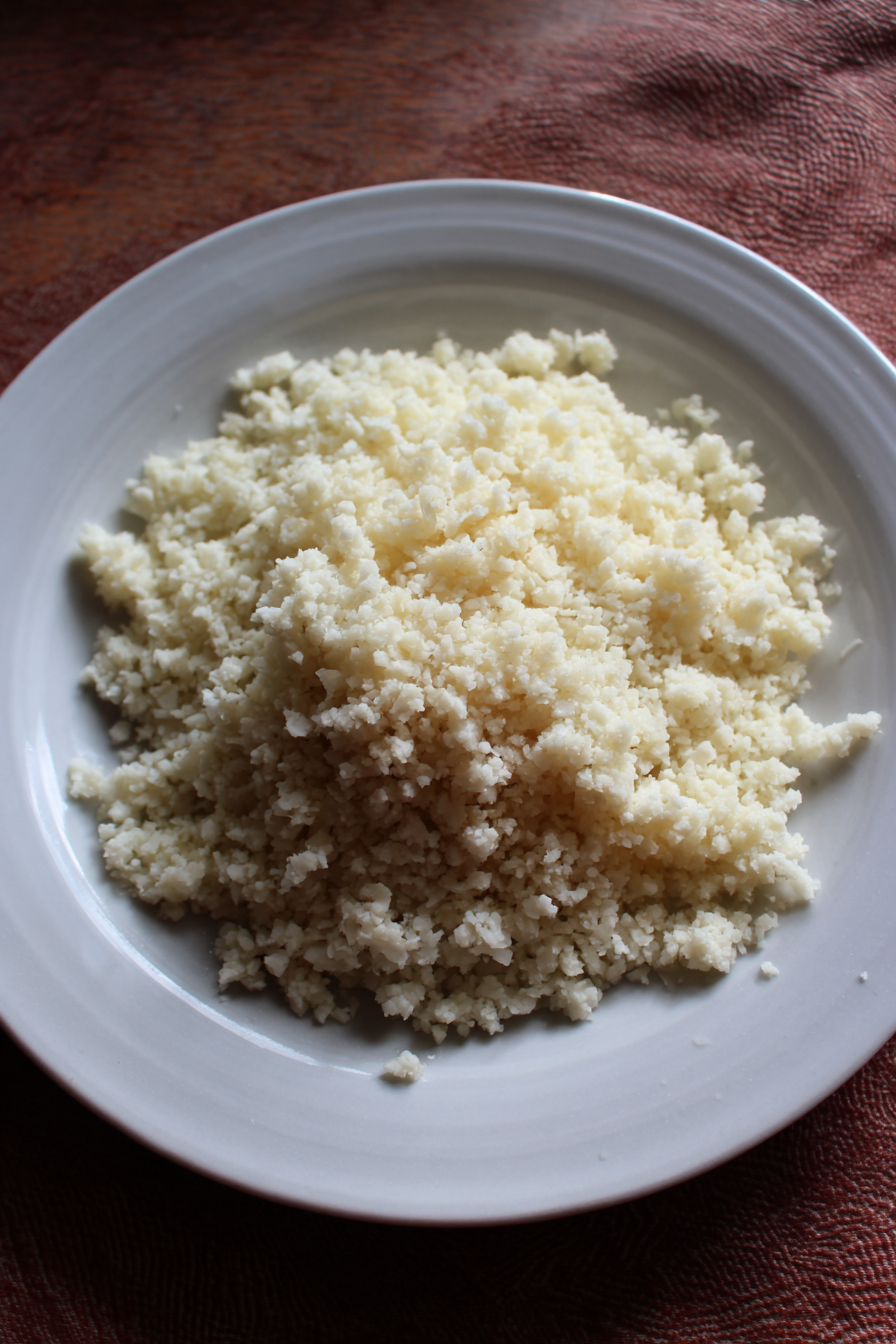
- Using a food processor (my preferred method!), pulse the cauliflower florets until they resemble rice grains. Be careful not to over-process, or you’ll end up with mush. If you don’t have a food processor, you can use a box grater, but prepare for an arm workout.
- Heat the olive oil in a large non-stick skillet over medium heat. Add the diced onion and cook for 3-5 minutes, until softened and translucent.
- Add the minced garlic and cook for another minute, until fragrant. Don’t let it brown!
- Stir in the riced cauliflower, salt, pepper, and any optional spices.
- Cook for 5-7 minutes, stirring occasionally, until the cauliflower is tender-crisp. Don’t overcook it – it should still have a slight bite.
- Remove from heat. If using, stir in fresh cilantro and a squeeze of lemon juice just before serving.
That first step about drying the cauliflower? Seriously, *do it*. I can’t stress this enough. My biggest early mistake was thinking a quick rinse was fine, then throwing soaking wet cauliflower into the pan. It steamed, it never browned, and it resulted in that dreaded soggy, watery cauliflower mush. Pat it down with paper towels like your life depends on it!
When you’re sautéing those onions and garlic, keep an eye on them. I got a little too confident one time and walked away to grab something from the fridge. Came back to slightly burnt onions and almost-black garlic. It’s salvageable sometimes, but it really does make a difference in the taste – a bitter one. Low and slow for the win!
And for the love of all that is holy, do not overcook that cauliflower rice. It’s not like regular rice that gets fluffier the longer it cooks. Cauliflower goes from perfectly tender-crisp to soft, watery, and mushy in a blink. I’ve ruined so many batches by just walking away for “one more minute,” only to come back to a sad, squishy pile. You want it to still have a little bite, almost like al dente pasta.
This recipe has become a staple in my house, truly. After all those early mishaps and kitchen disasters, it’s now my go-to “healthy swap” for almost any meal. It’s so versatile – I’ve made it plain with just salt and pepper as a side for grilled chicken, spiced it up with curry powder for a makeshift healthy fried “rice,” and even added it to burrito bowls. It’s surprisingly easy once you get the hang of it, and it feels like such a win when you know you’re eating something good for you that actually tastes great.
One of my favorite things is how quickly it cooks. When you’re starving and need an easy dinner, this checks all the boxes. Leftovers are fantastic too; I often make a double batch for meal prep for the week. Just store it in an airtight container, and you can reheat it quickly in the microwave or a skillet. It’s a real family favorite now, even my pickiest eater will gobble it up if I promise to add some cheese.
Nutrition Info (per serving)
| Calories | Carbs | Fat | Protein |
|---|---|---|---|
| 120 | 10g | 8g | 4g |
That nutrition info always makes me happy! It’s surprisingly low in calories and carbs, which is why I love it so much as a swap. I mean, compare that to a serving of regular rice and you’ll see why it’s a no-brainer for a healthy alternative. If you want to make it even lighter, you can cut down on the olive oil a bit, but don’t go too crazy or it won’t cook as nicely. For folks on keto or low-carb diets, this stuff is a lifesaver. It’s naturally gluten-free and vegan too, so it’s great for almost anyone.
Ingredient Swaps
| Ingredient | Substitution |
|---|---|
| Olive Oil | Coconut oil or avocado oil |
| Yellow Onion | Shallots or onion powder |
| Fresh Garlic | Garlic powder |
| Cauliflower | Broccoli (riced) |
Okay, so some of these swaps actually work, and some are… less successful in my experience. Coconut oil gives it a slightly different flavor profile, a bit more tropical, which can be awesome if you’re going for an Asian-inspired dish. Avocado oil is pretty neutral, so it’s a good direct swap for olive oil. Onion powder and garlic powder are fine in a pinch, but they really don’t deliver the same fresh, aromatic punch as the real deal. I’ve used them when I’m out of fresh ingredients, and it works, but it’s definitely a noticeable difference in flavor depth.
Now, about swapping cauliflower for riced broccoli… I tried it once, and it was a nope for me. Broccoli rice has a much stronger, more distinct flavor, and it’s a bit denser. It just didn’t have that neutral base quality that makes cauliflower rice so versatile. If you like broccoli and want a strong broccoli flavor, go for it, but don’t expect it to melt into your dish the same way cauliflower does. It’s just a different animal, you know?
Tips
- **Don’t Overcrowd Your Pan:** Cook in batches if your skillet isn’t big enough.
- **Dry, Dry, Dry Your Cauliflower:** Seriously, moisture is the enemy of non-soggy cauliflower rice.
- **Taste As You Go:** Adjust seasoning throughout the cooking process.
- **High Heat, Quick Cook:** Keep the heat medium-high and cook for a short amount of time for best texture.
- **Finish with Freshness:** A squeeze of lemon juice or fresh herbs brightens everything up.
I’ve broken almost every single one of these tips at some point, and let me tell you, I paid the price! That “don’t overcrowd the pan” one? Yeah, I was impatient one night, trying to fit a mountain of cauliflower into a regular-sized skillet. It didn’t sauté; it steamed itself into a watery, mushy mess because there was no room for the moisture to evaporate. It just sat there, looking sad and grey. I learned right then and there that batch cooking or using a bigger pan is essential for that perfect tender-crisp texture.
And the “taste as you go” tip? That’s golden. I used to just dump in the measured salt at the beginning and hope for the best. Sometimes it was bland, sometimes it was a salt bomb. Now, I add a little, stir, cook for a bit, and taste. Then I add more if needed. It makes such a difference in getting the seasoning just right, so you don’t end up with a dish that’s either begging for more flavor or making you reach for a glass of water after every bite.
FAQ
**Q: Why is my cauliflower rice soggy?**
A: Oh man, this is the number one question! Most likely, your cauliflower was too wet when it hit the pan, or you overcrowded your skillet. Remember, moisture needs to escape for it to get that nice sautéed texture. If it’s too packed, it’ll just steam itself. Also, don’t stir it constantly; let it sit for a minute or two between stirs to get a little color.
**Q: Can I meal prep this recipe? How long does it last?**
A: Absolutely! This is one of my favorite things to meal prep. I usually make a big batch on Sunday. It lasts pretty well in an airtight container in the fridge for about 3-4 days. Just be aware that it might get a little softer after reheating, but the flavor will still be great.
**Q: Can I use frozen riced cauliflower?**
A: Yes, you totally can! It’s a huge time-saver. The trick with frozen riced cauliflower is to *not* thaw it first. Just throw it straight into the hot pan. It will release a lot of water as it cooks, so you might need to cook it a little longer to let that moisture evaporate. I also sometimes add it to the pan *before* the aromatics, cook off the water, then add oil and finish it up.
**Q: How do I get more flavor into my cauliflower rice?**
A: The world is your oyster here! Think about what kind of cuisine you’re going for. For an Asian twist, try a splash of soy sauce (or tamari), ginger, and a little sesame oil. For Mexican, add chili powder, cumin, and a squeeze of lime. You can also mix in some sautéed veggies like bell peppers, mushrooms, or spinach. Don’t be afraid to experiment!
That’s everything I know about making Healthy Cauliflower Rice Recipe! Hope you give it a try. And if you mess it up, you’re in good company—I still do it sometimes.
Healthy Cauliflower Rice Recipe
Transform your meals with this perfectly tender-crisp cauliflower rice recipe, a delicious and healthy alternative to traditional grains. Master the secrets to avoid soggy results and enjoy a versatile, flavorful side dish that’s surprisingly easy to make.
Ingredients
- 1 large head of cauliflower (about 2 lbs)
- 1-2 tablespoons olive oil
- 1/2 small yellow onion, finely diced
- 2-3 cloves garlic, minced
- 1/2 teaspoon sea salt, or to taste
- 1/4 teaspoon black pepper, or to taste
- 1/2 teaspoon paprika (optional)
- 1/4 teaspoon ground cumin (optional)
- Fresh cilantro for garnish (optional)
- Squeeze of lemon juice (optional)
Instructions
-
Wash and thoroughly dry the cauliflower head. Remove the green leaves and cut the florets into manageable chunks.
-
Using a food processor, pulse the cauliflower florets until they resemble rice grains. Be careful not to over-process, or you’ll end up with mush.
-
Heat 1-2 tablespoons olive oil in a large non-stick skillet over medium heat. Add the diced onion and cook for 3-5 minutes, until softened and translucent.
-
Add the minced garlic and cook for another minute, until fragrant. Don’t let it brown!
-
Stir in the riced cauliflower, salt, pepper, and any optional spices (paprika, cumin).
-
Cook for 5-7 minutes, stirring occasionally, until the cauliflower is tender-crisp. Don’t overcook it – it should still have a slight bite.
-
Remove from heat. If using, stir in fresh cilantro and a squeeze of lemon juice just before serving.
Nutrition (Per Serving)