Cheesy Pickle Chips Recipe
I’ll never forget the first time I tried making these cheesy pickle chips. My friend Sarah told me about them and I was like, pickles and cheese? Really? I decided to whip up a batch for game night. I was so confident, but I used the wrong cheese and my chips turned into a greasy, melty puddle on the baking sheet. Everyone politely ate around the burnt edges. It was a mess, but we laughed so hard. Now, after many, many attempts, I’ve finally got it down and it’s my go-to snack for pretty much everything.
Recipe Card
| Recipe Title | Cheesy Pickle Chips Recipe |
|---|---|
| Servings | 4 |
| Prep Time | 15 minutes |
| Cooking Time | 20 minutes |
| Calories | About 180 per serving |
Ingredients
- 1 cup shredded cheddar cheese
- 1/2 cup shredded mozzarella cheese
- 1 large dill pickle, sliced into 1/4-inch rounds
- 1/4 cup all-purpose flour
- 1 large egg, beaten
- 1/2 cup breadcrumbs
- 1/2 tsp garlic powder
- 1/2 tsp paprika
- Cooking spray or a little oil
The cheese combo is everything here. I once used only cheddar and they were way too greasy. The mozzarella helps them hold their shape. And for the pickles, you gotta get the big, crunchy dill ones. I tried using those sandwich-sliced ones once and they were way too thin and soggy. It was a sad, floppy situation.
Directions
- Preheat your oven to 400°F (200°C) and line a baking sheet with parchment paper.
- Pat the pickle slices completely dry with paper towels. I mean, really dry them.
- Set up three shallow bowls: one with the flour, one with the beaten egg, and one with the breadcrumbs mixed with the garlic powder and paprika.
- Take a pickle slice, dredge it in the flour, then dip it in the egg, and finally coat it in the breadcrumb mixture. Press gently to make sure it’s coated well.
- Place the coated pickle on the baking sheet. Repeat with all the slices.
- In a small bowl, mix the shredded cheddar and mozzarella cheeses together.
- Take a small handful of the cheese mix and gently form it around each breaded pickle slice, creating a little “chip” or cup.
- Lightly spray the chips with cooking spray or brush with a tiny bit of oil.
- Bake for 18-20 minutes, or until the cheese is golden and bubbly.
- Let them cool on the sheet for at least 5 minutes before you try to eat them. They’ll be molten lava if you don’t!
The step where you form the cheese around the pickle is the trickiest. My first time, I just piled the cheese on top. Big mistake. They slid right off the pickle and fused into one giant, weird cheese blob in the oven. Now I make sure to really encase the pickle, like I’m tucking it into a cheesy little bed. It makes all the difference.
I love making these for my family because they feel like a treat but they’re not too hard. My nephew calls them “cheesy wheels” and he always wants to help. One time we had a race to see who could coat the pickles fastest. Let’s just say there was more breading on the floor than on the pickles, but it was so much fun. It’s become our little tradition.
As for leftovers, they’re okay the next day if you reheat them in the toaster oven or air fryer. The microwave makes them kinda soft, but hey, sometimes you just need a quick cheesy pickle fix and you don’t care. I wouldn’t call it a healthy swap, but it’s a great comfort food that feels fancier than it is.
If I were to change one thing next time, I might experiment with different seasonings in the breadcrumbs. Maybe some ranch powder or a little cayenne for heat. I’m always tweaking it, which is half the fun of home cooking, right? You never really nail a recipe, you just make it your own.
Nutrition Info (per serving)
| Calories | Carbs | Fat | Protein |
|---|---|---|---|
| 180 | 10g | 12g | 8g |
Okay, so the nutrition isn’t exactly health food, but it could be worse! I was surprised the protein was that high, honestly. I’ve tried making them a bit lighter by using low-fat cheese, but it doesn’t melt as well and can get a bit rubbery. For my gluten-free friends, just use GF flour and breadcrumbs. It works just fine, I’ve tested it!
Ingredient Swaps
| Ingredient | Substitution |
|---|---|
| Cheddar Cheese | Pepper Jack or Gouda |
| Breadcrumbs | Crushed Pork Rinds or Almond Flour |
| All-Purpose Flour | Gluten-Free 1-to-1 Flour |
I’ve tried a bunch of these swaps. Pepper jack is amazing if you like a little kick. But I tried using pre-shredded bagged cheese once because I was lazy, and it was a disaster. It has anti-caking agents that stop it from melting into a proper chip. It just stayed in little shreds. Crushed pork rinds for a keto version actually worked pretty well, but they brown super fast so you gotta watch them like a hawk.
Tips
- DRY THOSE PICKLES. I can’t say it enough. If they’re wet, the coating slides right off.
- Don’t skip the parchment paper. I learned that the hard way with a nightmare cleanup job.
- Let them cool! The cheese needs a minute to set up, or you’ll burn the roof of your mouth. I’ve done it more than once.
The tip about drying the pickles is the one I mess up the most, honestly. I’ll be in a hurry and just give them a quick dab. Then I’m wondering why my breading is a slimy mess. Taking that extra two minutes with the paper towels is a game-changer. It seems so simple, but it’s the difference between a win and a kitchen fail.
FAQ
Can I make these in an air fryer?
Absolutely! And they come out super crispy. I do 375°F for about 10-12 minutes. Just don’t overcrowd the basket, they need space to get crispy. I made that mistake and ended up with steamed cheesy pickles. Not great.
Why are my chips falling apart?
Oh, I know this one well. It’s usually one of two things: your pickles were too wet, or your cheese wasn’t cold enough when you formed the chips. If the cheese is warm from your hands, it gets too soft to hold its shape in the oven. I sometimes pop the cheese mixture in the fridge for 10 minutes before I start.
Can I prep these ahead of time?
You can assemble them and keep them in the fridge for a few hours before baking. I wouldn’t do it the night before though, the pickles can make the breading soggy over time. I tried it for a party once and they were a bit soft. Still tasty, but not that perfect crunch.
That’s everything I know about making Cheesy Pickle Chips! Hope you give it a try, and if you mess it up, you’re in good company—I do it all the time. Let me know how yours turn out!
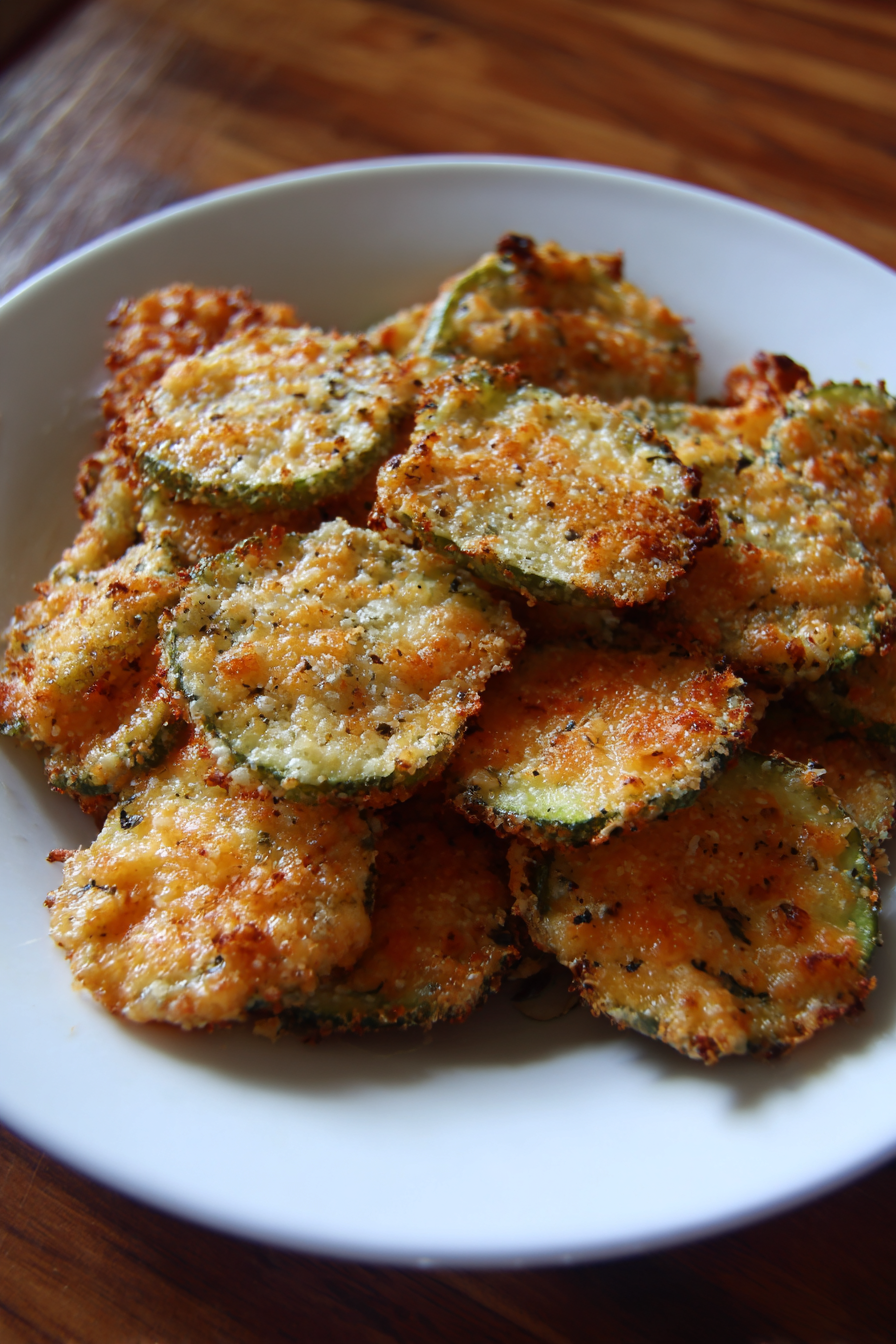
Cheesy Pickle Chips Recipe
Crispy, golden cheese cups encasing tangy dill pickle slices – the perfect game day snack or party appetizer that’s surprisingly easy to make.
Ingredients
- 1 cup shredded cheddar cheese
- 1/2 cup shredded mozzarella cheese
- 1 large dill pickle, sliced into 1/4-inch rounds
- 1/4 cup all-purpose flour
- 1 large egg, beaten
- 1/2 cup breadcrumbs
- 1/2 tsp garlic powder
- 1/2 tsp paprika
- Cooking spray or a little oil
Instructions
-
Preheat oven to 400°F (200°C) and line a baking sheet with parchment paper
-
Pat pickle slices completely dry with paper towels
-
Set up three shallow bowls: one with flour, one with beaten egg, and one with breadcrumbs mixed with garlic powder and paprika
-
Dredge each pickle slice in flour, then dip in egg, then coat in breadcrumb mixture, pressing gently to adhere
-
Place coated pickles on baking sheet
-
Mix shredded cheddar and mozzarella cheeses together in a small bowl
-
Take a small handful of cheese mixture and gently form it around each breaded pickle slice, creating a chip or cup shape
-
Lightly spray chips with cooking spray or brush with oil
-
Bake for 18-20 minutes until cheese is golden and bubbly
-
Let cool on baking sheet for at least 5 minutes before serving
Nutrition (Per Serving)